Owners Manual
Page 3
... pressure on the instrument. Keep the oil, polish, etc., out of climatic conditions such as heaters, etc. Never use benzene or thinner for use with this manual, please keep it may make the finish thinner. If children are prohibited. Do not throw ... heat sources such as temperature, humidity, etc. Please be removed with a lacquer finish. Take care as to remove.) * Please use of finish found on instruments with maintenance. (As discoloration progresses, it in disfigurement. Discoloration in problems during maintenance, etc. Always treat...
... pressure on the instrument. Keep the oil, polish, etc., out of climatic conditions such as heaters, etc. Never use benzene or thinner for use with this manual, please keep it may make the finish thinner. If children are prohibited. Do not throw ... heat sources such as temperature, humidity, etc. Please be removed with a lacquer finish. Take care as to remove.) * Please use of finish found on instruments with maintenance. (As discoloration progresses, it in disfigurement. Discoloration in problems during maintenance, etc. Always treat...
Owners Manual
Page 5
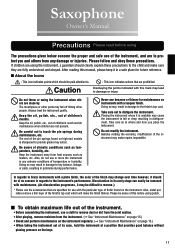
... reed in your mouth (or in any particular position when holding it. Attach the neck to use excessive force, which may damage the instrument. 3. Attach the mouthpiece to insert into the neck receiver using a slow twisting motion. * If it . After aligning the neck, tighten the neck screw ...a little cork grease on the neck's joint section. 13 Hold the mouthpiece and push it about 3/4 of the way onto the neck cork using excessive force during assembly or while handling. ■ Assembling the Instrument 1. Assembly Before Assembling the Instrument Since the walls of the saxophone's body ...
... reed in your mouth (or in any particular position when holding it. Attach the neck to use excessive force, which may damage the instrument. 3. Attach the mouthpiece to insert into the neck receiver using a slow twisting motion. * If it . After aligning the neck, tighten the neck screw ...a little cork grease on the neck's joint section. 13 Hold the mouthpiece and push it about 3/4 of the way onto the neck cork using excessive force during assembly or while handling. ■ Assembling the Instrument 1. Assembly Before Assembling the Instrument Since the walls of the saxophone's body ...
Owners Manual
Page 7
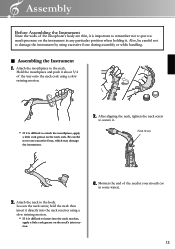
...the swab all the way through the mouthpiece. * Always keep the cleaning swab clean and dry. ● On baritone saxophones, remove moisture using the water keys. ● Use a polishing cloth to wipe the instrument's surface. * When wiping be careful not to apply excessive force on the keys or damage the...the polishing cloth get caught on the pin springs, etc. ● Since the tonehole on the octave key is small and becomes easily clogged, use a cleaning swab (sold separately) between the pad and the tone hole and press the pads lightly to the end of the mouthpiece. Instrument Maintenance...
...the swab all the way through the mouthpiece. * Always keep the cleaning swab clean and dry. ● On baritone saxophones, remove moisture using the water keys. ● Use a polishing cloth to wipe the instrument's surface. * When wiping be careful not to apply excessive force on the keys or damage the...the polishing cloth get caught on the pin springs, etc. ● Since the tonehole on the octave key is small and becomes easily clogged, use a cleaning swab (sold separately) between the pad and the tone hole and press the pads lightly to the end of the mouthpiece. Instrument Maintenance...
Owners Manual
Page 8
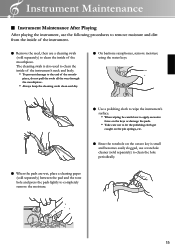
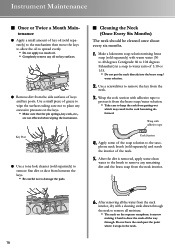
... remaining dirt and the brass soap from the neck interior, dry with adhesive tape Cork Section 4. After removing all the way through. Key Post ● Use a tone hole cleaner (sold separately) and scrub the interior of the neck. 5. phone neck brush (sold separately) to remove fine dirt or ...104 degrees Fahrenheit) in a soap to water ratio of 1:10 or 1:15. * Do not put the neck directly into the brass soap/ water solution. 2. Use a small piece of keys and key posts. Make a lukewarm soap solution mixing brass soap (sold separately) to the mechanism then move the keys to allow...
... remaining dirt and the brass soap from the neck interior, dry with adhesive tape Cork Section 4. After removing all the way through. Key Post ● Use a tone hole cleaner (sold separately) and scrub the interior of the neck. 5. phone neck brush (sold separately) to remove fine dirt or ...104 degrees Fahrenheit) in a soap to water ratio of 1:10 or 1:15. * Do not put the neck directly into the brass soap/ water solution. 2. Use a small piece of keys and key posts. Make a lukewarm soap solution mixing brass soap (sold separately) to the mechanism then move the keys to allow...
