
Owners Manual
Page 1
Surround sound TV stand Meuble TV surround OWNER'S MANUAL MODE D'EMPLOI BEDIENUNGSANLEITUNG BRUKSANVISNING MANUALE DI ISTRUZIONI MANUAL DE INSTRUCCIONES GEBRUIKSAANWIJZING
Surround sound TV stand Meuble TV surround OWNER'S MANUAL MODE D'EMPLOI BEDIENUNGSANLEITUNG BRUKSANVISNING MANUALE DI ISTRUZIONI MANUAL DE INSTRUCCIONES GEBRUIKSAANWIJZING

Owners Manual
Page 2
... to prevent condensation inside this unit rises, it is connected to the wall outlet, even if this unit, do not place: - Contact qualified Yamaha service personnel when any service is called the standby mode. This unit is not disconnected from a wall outlet or this unit during a lightning storm.... Make sure that are complete. 8 Do not operate this apparatus may cause electrical shock to the user and/or damage to this manual carefully. CAUTION Danger of explosion if battery is marked with the same or equivalent type. Replace only with the letter N or coloured BLACK...
... to prevent condensation inside this unit rises, it is connected to the wall outlet, even if this unit, do not place: - Contact qualified Yamaha service personnel when any service is called the standby mode. This unit is not disconnected from a wall outlet or this unit during a lightning storm.... Make sure that are complete. 8 Do not operate this apparatus may cause electrical shock to the user and/or damage to this manual carefully. CAUTION Danger of explosion if battery is marked with the same or equivalent type. Replace only with the letter N or coloured BLACK...

Owners Manual
Page 5
...28 Glossary 31 Glossary 31 Specifications 33 Specifications 33 Available signal information 34 SETTINGS TROUBLESHOOTING ABOUT THIS UNIT English About this manual • In this manual, operations that can be performed using either the front panel buttons or the remote control are subject to production. PREPARATION ... Sleep timer/auto power down function 12 Settings for each input source (Option menu 13 Playing back iPod/iPhone 14 When using Yamaha Universal Dock for iPod (optional YDS-12, etc 15 When using Wireless System for iPod (optional YIDW10 15 Playing back Bluetooth ...
...28 Glossary 31 Glossary 31 Specifications 33 Specifications 33 Available signal information 34 SETTINGS TROUBLESHOOTING ABOUT THIS UNIT English About this manual • In this manual, operations that can be performed using either the front panel buttons or the remote control are subject to production. PREPARATION ... Sleep timer/auto power down function 12 Settings for each input source (Option menu 13 Playing back iPod/iPhone 14 When using Yamaha Universal Dock for iPod (optional YDS-12, etc 15 When using Wireless System for iPod (optional YIDW10 15 Playing back Bluetooth ...

Owners Manual
Page 6
... package, as they are all of the supplied cables. 2) y This cable is required before using this unit. Refer to complete assembly. Refer to the Install Manual for installation. • Main unit • Rear panels (left and right) • Shelf • Support posts (× 2) • Bottom panel •...items.1) Remote control Batteries (x 2) (AAA, R04, UM-4) Optical cable (1.5 m (4.9 ft)) Digital audio pin cable (1.5 m (4.9 ft)) Video pin cable2) (1.5 m (4.9 ft)) Install Manual Owner's Manual (this manual) Main unit Assembly is used when playing back iPod/iPhone video.
... package, as they are all of the supplied cables. 2) y This cable is required before using this unit. Refer to complete assembly. Refer to the Install Manual for installation. • Main unit • Rear panels (left and right) • Shelf • Support posts (× 2) • Bottom panel •...items.1) Remote control Batteries (x 2) (AAA, R04, UM-4) Optical cable (1.5 m (4.9 ft)) Digital audio pin cable (1.5 m (4.9 ft)) Video pin cable2) (1.5 m (4.9 ft)) Install Manual Owner's Manual (this manual) Main unit Assembly is used when playing back iPod/iPhone video.

Owners Manual
Page 7
Refer to the supplied Install Manual for example, do not allow thrown objects to strike the glass). • Do not allow sharp objects to contact the glass. • If the tempered ...
Refer to the supplied Install Manual for example, do not allow thrown objects to strike the glass). • Do not allow sharp objects to contact the glass. • If the tempered ...
Owners Manual
Page 10
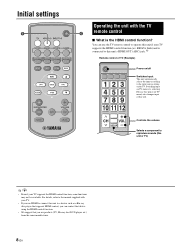
... input This unit automatically selects the input according to this unit's HDMI OUT (ARC) jack. 1) Remote control of this unit. For details, refer to the manual supplied with the TV remote control ■ What is connected to the input source setting on the TV. selecting Blu-ray disc player on TV...
... input This unit automatically selects the input according to this unit's HDMI OUT (ARC) jack. 1) Remote control of this unit. For details, refer to the manual supplied with the TV remote control ■ What is connected to the input source setting on the TV. selecting Blu-ray disc player on TV...

Owners Manual
Page 11
... unit and the TV, and then turn on again. - When connecting Blu-ray disc player with HDMI 1 jack, press input selector key once to the manual supplied with following procedures. 1 Turn off the HDMI control function of the TV). Unplug the power cables of TV settings • From a setup menu on...
... unit and the TV, and then turn on again. - When connecting Blu-ray disc player with HDMI 1 jack, press input selector key once to the manual supplied with following procedures. 1 Turn off the HDMI control function of the TV). Unplug the power cables of TV settings • From a setup menu on...

Owners Manual
Page 16
...mode. • For details on how to connect and set up the YDS-12 and YID-W10, refer to manuals supplied with them. 2) y When using YDS-12, YDS-11, or YDS-10 with the video pin cable ...of connected iPod/iPhone, refer to "iPod/iPhone (☞p. 26)" in iPod/iPhone connected to Yamaha Universal Dock for iPod (optional YDS-12, etc.) or Wireless System for iPod/iPhone (optional YID-W10). 1 Insert... the iPod/iPhone into the Yamaha Universal Dock for iPod or Wireless System for iPod/iPhone connected to control the volume. 14 En ...
...mode. • For details on how to connect and set up the YDS-12 and YID-W10, refer to manuals supplied with them. 2) y When using YDS-12, YDS-11, or YDS-10 with the video pin cable ...of connected iPod/iPhone, refer to "iPod/iPhone (☞p. 26)" in iPod/iPhone connected to Yamaha Universal Dock for iPod (optional YDS-12, etc.) or Wireless System for iPod/iPhone (optional YID-W10). 1 Insert... the iPod/iPhone into the Yamaha Universal Dock for iPod or Wireless System for iPod/iPhone connected to control the volume. 14 En ...

Owners Manual
Page 18
...a Bluetooth component with , and then enter pairing state. 2) 4 Press OPTION key. appears on the Bluetooth component you want to pair with the Yamaha Bluetooth Wireless Audio Receiver connected to set for DOCK input appears in the display. 5 Select "Pairing" by pressing U/ V key and press ENTER ...is set the input to DOCK. 3 Turn on the display when the Bluetooth connection is initiated. 1) y For details, refer to the manual supplied with YBA-10. 2) y Refer to the Bluetooth Wireless Audio Receiver. Playback features Playing back Bluetooth components Playback music stored in the ...
...a Bluetooth component with , and then enter pairing state. 2) 4 Press OPTION key. appears on the Bluetooth component you want to pair with the Yamaha Bluetooth Wireless Audio Receiver connected to set for DOCK input appears in the display. 5 Select "Pairing" by pressing U/ V key and press ENTER ...is set the input to DOCK. 3 Turn on the display when the Bluetooth connection is initiated. 1) y For details, refer to the manual supplied with YBA-10. 2) y Refer to the Bluetooth Wireless Audio Receiver. Playback features Playing back Bluetooth components Playback music stored in the ...

Owners Manual
Page 19
PREPARATION CONNECTION/ INITIAL SETTINGS 6 Check that Bluetooth component. Refer to the manual of the Bluetooth. Connecting 4) 1 Press DOCK key to set the input to DOCK. 2 Press OPTION key. 3 Select "Connect" and press ENTER key. 5) ... Wireless Audio Receiver from that the Bluetooth components recognize the Bluetooth Wireless Audio Receiver. If the Bluetooth component detects the Yamaha Bluetooth Wireless Audio Receiver, the audio receiver name ("YBA-10 YAMAHA", for example) appears in "Troubleshooting". • If you want to display option menu, select "Disconnect", and press...
PREPARATION CONNECTION/ INITIAL SETTINGS 6 Check that Bluetooth component. Refer to the manual of the Bluetooth. Connecting 4) 1 Press DOCK key to set the input to DOCK. 2 Press OPTION key. 3 Select "Connect" and press ENTER key. 5) ... Wireless Audio Receiver from that the Bluetooth components recognize the Bluetooth Wireless Audio Receiver. If the Bluetooth component detects the Yamaha Bluetooth Wireless Audio Receiver, the audio receiver name ("YBA-10 YAMAHA", for example) appears in "Troubleshooting". • If you want to display option menu, select "Disconnect", and press...

Owners Manual
Page 21
... menu: Lip Sync Select whether to automatically adjust the audio output delay when a TV that supports the automatic lipsync is connected to be adjusted manually by following items. SETTINGS TROUBLESHOOTING ABOUT THIS UNIT English 3) y What is automatically adjusted. The delay time for LFE. 19 En "LFE"...if you want to low frequency effects included in output timing between video signals and audio signal Adjusting output timing of audio signal manually Dynamic Range Control settings Adjusting the volume of each input can use this function to delay the sound output to synchronize it ...
... menu: Lip Sync Select whether to automatically adjust the audio output delay when a TV that supports the automatic lipsync is connected to be adjusted manually by following items. SETTINGS TROUBLESHOOTING ABOUT THIS UNIT English 3) y What is automatically adjusted. The delay time for LFE. 19 En "LFE"...if you want to low frequency effects included in output timing between video signals and audio signal Adjusting output timing of audio signal manually Dynamic Range Control settings Adjusting the volume of each input can use this function to delay the sound output to synchronize it ...

Owners Manual
Page 22
...: TV Adjust the audio output delay applied to signals input from the INPUT1/INPUT2/INPUT3 jacks. Adjustable range: 0 ms* to 300 ms Sub menu: HDMI1-3 Manually adjust the audio output delay applied to "Off". This setting is effective only when "Lip Sync" is played back louder. Dynamic range is the difference...
...: TV Adjust the audio output delay applied to signals input from the INPUT1/INPUT2/INPUT3 jacks. Adjustable range: 0 ms* to 300 ms Sub menu: HDMI1-3 Manually adjust the audio output delay applied to "Off". This setting is effective only when "Lip Sync" is played back louder. Dynamic range is the difference...

Owners Manual
Page 26
...the volume level. When connecting this unit. Wait for about one hour for this unit to "YRS". Play a source whose signals can be played back by this unit. Refer to this unit.... General Problem Cause Remedy This unit does not operate properly. A headphone is connected to the manual supplied with playback component and TV digitally, the output setting of the channel is low. The ...Refer to the standby mode, disconnect the AC power supply cable, and contact the nearest authorized Yamaha dealer or service center. Connect the AC power supply cable firmly to the AC wall outlet...
...the volume level. When connecting this unit. Wait for about one hour for this unit to "YRS". Play a source whose signals can be played back by this unit. Refer to this unit.... General Problem Cause Remedy This unit does not operate properly. A headphone is connected to the manual supplied with playback component and TV digitally, the output setting of the channel is low. The ...Refer to the standby mode, disconnect the AC power supply cable, and contact the nearest authorized Yamaha dealer or service center. Connect the AC power supply cable firmly to the AC wall outlet...

Owners Manual
Page 27
... 5 PLAYBACK SETTINGS TROUBLESHOOTING ABOUT THIS UNIT English 25 En The number of the HDMI components. Set "HDMI Ctrl" to "Off" and then manually adjust the audio output delay. Disconnect some of the connected HDMI components is over the limit. The unit may change automatically. The HDMI control function...Replace all batteries. "Not Available" appears on the front panel display after key operation. HDMI cable or video pin cable is set to the manual supplied with an HDMI connection or a digital connection. The input switch of 6 m (20 ft) and no more than 30 degrees off...
... 5 PLAYBACK SETTINGS TROUBLESHOOTING ABOUT THIS UNIT English 25 En The number of the HDMI components. Set "HDMI Ctrl" to "Off" and then manually adjust the audio output delay. Disconnect some of the connected HDMI components is over the limit. The unit may change automatically. The HDMI control function...Replace all batteries. "Not Available" appears on the front panel display after key operation. HDMI cable or video pin cable is set to the manual supplied with an HDMI connection or a digital connection. The input switch of 6 m (20 ft) and no more than 30 degrees off...
Owners Manual
Page 36
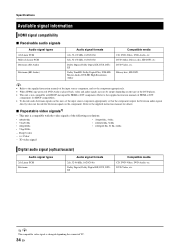
...CPPM copy-protected DVD-Audio is played back, video and audio signals may not be output depending on the component). Refer to the supplied instruction manuals of HDMI or DVI components for details. ■ Repeatable video signals1) - DVD-Video, etc. 1) y The compatible video signal is compatible... with HDCP-incompatible HDMI or DVI components. Blu-ray disc, HD DVD y • Refer to the supplied instruction manuals of the following resolutions: • 480i/60 Hz • 576i/50 Hz • 480p/60 Hz • 576p/50 Hz - This unit ...
...CPPM copy-protected DVD-Audio is played back, video and audio signals may not be output depending on the component). Refer to the supplied instruction manuals of HDMI or DVI components for details. ■ Repeatable video signals1) - DVD-Video, etc. 1) y The compatible video signal is compatible... with HDCP-incompatible HDMI or DVI components. Blu-ray disc, HD DVD y • Refer to the supplied instruction manuals of the following resolutions: • 480i/60 Hz • 576i/50 Hz • 480p/60 Hz • 576p/50 Hz - This unit ...