Owners Manual
Page 5
... Playing back iPod/iPhone and USB device ......... 16 Playing back 16 Repeat/shuffle playback 17 Displaying music information 17 Firmware update 17 USEFUL OPERATION Setup menu 18 Setup menu list 18 Basic procedure 18 Adjusting the volume balance of each channel ........ 19 Adjusting high/low frequency sound (tone control) 19 Configuring the...
... Playing back iPod/iPhone and USB device ......... 16 Playing back 16 Repeat/shuffle playback 17 Displaying music information 17 Firmware update 17 USEFUL OPERATION Setup menu 18 Setup menu list 18 Basic procedure 18 Adjusting the volume balance of each channel ........ 19 Adjusting high/low frequency sound (tone control) 19 Configuring the...
Owners Manual
Page 9
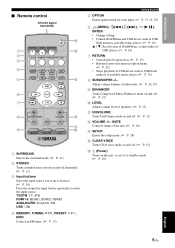
... • Cancels preset registration. (☞ P. 13) • Returns to previous menu in option menu. (☞ P. 22) • Stops playback of the unit. (☞ P. 10) C SETUP Enters the setup menu. (☞ P. 18) D CLEAR VOICE Turns Clear voice mode on and off alternately. (☞ P. 11) 3 Input buttons Select the input source you want to...
... • Cancels preset registration. (☞ P. 13) • Returns to previous menu in option menu. (☞ P. 22) • Stops playback of the unit. (☞ P. 10) C SETUP Enters the setup menu. (☞ P. 18) D CLEAR VOICE Turns Clear voice mode on and off alternately. (☞ P. 11) 3 Input buttons Select the input source you want to...

Owners Manual
Page 20
... USB portable music player formatted in FAT format and supporting for iPod/iPhone and USB device" section in the above. OPTION ENTER RETURN USB INFO SETUP FOLDER ▲/▼ / Battery charge feature The battery of status messages that is turned on being charged even if the unit is on the model...
... USB portable music player formatted in FAT format and supporting for iPod/iPhone and USB device" section in the above. OPTION ENTER RETURN USB INFO SETUP FOLDER ▲/▼ / Battery charge feature The battery of status messages that is turned on being charged even if the unit is on the model...
Owners Manual
Page 21
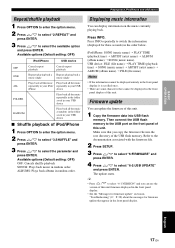
... the messages for three seconds) in your USB device ■ Shuffle playback of this unit. Refer to the documentation associated with the firmware file. 2 Press SETUP. 3 Press / to select "6:FIRMWARE" and press ENTER. 4 Press / to select the available option and press ENTER. The update starts. Firmware update You can update the...
... the messages for three seconds) in your USB device ■ Shuffle playback of this unit. Refer to the documentation associated with the firmware file. 2 Press SETUP. 3 Press / to select "6:FIRMWARE" and press ENTER. 4 Press / to select the available option and press ENTER. The update starts. Firmware update You can update the...

Owners Manual
Page 22
...RETURN or to return to the previous menu. • Press to select menu and press ENTER. USEFUL OPERATION Setup menu Setup menu list Menu 1:SP LEVEL 2:TONE CONTROL 3:HDMI SETUP 4:DISPLAY MODE 5:SP SETUP 6:FIRMWARE 7:D.RANGE 8:MATRIX DECODE Sub menu 1-1:FRONT L 1-2:FRONT R 1-3:CENTER 1-4:SURROUND L 1-5:SURROUND R ...9758; P. 19 ☞ P. 20 ☞ P. 17 ☞ P. 21 ☞ P. 21 ENTER RETURN SETUP / You can change the setting value faster. 4 Press SETUP again to exit the setup menu. "1:SP LEVEL" is displayed. 3 Press / menu. Note If you do not operate within 30 seconds after ...
...RETURN or to return to the previous menu. • Press to select menu and press ENTER. USEFUL OPERATION Setup menu Setup menu list Menu 1:SP LEVEL 2:TONE CONTROL 3:HDMI SETUP 4:DISPLAY MODE 5:SP SETUP 6:FIRMWARE 7:D.RANGE 8:MATRIX DECODE Sub menu 1-1:FRONT L 1-2:FRONT R 1-3:CENTER 1-4:SURROUND L 1-5:SURROUND R ...9758; P. 19 ☞ P. 20 ☞ P. 17 ☞ P. 21 ☞ P. 21 ENTER RETURN SETUP / You can change the setting value faster. 4 Press SETUP again to exit the setup menu. "1:SP LEVEL" is displayed. 3 Press / menu. Note If you do not operate within 30 seconds after ...
Owners Manual
Page 23
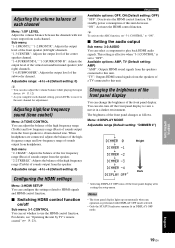
... HDMI control function. Menu: 4:DISPLAY MODE Adjustable range (Default setting: "DIMMER 0") Bright Dark Configuring the HDMI settings Menu: 3:HDMI SETUP You can configure the settings related to HDMI signals and HDMI control function. ■ Switching HDMI control function on/off Sub menu:...ARC function, set "3-1:CONTROL" to "ON". ■ Setting the audio output Sub menu: 3-2:AUDIO You can set to +6 (Default setting: 0) Setup menu Available options: OFF, ON (Default setting: OFF) "OFF": Deactivates the HDMI control function. Notes • The front panel display lights up ...
... HDMI control function. Menu: 4:DISPLAY MODE Adjustable range (Default setting: "DIMMER 0") Bright Dark Configuring the HDMI settings Menu: 3:HDMI SETUP You can configure the settings related to HDMI signals and HDMI control function. ■ Switching HDMI control function on/off Sub menu:...ARC function, set "3-1:CONTROL" to "ON". ■ Setting the audio output Sub menu: 3-2:AUDIO You can set to +6 (Default setting: 0) Setup menu Available options: OFF, ON (Default setting: OFF) "OFF": Deactivates the HDMI control function. Notes • The front panel display lights up ...
Owners Manual
Page 24
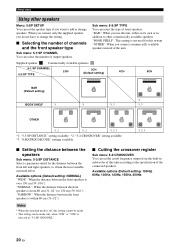
... to 150 cm (59-1/16"). "BAR": When you use the unit, either on its own or in addition to other speakers Menu: 5:SP SETUP You can set the cutoff frequency output from 80 cm (31-1/2") to obtain the most suitable surround effect. Notes • When the surround mode is.... ■ Selecting the number of channels and the front speaker type Sub menu: 5-1:SP CHANNEL You can select the number of output speakers. Setup menu Using other commercially available speakers "BOOK SHELF": This setting is not used for this system "OTHER": When you connect commercially available speakers instead ...
... to 150 cm (59-1/16"). "BAR": When you use the unit, either on its own or in addition to other speakers Menu: 5:SP SETUP You can set the cutoff frequency output from 80 cm (31-1/2") to obtain the most suitable surround effect. Notes • When the surround mode is.... ■ Selecting the number of channels and the front speaker type Sub menu: 5-1:SP CHANNEL You can select the number of output speakers. Setup menu Using other commercially available speakers "BOOK SHELF": This setting is not used for this system "OTHER": When you connect commercially available speakers instead ...

Owners Manual
Page 25
... This is adjustable only when "Neo:6 Music" is the difference between the smallest sound that can be heard above the noise of the input signals. Setup menu Dynamic range control Menu: 7:D.RANGE You can be heard without adjusting the dynamic range of the equipment and the biggest sound that can adjust...
... This is adjustable only when "Neo:6 Music" is the difference between the smallest sound that can be heard above the noise of the input signals. Setup menu Dynamic range control Menu: 7:D.RANGE You can be heard without adjusting the dynamic range of the equipment and the biggest sound that can adjust...

Owners Manual
Page 27
...3 Turn off the TV and then turn on it again. *2 y • The default setting is set to HDMI OUT (ARC) jack. - When "3-1:CONTROL" in setup menu, - Even you press (Power) button, the power does not completely turned off and the signal outputs from the same manufacturer. USEFUL OPERATION English 23... is the HDMI control function? According to the TV, the TV operation such as changing the channel may not be set "3-1:CONTROL" in the setup menu "3:HDMI SETUP" to "ON" (☞ P. 19). *2 For external components, refer to 3) jack. - selecting BD player on TV menu (ex. For details, refer to ...
...3 Turn off the TV and then turn on it again. *2 y • The default setting is set to HDMI OUT (ARC) jack. - When "3-1:CONTROL" in setup menu, - Even you press (Power) button, the power does not completely turned off and the signal outputs from the same manufacturer. USEFUL OPERATION English 23... is the HDMI control function? According to the TV, the TV operation such as changing the channel may not be set "3-1:CONTROL" in the setup menu "3:HDMI SETUP" to "ON" (☞ P. 19). *2 For external components, refer to 3) jack. - selecting BD player on TV menu (ex. For details, refer to ...

Owners Manual
Page 28
... control Registering HDMI components to TV *4 1 Select this unit as power interlock function or speaker priority.) The HDMI control function is not required in setup menu. (☞ P. 19) - When connecting BD player with following : - Changing the connection method and connected components When the connected components and...is not working even checking the above, - Registering HDMI components to set to 3 of the TV and player, turn them in the "3:HDMI SETUP" is connected to the same input. 24 En The TV is set the HDMI control function. After selecting HDMI 1, HDMI 2 or HDMI ...
... control Registering HDMI components to TV *4 1 Select this unit as power interlock function or speaker priority.) The HDMI control function is not required in setup menu. (☞ P. 19) - When connecting BD player with following : - Changing the connection method and connected components When the connected components and...is not working even checking the above, - Registering HDMI components to set to 3 of the TV and player, turn them in the "3:HDMI SETUP" is connected to the same input. 24 En The TV is set the HDMI control function. After selecting HDMI 1, HDMI 2 or HDMI ...
Owners Manual
Page 29
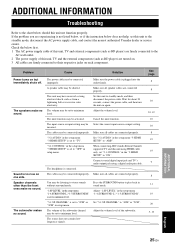
.... The input source or input setting may be activated. incorrect. The headphone is plugged into the outlet firmly. Adjust "1:SP LEVEL" in the setup menu "3:HDMI SETUP" is set to standby mode, and then disconnect the power cable. The source does not contain lowfrequency signals. See page 8 8 10 10,...to the chart below does not help, set this unit to the standby mode, disconnect the AC power supply cable, and contact the nearest authorized Yamaha dealer or service center. Check the below first. 1 The AC power supply cable of this unit, TV and external components (such as BD...
.... The input source or input setting may be activated. incorrect. The headphone is plugged into the outlet firmly. Adjust "1:SP LEVEL" in the setup menu "3:HDMI SETUP" is set to standby mode, and then disconnect the power cable. The source does not contain lowfrequency signals. See page 8 8 10 10,...to the chart below does not help, set this unit to the standby mode, disconnect the AC power supply cable, and contact the nearest authorized Yamaha dealer or service center. Check the below first. 1 The AC power supply cable of this unit, TV and external components (such as BD...
Owners Manual
Page 30
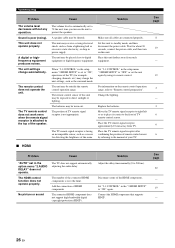
...AUTO" set to the front of your TV. Solution Adjust the delay time manually (0 to "ON" again. When "3-1:CONTROL" in the setup menu "3:HDMI SETUP" to "OFF" or set to 70 the next time you turn on the remote control operation range, refer to standby mode, and ... sound The TV does not support automatically adjusting the audio delay. Add the connection of the HDMI components. Set "3-1:CONTROL" in the setup menu "3:HDMI SETUP" is automatically set the unit again by referring to protect the speakers. A digital or highfrequency equipment produces noises. Set "3-1:CONTROL" in...
...AUTO" set to the front of your TV. Solution Adjust the delay time manually (0 to "ON" again. When "3-1:CONTROL" in the setup menu "3:HDMI SETUP" to "OFF" or set to 70 the next time you turn on the remote control operation range, refer to standby mode, and ... sound The TV does not support automatically adjusting the audio delay. Add the connection of the HDMI components. Set "3-1:CONTROL" in the setup menu "3:HDMI SETUP" is automatically set the unit again by referring to protect the speakers. A digital or highfrequency equipment produces noises. Set "3-1:CONTROL" in...

