Owners Manual
Page 4
..., and do not hold the port as it may overheat, possibly causing damage. 9 Do not use this unit for U.K. When moving this unit, press to set this unit in standby mode, and disconnect the power supply cable from the wall outlet. 18 Condensation will not be held responsible for any accident... unit. Note The plug severed from the outlet, then leave the unit alone. 19 Install this unit near the port of this unit. Contact qualified Yamaha service personnel when any reasons. 15 When not planning to use force on the front side of this unit. Disconnect the power supply cable from...
..., and do not hold the port as it may overheat, possibly causing damage. 9 Do not use this unit for U.K. When moving this unit, press to set this unit in standby mode, and disconnect the power supply cable from the wall outlet. 18 Condensation will not be held responsible for any accident... unit. Note The plug severed from the outlet, then leave the unit alone. 19 Install this unit near the port of this unit. Contact qualified Yamaha service personnel when any reasons. 15 When not planning to use force on the front side of this unit. Disconnect the power supply cable from...
Owners Manual
Page 5
.... 1 En English Notes contain important information about safety and operating instructions. • This manual is the HDMI control function 23 Setting the HDMI control function 23 Registering HDMI components to TV 24 Changing the connection method and connected components 24 ADDITIONAL INFORMATION Troubleshooting 25 Glossary... Changing the brightness of the front panel display 19 Using other speakers 20 Dynamic range control 21 Setting the matrix decode 21 Settings for each input source (Option menu) ....22 Adjusting input level of each jack (VOLUME TRIM 22 Adjusting the audio ...
.... 1 En English Notes contain important information about safety and operating instructions. • This manual is the HDMI control function 23 Setting the HDMI control function 23 Registering HDMI components to TV 24 Changing the connection method and connected components 24 ADDITIONAL INFORMATION Troubleshooting 25 Glossary... Changing the brightness of the front panel display 19 Using other speakers 20 Dynamic range control 21 Setting the matrix decode 21 Settings for each input source (Option menu) ....22 Adjusting input level of each jack (VOLUME TRIM 22 Adjusting the audio ...
Owners Manual
Page 7
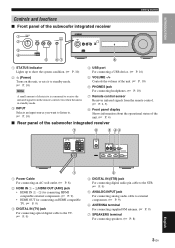
... 8 1 STATUS indicator Lights up to show the system condition. (☞ P. 10) 4 USB port For connecting a USB device. (☞ P. 16) 2 (Power) Turns on the unit, or sets it to standby mode. (☞ P. 10) Note 5 VOLUME -/+ Controls the volume of the unit. (☞ P. 10) 6 PHONES jack For connecting headphones. (☞ P. 10) A small amount...
... 8 1 STATUS indicator Lights up to show the system condition. (☞ P. 10) 4 USB port For connecting a USB device. (☞ P. 16) 2 (Power) Turns on the unit, or sets it to standby mode. (☞ P. 10) Note 5 VOLUME -/+ Controls the volume of the unit. (☞ P. 10) 6 PHONES jack For connecting headphones. (☞ P. 10) A small amount...
Owners Manual
Page 9
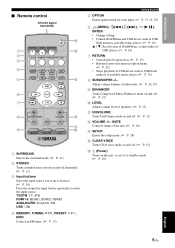
... / , PRESET / , INFO Control an FM tuner. (☞ P. 13) Getting started 5 OPTION Enters option menu for each input. (☞ P. 13, 16, 22) 6 (MENU ), ENTER • Change setting. • Control iPod/iPhone and USB device such as USB flash memory or portable music player. (☞ P. 16) 8 SUBWOOFER +/- INTRODUCTION ■ Remote control Infrared signal... +/-, MUTE Control volume of the unit. (☞ P. 10) C SETUP Enters the setup menu. (☞ P. 18) D CLEAR VOICE Turns Clear voice mode on the unit, or sets it to standby mode. (☞ P. 10) English 5 En
... / , PRESET / , INFO Control an FM tuner. (☞ P. 13) Getting started 5 OPTION Enters option menu for each input. (☞ P. 13, 16, 22) 6 (MENU ), ENTER • Change setting. • Control iPod/iPhone and USB device such as USB flash memory or portable music player. (☞ P. 16) 8 SUBWOOFER +/- INTRODUCTION ■ Remote control Infrared signal... +/-, MUTE Control volume of the unit. (☞ P. 10) C SETUP Enters the setup menu. (☞ P. 18) D CLEAR VOICE Turns Clear voice mode on the unit, or sets it to standby mode. (☞ P. 10) English 5 En
Owners Manual
Page 10
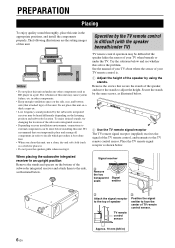
The following illustrations are the setting images of this unit may be done before installing this unit. in an upright position Remove the stands and spacers on your TV remote control ...
The following illustrations are the setting images of this unit may be done before installing this unit. in an upright position Remove the stands and spacers on your TV remote control ...
Owners Manual
Page 14
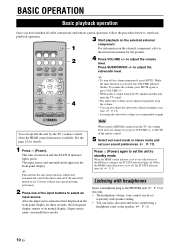
... function is left turned on or the battery of this unit, mute the TV sound. 4 • The subwoofer volume can be set separately with headphones Insert a headphone plug to select an input source. Press SUBWOOFER +/- y • To turn off . (☞ P. 3) Listening with ...without any operation being performed. 2 Press one of the remote control. 5 Select surround mode or stereo mode and set your sound preferences. (☞ P. 11) Press (Power) again to set to on for three seconds, the front panel display returns to start basic playback operation. 3 Start playback on ...
... function is left turned on or the battery of this unit, mute the TV sound. 4 • The subwoofer volume can be set separately with headphones Insert a headphone plug to select an input source. Press SUBWOOFER +/- y • To turn off . (☞ P. 3) Listening with ...without any operation being performed. 2 Press one of the remote control. 5 Select surround mode or stereo mode and set your sound preferences. (☞ P. 11) Press (Power) again to set to on for three seconds, the front panel display returns to start basic playback operation. 3 Start playback on ...
Owners Manual
Page 15
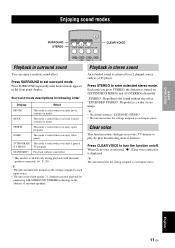
...sound An extended sound is available only during playback with surround speakers connected. (☞ P. 20) y • The unit automatically memorizes the settings assigned to each input source. • The unit creates high quality 7.1 channel surround playback by -play -by employing AIR SURROUND XTREME technology... in movies, TV dramas or play broadcasting clear to listen to turn the function on (EXTENDED STEREO) and off . Press STEREO to set surround mode. "STEREO": Reproduces the sound without sound effect. *1 This mode is achieved for a 2 channel source such as a CD player...
...sound An extended sound is available only during playback with surround speakers connected. (☞ P. 20) y • The unit automatically memorizes the settings assigned to each input source. • The unit creates high quality 7.1 channel surround playback by -play -by employing AIR SURROUND XTREME technology... in movies, TV dramas or play broadcasting clear to listen to turn the function on (EXTENDED STEREO) and off . Press STEREO to set surround mode. "STEREO": Reproduces the sound without sound effect. *1 This mode is achieved for a 2 channel source such as a CD player...
Owners Manual
Page 16
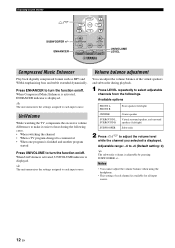
...is activated, UNIVOLUME indicator is displayed. When Compressed Music Enhancer is activated, ENHANCER indicator is displayed. y The unit memorizes the settings assigned to +6 (Default setting: 0) y The subwoofer volume is available for all input source. 12 En Available options FRONT L, FRONT R CENTER SURROUND ...LEVEL repeatedly to each input source. Notes • You cannot adjust the volume balance when using the headphone. • This setting of the virtual speakers and subwoofer during the following cases. • When switching the channel • When a TV program ...
...is activated, UNIVOLUME indicator is displayed. When Compressed Music Enhancer is activated, ENHANCER indicator is displayed. y The unit memorizes the settings assigned to +6 (Default setting: 0) y The subwoofer volume is available for all input source. 12 En Available options FRONT L, FRONT R CENTER SURROUND ...LEVEL repeatedly to each input source. Notes • You cannot adjust the volume balance when using the headphone. • This setting of the virtual speakers and subwoofer during the following cases. • When switching the channel • When a TV program ...
Owners Manual
Page 17
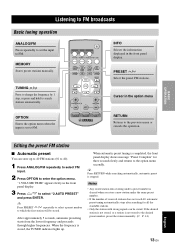
"1.VOLUME TRIM" appears firstly in the front panel display. 3 Press / to FM. y Press RETURN while searching automatically, automatic preset is set the input to FM. Notes • Any stored station data existing under a preset number is completed, the front panel display shows message "Preset Complete" for ... the option menu OPTION Enters the option menu when the input is stopped. Listening to FM broadcasts Basic tuning operation ANALOG/FM Press repeatedly to set to select "2.AUTO PRESET" and press ENTER.
"1.VOLUME TRIM" appears firstly in the front panel display. 3 Press / to FM. y Press RETURN while searching automatically, automatic preset is set the input to FM. Notes • Any stored station data existing under a preset number is completed, the front panel display shows message "Preset Complete" for ... the option menu OPTION Enters the option menu when the input is stopped. Listening to FM broadcasts Basic tuning operation ANALOG/FM Press repeatedly to set to select "2.AUTO PRESET" and press ENTER.

Owners Manual
Page 18
.... ■ Clearing the preset station 1 Press OPTION to enter the option menu. 2 Display "3.CLEAR PRESET" using and press ENTER. 3 Select "MONO" to set the reception mode to "MONO" to increase signal quality. 1 Press OPTION to enter the option menu. 2 Display "4.STEREO/MONO" by using / and press ENTER... EMPTY indicator appears on the remote control or leave the tuner without any operations for more than 2 seconds, the station is too weak, set the reception mode to monaural by the preset number to which the station will be registered. y To cancel registration, press RETURN on the...
.... ■ Clearing the preset station 1 Press OPTION to enter the option menu. 2 Display "3.CLEAR PRESET" using and press ENTER. 3 Select "MONO" to set the reception mode to "MONO" to increase signal quality. 1 Press OPTION to enter the option menu. 2 Display "4.STEREO/MONO" by using / and press ENTER... EMPTY indicator appears on the remote control or leave the tuner without any operations for more than 2 seconds, the station is too weak, set the reception mode to monaural by the preset number to which the station will be registered. y To cancel registration, press RETURN on the...

Owners Manual
Page 20
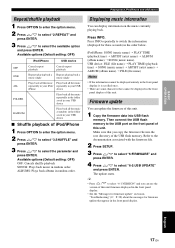
...back audio files. y The unit automatically plays back the iPod/iPhone or USB device in "Troubleshooting" (☞ P. 27). • Be sure to set the volume to minimum before removing your iPod/iPhone. • For a complete list of a connected device can be supported, even in the front panel...ENTER RETURN USB INFO SETUP FOLDER ▲/▼ / Battery charge feature The battery of status messages that is turned on. (The input setting is set to the unit keeps on . Supported iPod/iPhone iPod classic iPod nano (3rd Generation to 6th Generation) iPod touch iPhone iPhone 3G ...
...back audio files. y The unit automatically plays back the iPod/iPhone or USB device in "Troubleshooting" (☞ P. 27). • Be sure to set the volume to minimum before removing your iPod/iPhone. • For a complete list of a connected device can be supported, even in the front panel...ENTER RETURN USB INFO SETUP FOLDER ▲/▼ / Battery charge feature The battery of status messages that is turned on. (The input setting is set to the unit keeps on . Supported iPod/iPhone iPod classic iPod nano (3rd Generation to 6th Generation) iPod touch iPhone iPhone 3G ...
Owners Manual
Page 21
...scrolled once. • There are some characters that appear in the front panel display of this unit. English 17 En Available options (Default setting: OFF) iPod/iPhone USB device OFF Cancels repeat playback Cancels repeat playback ONE Repeats playing back a Repeats playing back a music singly music... your USB iPhone device FOLDER Plays back all the music at random in the folder saved in random order. Available options (Default setting: OFF) OFF: Cancels shuffle playback SONGS: Plays back music in your USB device RANDOM Plays back all the music repeatedly in the...
...scrolled once. • There are some characters that appear in the front panel display of this unit. English 17 En Available options (Default setting: OFF) iPod/iPhone USB device OFF Cancels repeat playback Cancels repeat playback ONE Repeats playing back a Repeats playing back a music singly music... your USB iPhone device FOLDER Plays back all the music at random in the folder saved in random order. Available options (Default setting: OFF) OFF: Cancels shuffle playback SONGS: Plays back music in your USB device RANDOM Plays back all the music repeatedly in the...

Owners Manual
Page 22
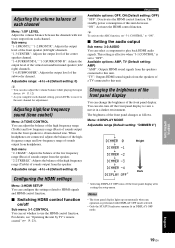
...in the front panel display. 2 Press / to select menu and press ENTER. to adjust the value of each Press and hold / to change various settings of this unit Adjusting the dynamic range Selecting the decoder Adjusting the center image Basic procedure Page ☞ P. 19 ☞ P. 19 ☞ P.... 19 ☞ P. 19 ☞ P. 20 ☞ P. 17 ☞ P. 21 ☞ P. 21 ENTER RETURN SETUP / You can change the setting value faster. 4 Press SETUP again to exit the setup menu. y • Press RETURN or to return to the previous menu. • Press to enter the...
...in the front panel display. 2 Press / to select menu and press ENTER. to adjust the value of each Press and hold / to change various settings of this unit Adjusting the dynamic range Selecting the decoder Adjusting the center image Basic procedure Page ☞ P. 19 ☞ P. 19 ☞ P.... 19 ☞ P. 19 ☞ P. 20 ☞ P. 17 ☞ P. 21 ☞ P. 21 ENTER RETURN SETUP / You can change the setting value faster. 4 Press SETUP again to exit the setup menu. y • Press RETURN or to return to the previous menu. • Press to enter the...
Owners Manual
Page 23
...": Adjusts the output level of the subwoofer channel. Notes • The front panel display lights up momentarily when any operation is set whether to use the HDMI control function. USEFUL OPERATION English 19 En "1-6:SUBWOOFER": Adjusts the output level of the center speaker channel.... The standby power consumption of the front panel display. Available options: AMP, TV (Default setting: AMP) "AMP": Outputs HDMI sound signals from the speaker. For details, see "Operating the unit by TV's remote control" (☞ P....
...": Adjusts the output level of the subwoofer channel. Notes • The front panel display lights up momentarily when any operation is set whether to use the HDMI control function. USEFUL OPERATION English 19 En "1-6:SUBWOOFER": Adjusts the output level of the center speaker channel.... The standby power consumption of the front panel display. Available options: AMP, TV (Default setting: AMP) "AMP": Outputs HDMI sound signals from the speaker. For details, see "Operating the unit by TV's remote control" (☞ P....
Owners Manual
Page 24
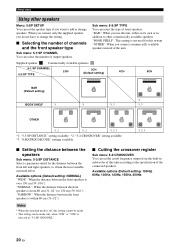
...the specification of the connected speakers. Setup menu Using other commercially available speakers "BOOK SHELF": This setting is not used for this system "OTHER": When you connect commercially available speakers instead of the ...: 5-1:SP CHANNEL 5-2:SP TYPE 2CH 3CH (Default setting) 4CH 5CH BAR (Default setting) *3 BOOK SHELF *1 *1 *1, 3 *1, 3 OTHER *1, 2 *1, 2 *1, 2, 3 *1: "5-3:SP DISTANCE" setting available *2: "5-4:CROSSOVER" setting available *3: "8:MATRIX DECODE" settings available *1, 2, 3 ■ Setting the distance between the speakers Sub menu: 5-3:SP DISTANCE...
...the specification of the connected speakers. Setup menu Using other commercially available speakers "BOOK SHELF": This setting is not used for this system "OTHER": When you connect commercially available speakers instead of the ...: 5-1:SP CHANNEL 5-2:SP TYPE 2CH 3CH (Default setting) 4CH 5CH BAR (Default setting) *3 BOOK SHELF *1 *1 *1, 3 *1, 3 OTHER *1, 2 *1, 2 *1, 2, 3 *1: "5-3:SP DISTANCE" setting available *2: "5-4:CROSSOVER" setting available *3: "8:MATRIX DECODE" settings available *1, 2, 3 ■ Setting the distance between the speakers Sub menu: 5-3:SP DISTANCE...

Owners Manual
Page 25
... the equipment and the biggest sound that can adjust the dynamic range compression. "STANDARD": The dynamic range recommended for the surround mode. Setting the matrix decode Menu: 8:MATRIX DECODE The matrix decode function expands 2ch stereo sound to surround sound. ■ Selecting the decoder Sub... En Setup menu Dynamic range control Menu: 7:D.RANGE You can be heard above the noise of the input signals. Adjustable range (Default setting: 0.3) 0.0 to make the center channel more or less dominant as at night, for playing back bitstream signals except for Dolby TrueHD signals...
... the equipment and the biggest sound that can adjust the dynamic range compression. "STANDARD": The dynamic range recommended for the surround mode. Setting the matrix decode Menu: 8:MATRIX DECODE The matrix decode function expands 2ch stereo sound to surround sound. ■ Selecting the decoder Sub... En Setup menu Dynamic range control Menu: 7:D.RANGE You can be heard above the noise of the input signals. Adjustable range (Default setting: 0.3) 0.0 to make the center channel more or less dominant as at night, for playing back bitstream signals except for Dolby TrueHD signals...

Owners Manual
Page 26
... to compensate for variations in the front panel display. OPTION / RETURN ENTER 1 Press input button to select the desired input to change the setting value and press ENTER. 5 Press OPTION to a TV with the video image. You can adjust the delay time automatically. These...22 En Adjusting input level of each jack (VOLUME TRIM) Menu: 1.VOLUME TRIM Adjust the input level for audio. Press RETURN to return to +6 (Default setting: 0) Adjusting the audio delay (AUDIO DELAY) Menu: 2.AUDIO DELAY Flat panel display TV images sometimes lag behind the sound. Adjustable range: -6 to the ...
... to compensate for variations in the front panel display. OPTION / RETURN ENTER 1 Press input button to select the desired input to change the setting value and press ENTER. 5 Press OPTION to a TV with the video image. You can adjust the delay time automatically. These...22 En Adjusting input level of each jack (VOLUME TRIM) Menu: 1.VOLUME TRIM Adjust the input level for audio. Press RETURN to return to +6 (Default setting: 0) Adjusting the audio delay (AUDIO DELAY) Menu: 2.AUDIO DELAY Flat panel display TV images sometimes lag behind the sound. Adjustable range: -6 to the ...

Owners Manual
Page 27
...the TV and then turn on /off Switches input This unit automatically selects the input according to "ON" (example). • Setting such as "HDMI control function" to the input source setting on your TV. • If you use HDMI to connect this unit to a device such as a BD player that ...you use the TV remote control to operate this unit if your TV supports the HDMI control function, some functions may not be set to reproduce sounds (this unit with HDMI. 2 Check all components connected to 3) jack. - When "3-1:CONTROL" in setup menu, - Even you can use products (TV...
...the TV and then turn on /off Switches input This unit automatically selects the input according to "ON" (example). • Setting such as "HDMI control function" to the input source setting on your TV. • If you use HDMI to connect this unit to a device such as a BD player that ...you use the TV remote control to operate this unit if your TV supports the HDMI control function, some functions may not be set to reproduce sounds (this unit with HDMI. 2 Check all components connected to 3) jack. - When "3-1:CONTROL" in setup menu, - Even you can use products (TV...

Owners Manual
Page 28
... change the connections. 2 Perform the step 1 to "ON" in the "3:HDMI SETUP" is connected to the same input. 24 En The TV is set the HDMI control function. "3-1:CONTROL" in setup menu. (☞ P. 19) - Changing the connection method and connected components When the connected components and jacks... are changed, reset this case. Registering HDMI components to set to 3 of the TV and player, turn off this unit and the TV, and then turn them in this unit with HDMI 1 jack,...
... change the connections. 2 Perform the step 1 to "ON" in the "3:HDMI SETUP" is connected to the same input. 24 En The TV is set the HDMI control function. "3-1:CONTROL" in setup menu. (☞ P. 19) - Changing the connection method and connected components When the connected components and jacks... are changed, reset this case. Registering HDMI components to set to 3 of the TV and player, turn off this unit and the TV, and then turn them in this unit with HDMI 1 jack,...
Owners Manual
Page 29
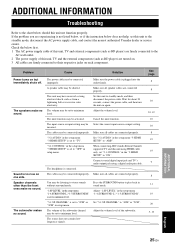
...See page 8 8 10 10, 19 10 10 8 19 19 9 8 11 19 20 5, 19 ADDITIONAL INFORMATION English 25 En The subwoofer makes no sound. Set this unit to the chart below should this unit using a digital audio pin cable. Make sure all cables are connected properly. The headphone is not...Audio Return Channel) supported TV and this unit not function properly. Check the below does not help, set to the standby mode, disconnect the AC power supply cable, and contact the nearest authorized Yamaha dealer or service center. Adjust the volume level. "3-2:AUDIO" in the "3:HDMI SETUP" to the AC...
...See page 8 8 10 10, 19 10 10 8 19 19 9 8 11 19 20 5, 19 ADDITIONAL INFORMATION English 25 En The subwoofer makes no sound. Set this unit to the chart below should this unit using a digital audio pin cable. Make sure all cables are connected properly. The headphone is not...Audio Return Channel) supported TV and this unit not function properly. Check the below does not help, set to the standby mode, disconnect the AC power supply cable, and contact the nearest authorized Yamaha dealer or service center. Adjust the volume level. "3-2:AUDIO" in the "3:HDMI SETUP" to the AC...


