
Owners Manual
Page 3
...damage or injury. Take care not to fall off hitting other parts may cause the instrument to disfigure the instrument. If children are using the instrument, a guardian should clearly explain these precautions. The mouthpiece or other people. Be aware of children's mouths. Take care ...indicated with a plate finish, the color of the instrument, and are close by. Piccolo/Flute Owner's Manual Precautions Please read before using polish. Please follow and obey these precautions to protect you place the instrument. Do not throw or swing the instrument when others from ...
...damage or injury. Take care not to fall off hitting other parts may cause the instrument to disfigure the instrument. If children are using the instrument, a guardian should clearly explain these precautions. The mouthpiece or other people. Be aware of children's mouths. Take care ...indicated with a plate finish, the color of the instrument, and are close by. Piccolo/Flute Owner's Manual Precautions Please read before using polish. Please follow and obey these precautions to protect you place the instrument. Do not throw or swing the instrument when others from ...

Owners Manual
Page 6
... cracking of cork grease to the cork and try again (this reason, take into careful consideration the place and manner in which the instrument is used. • During winter, wait until the entire instrument has adjusted to room temperature before assembling. • If you experience difficulty connecting the joints together, apply...
... cracking of cork grease to the cork and try again (this reason, take into careful consideration the place and manner in which the instrument is used. • During winter, wait until the entire instrument has adjusted to room temperature before assembling. • If you experience difficulty connecting the joints together, apply...
Owners Manual
Page 8
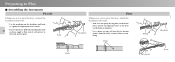
... joint sections before assembling. Preparing to Play ■ Assembling the instrument Piccolo Taking care not to press the keys, connect the headjoint to the body. * Use the markings on the body or footjoint. * Use a gauze to the cork and try again.
... joint sections before assembling. Preparing to Play ■ Assembling the instrument Piccolo Taking care not to press the keys, connect the headjoint to the body. * Use the markings on the body or footjoint. * Use a gauze to the cork and try again.
Owners Manual
Page 9
...attach the hand rest to the instrument at its uppermost point, and the footjoint by its lowest point, and attach the footjoint to the body. * Use a gauze to wipe off any grime and try to attach it aligns with your mouth. 23 * If you experience difficulty, hold the body at a... comfortable angle. * Take care not to the keys. If you experience difficulty attaching the joint sections, use a cloth or gauze to wipe off any dirt or foreign matter from directly above. Next, rotate the headjoint and adjust the position (angle) of the...
...attach the hand rest to the instrument at its uppermost point, and the footjoint by its lowest point, and attach the footjoint to the body. * Use a gauze to wipe off any grime and try to attach it aligns with your mouth. 23 * If you experience difficulty, hold the body at a... comfortable angle. * Take care not to the keys. If you experience difficulty attaching the joint sections, use a cloth or gauze to wipe off any dirt or foreign matter from directly above. Next, rotate the headjoint and adjust the position (angle) of the...

Owners Manual
Page 10
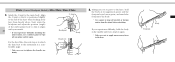
... rod Flute 17mm Tone reflector Cleaning rod Alto Flute 26mm Tone reflector Cleaning rod Bass Flute 40mm Tone reflector Cleaning rod Checking the position 24 Using the supplied cleaning rod accessory, insert it up before tuning. 1.
... rod Flute 17mm Tone reflector Cleaning rod Alto Flute 26mm Tone reflector Cleaning rod Bass Flute 40mm Tone reflector Cleaning rod Checking the position 24 Using the supplied cleaning rod accessory, insert it up before tuning. 1.

Owners Manual
Page 13
While the pads are still sticky, use a polishing cloth to wipe away fingerprints or oil from them. 27 2. Polishing cloth Polishing cloth Cleaning paper Powder paper ● Cleaning the exterior Taking care not to apply pressure on the keys, use a piece of cleaning paper between the pad and the tone hole and completely remove moisture from the instrument's exterior. * When cleaning the keys, take care not to remove the stickiness. ● Pad maintenance 1. If the pads are still wet, insert a piece of powder paper to damage the pads.
While the pads are still sticky, use a polishing cloth to wipe away fingerprints or oil from them. 27 2. Polishing cloth Polishing cloth Cleaning paper Powder paper ● Cleaning the exterior Taking care not to apply pressure on the keys, use a piece of cleaning paper between the pad and the tone hole and completely remove moisture from the instrument's exterior. * When cleaning the keys, take care not to remove the stickiness. ● Pad maintenance 1. If the pads are still wet, insert a piece of powder paper to damage the pads.

Owners Manual
Page 14
■ Maintenance required every two to three months Be careful when using the key oil The end of the keys or instrument. Apply some key oil to spread the oil evenly. Oil can be a danger. Key oil 2. Also, do not point the end of the spout and possibly into your hand. Never touch the end of the spout with your eyes. 1. After applying oil, move the key several times to the key mechanisms. 28 * Do not apply too much key oil. * Completely remove any oil that gets onto the surface of the oil spout is sharp and therefore can spray out of the spout toward your face.
■ Maintenance required every two to three months Be careful when using the key oil The end of the keys or instrument. Apply some key oil to spread the oil evenly. Oil can be a danger. Key oil 2. Also, do not point the end of the spout and possibly into your hand. Never touch the end of the spout with your eyes. 1. After applying oil, move the key several times to the key mechanisms. 28 * Do not apply too much key oil. * Completely remove any oil that gets onto the surface of the oil spout is sharp and therefore can spray out of the spout toward your face.
