Owners Manual
Page 3
Piccolo/Flute Owner's Manual Precautions Please read before using polish. Be aware of the instrument, and are to protect you place the instrument. Doing so may fall ...
Piccolo/Flute Owner's Manual Precautions Please read before using polish. Be aware of the instrument, and are to protect you place the instrument. Doing so may fall ...

Owners Manual
Page 4
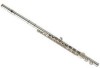
Nomenclature ■ Piccolo Headjoint 18 Crown Embouchure Hole ■ Flute Headjoint Body Crown Embouchure Hole Keys Headjoint Crown Body Lip Plate Embouchure Hole Footjoint Keys Body Keys Footjoint
Nomenclature ■ Piccolo Headjoint 18 Crown Embouchure Hole ■ Flute Headjoint Body Crown Embouchure Hole Keys Headjoint Crown Body Lip Plate Embouchure Hole Footjoint Keys Body Keys Footjoint

Owners Manual
Page 5
■ Alto Flute Crown Headjoint 19 Lip Plate Embouchure Hole Lip Plate U-Joint Crown Headjoint Embouchure Hole Body Keys ■ Bass Flute U-Joint Body Hand rest Footjoint Headjoint Lip Plate Embouchure Hole Crown Keys Footjoint
■ Alto Flute Crown Headjoint 19 Lip Plate Embouchure Hole Lip Plate U-Joint Crown Headjoint Embouchure Hole Body Keys ■ Bass Flute U-Joint Body Hand rest Footjoint Headjoint Lip Plate Embouchure Hole Crown Keys Footjoint

Owners Manual
Page 6
... and manner in cracking of the body or difficulty when connecting the body sections together. Hand rest Bass Flute Before assembling the instrument, please observe the following points. • When holding the flute Some flute and piccolo bodies are made of natural wood (Grenadilla) so sudden changes in temperature or humidity may make... any dirt or foreign matter from the instrument whenever possible. Play it for about 20 to 30 minutes a day for long periods of time. Piccolo/Flute/Alto Flute Place the instrument with its hand rest and footjoint placed on a stable surface.
... and manner in cracking of the body or difficulty when connecting the body sections together. Hand rest Bass Flute Before assembling the instrument, please observe the following points. • When holding the flute Some flute and piccolo bodies are made of natural wood (Grenadilla) so sudden changes in temperature or humidity may make... any dirt or foreign matter from the instrument whenever possible. Play it for about 20 to 30 minutes a day for long periods of time. Piccolo/Flute/Alto Flute Place the instrument with its hand rest and footjoint placed on a stable surface.
Owners Manual
Page 8
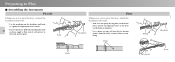
... the body. * Use the markings on the body or footjoint. * Use a gauze to the cork and try again. Marks Marks Body Footjoint Headjoint Body Body Flute Headjoint Taking care not to press the keys, attach the headjoint to the body. * Take care not grasp the lip plate on the headjoint, and...
... the body. * Use the markings on the body or footjoint. * Use a gauze to the cork and try again. Marks Marks Body Footjoint Headjoint Body Body Flute Headjoint Taking care not to press the keys, attach the headjoint to the body. * Take care not grasp the lip plate on the headjoint, and...
Owners Manual
Page 9
Attach the U-joint to tighten the handle too firmly. Flute (Curved Headjoint Models)/Alto Flute/Bass Flute 1. Taking care not to press to the keys, hold the body in the middle and try again. If you experience difficulty, hold the body at ... so that it again. * Take care not to apply unnecessary force to the instrument at the keys from the joints before attaching. For the bass flute, the next step is positioned slightly to the left of the embouchure hole so that it is to attach the hand rest to the keys...
Attach the U-joint to tighten the handle too firmly. Flute (Curved Headjoint Models)/Alto Flute/Bass Flute 1. Taking care not to press to the keys, hold the body in the middle and try again. If you experience difficulty, hold the body at ... so that it again. * Take care not to apply unnecessary force to the instrument at the keys from the joints before attaching. For the bass flute, the next step is positioned slightly to the left of the embouchure hole so that it is to attach the hand rest to the keys...

Owners Manual
Page 10
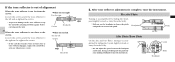
... it up before tuning. 1. Should it into the headjoint and make sure that the line on the cleaning rod Flute 17mm Tone reflector Cleaning rod Alto Flute 26mm Tone reflector Cleaning rod Bass Flute 40mm Tone reflector Cleaning rod Check the position of the tone reflector. Tuning Since changes in temperature and humidity...
... it up before tuning. 1. Should it into the headjoint and make sure that the line on the cleaning rod Flute 17mm Tone reflector Cleaning rod Alto Flute 26mm Tone reflector Cleaning rod Bass Flute 40mm Tone reflector Cleaning rod Check the position of the tone reflector. Tuning Since changes in temperature and humidity...
Owners Manual
Page 11
... adjustment is accomplished by sliding the headjoint slightly toward or away from the body. * Do not adjust the space between the headjoint and U-joint. Piccolo/Flute Tuning is too close to the crown Loosen the crown, push the tone reflector to the right and re-tighten the crown. * If the cork...
... adjustment is accomplished by sliding the headjoint slightly toward or away from the body. * Do not adjust the space between the headjoint and U-joint. Piccolo/Flute Tuning is too close to the crown Loosen the crown, push the tone reflector to the right and re-tighten the crown. * If the cork...


