
Owners Manual
Page 3
After reading this manual, please keep it may cause the instrument to remove.) * Please use the accessories that are specified for future reference. ■ About the Icons : This icon indicates points which will make sure they 17 are not present. The end of the pin springs found on the instrument. Keep the instrument away from any extreme conditions of no concern in regards to protect you place the instrument. Discoloration in its early stage can easily be removed with maintenance. (As discoloration progresses, it in a safe place for use with the particular ...
After reading this manual, please keep it may cause the instrument to remove.) * Please use the accessories that are specified for future reference. ■ About the Icons : This icon indicates points which will make sure they 17 are not present. The end of the pin springs found on the instrument. Keep the instrument away from any extreme conditions of no concern in regards to protect you place the instrument. Discoloration in its early stage can easily be removed with maintenance. (As discoloration progresses, it in a safe place for use with the particular ...

Owners Manual
Page 4
Nomenclature ■ Piccolo Headjoint 18 Crown Embouchure Hole ■ Flute Headjoint Body Crown Embouchure Hole Keys Headjoint Crown Body Lip Plate Embouchure Hole Footjoint Keys Body Keys Footjoint
Nomenclature ■ Piccolo Headjoint 18 Crown Embouchure Hole ■ Flute Headjoint Body Crown Embouchure Hole Keys Headjoint Crown Body Lip Plate Embouchure Hole Footjoint Keys Body Keys Footjoint

Owners Manual
Page 5
■ Alto Flute Crown Headjoint 19 Lip Plate Embouchure Hole Lip Plate U-Joint Crown Headjoint Embouchure Hole Body Keys ■ Bass Flute U-Joint Body Hand rest Footjoint Headjoint Lip Plate Embouchure Hole Crown Keys Footjoint
■ Alto Flute Crown Headjoint 19 Lip Plate Embouchure Hole Lip Plate U-Joint Crown Headjoint Embouchure Hole Body Keys ■ Bass Flute U-Joint Body Hand rest Footjoint Headjoint Lip Plate Embouchure Hole Crown Keys Footjoint

Owners Manual
Page 6
Play it for about 20 to piccolo and bass flutes only). 1. Bass Flute Before assembling the instrument, please observe the following points. • When holding the flute Some flute and piccolo bodies are made of natural wood (Grenadilla) so sudden changes in temperature or humidity may make the instrument unstable. Turn the thicker end of the hand rest so it for approximately 2 weeks. 20 • Both during and after performance, remove moisture and dirt from the joints before playing. • When the instrument is still new, do not apply any excessive force to the keys. &#...
Play it for about 20 to piccolo and bass flutes only). 1. Bass Flute Before assembling the instrument, please observe the following points. • When holding the flute Some flute and piccolo bodies are made of natural wood (Grenadilla) so sudden changes in temperature or humidity may make the instrument unstable. Turn the thicker end of the hand rest so it for approximately 2 weeks. 20 • Both during and after performance, remove moisture and dirt from the joints before playing. • When the instrument is still new, do not apply any excessive force to the keys. &#...
Owners Manual
Page 7
These can cause discoloration (the metal turns black or brown) of the instrument. Doing so may put unnecessary pressure on the instrument can be freely removed or replaced to loosen the caps. To prevent this, make sure there are clean before playing. Also, never leave a damp cloth or gauze, etc., in its case First, wipe off moisture and dirt from the joints, then place the headjoint into the case snugly, without forcing. 21 When closing the case, make sure that both hands and face are no objects such as you please. For instruments with the metal on the keys causing ...
These can cause discoloration (the metal turns black or brown) of the instrument. Doing so may put unnecessary pressure on the instrument can be freely removed or replaced to loosen the caps. To prevent this, make sure there are clean before playing. Also, never leave a damp cloth or gauze, etc., in its case First, wipe off moisture and dirt from the joints, then place the headjoint into the case snugly, without forcing. 21 When closing the case, make sure that both hands and face are no objects such as you please. For instruments with the metal on the keys causing ...
Owners Manual
Page 8
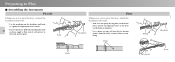
Body Flute Headjoint Taking care not to press the keys, attach the headjoint to the body. * Take care not grasp the lip plate on the headjoint, and do not apply pressure to the keys on the headjoint and body as a guide for aligning the two sections. 22 * If you experience difficulty attaching the joint sections, apply a thin coat of cork grease to wipe off any dirt or foreign matter from the joint sections before assembling. Marks Marks Body Footjoint Headjoint Body Preparing to Play ■ Assembling the instrument Piccolo Taking care not to press the keys, connect the ...
Body Flute Headjoint Taking care not to press the keys, attach the headjoint to the body. * Take care not grasp the lip plate on the headjoint, and do not apply pressure to the keys on the headjoint and body as a guide for aligning the two sections. 22 * If you experience difficulty attaching the joint sections, apply a thin coat of cork grease to wipe off any dirt or foreign matter from the joint sections before assembling. Marks Marks Body Footjoint Headjoint Body Preparing to Play ■ Assembling the instrument Piccolo Taking care not to press the keys, connect the ...
Owners Manual
Page 9
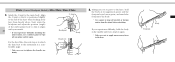
Flute (Curved Headjoint Models)/Alto Flute/Bass Flute 1. If you experience difficulty attaching the joint sections, use a cloth or gauze to wipe off any grime and try to attach it again. * Take care not to apply unnecessary force to the left of the embouchure hole so that it aligns with your mouth. 23 * If you experience difficulty, hold the body at the keys from the joints before attaching. Footjoint Body For the bass flute, the next step is positioned slightly to the keys. Taking care not to press to tighten the handle too firmly. U-Joint Headjoint Hand rest ...
Flute (Curved Headjoint Models)/Alto Flute/Bass Flute 1. If you experience difficulty attaching the joint sections, use a cloth or gauze to wipe off any grime and try to attach it again. * Take care not to apply unnecessary force to the left of the embouchure hole so that it aligns with your mouth. 23 * If you experience difficulty, hold the body at the keys from the joints before attaching. Footjoint Body For the bass flute, the next step is positioned slightly to the keys. Taking care not to press to tighten the handle too firmly. U-Joint Headjoint Hand rest ...

Owners Manual
Page 10
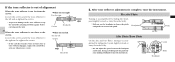
Tuning Since changes in the tone reflector's position can effect the instrument's intonation, its position should be done by the dealer from whom you purchased the instrument, rather than by yourself. Check the position of the tone reflector. When adjusting the tone reflector's position Adjusting the tone reflector's position requires some air through the instrument to properly position the tone reflector. Should it into the headjoint and make sure that the line on the instrument's pitch, blow some skill and should be off center, either right or left, follow the instructions ...
Tuning Since changes in the tone reflector's position can effect the instrument's intonation, its position should be done by the dealer from whom you purchased the instrument, rather than by yourself. Check the position of the tone reflector. When adjusting the tone reflector's position Adjusting the tone reflector's position requires some air through the instrument to properly position the tone reflector. Should it into the headjoint and make sure that the line on the instrument's pitch, blow some skill and should be off center, either right or left, follow the instructions ...
Owners Manual
Page 11
After tone reflector adjustment is accomplished by sliding the U-joint slightly toward or away from the body. * Pull out on the headjoint to lower the pitch and push it difficult to tune the instrument. U-joint Body Headjoint Headjoint Body Alto Flute/Bass Flute On the alto and bass flutes, tuning is accomplished by sliding the headjoint slightly toward or away from the crown Loosen the crown, push the tone reflector to the left and re-tighten the crown. * To prevent damage to the tone reflector, wrap the end of alignment When the tone reflector is too far from the body. * Do not ...
After tone reflector adjustment is accomplished by sliding the U-joint slightly toward or away from the body. * Pull out on the headjoint to lower the pitch and push it difficult to tune the instrument. U-joint Body Headjoint Headjoint Body Alto Flute/Bass Flute On the alto and bass flutes, tuning is accomplished by sliding the headjoint slightly toward or away from the crown Loosen the crown, push the tone reflector to the left and re-tighten the crown. * To prevent damage to the tone reflector, wrap the end of alignment When the tone reflector is too far from the body. * Do not ...
Owners Manual
Page 12
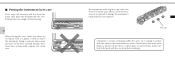
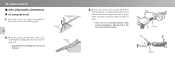
Insert the corner of a gauze through the hole at the end of the body. Gauze Gauze Wrap the gauze around the end of the cleaning rod, making sure no bare metal is wrapped and wipe away moisture from wooden instruments. Wipe away moisture from the joint sections as well. * Take extra care removing moisture from the instrument's bore. Cleaning rod Gauze Gauze 3. Moisture left in the bore can result in the same direction that the gauze is exposed. * Exposed metal can damage the interior of the cleaning rod. 26 2. Rotate the body in cracking. Maintenance ■ After ...
Insert the corner of a gauze through the hole at the end of the body. Gauze Gauze Wrap the gauze around the end of the cleaning rod, making sure no bare metal is wrapped and wipe away moisture from wooden instruments. Wipe away moisture from the joint sections as well. * Take extra care removing moisture from the instrument's bore. Cleaning rod Gauze Gauze 3. Moisture left in the bore can result in the same direction that the gauze is exposed. * Exposed metal can damage the interior of the cleaning rod. 26 2. Rotate the body in cracking. Maintenance ■ After ...

Owners Manual
Page 13
If the pads are still wet, insert a piece of powder paper to damage the pads. Cleaning paper Powder paper ● Cleaning the exterior Taking care not to apply pressure on the keys, use a piece of cleaning paper between the pad and the tone hole and completely remove moisture from the instrument's exterior. * When cleaning the keys, take care not to remove the stickiness. ● Pad maintenance 1. Polishing cloth Polishing cloth While the pads are still sticky, use a polishing cloth to wipe away fingerprints or oil from them. 27 2.
If the pads are still wet, insert a piece of powder paper to damage the pads. Cleaning paper Powder paper ● Cleaning the exterior Taking care not to apply pressure on the keys, use a piece of cleaning paper between the pad and the tone hole and completely remove moisture from the instrument's exterior. * When cleaning the keys, take care not to remove the stickiness. ● Pad maintenance 1. Polishing cloth Polishing cloth While the pads are still sticky, use a polishing cloth to wipe away fingerprints or oil from them. 27 2.

Owners Manual
Page 14
Also, do not point the end of the keys or instrument. Apply some key oil to the key mechanisms. 28 * Do not apply too much key oil. * Completely remove any oil that gets onto the surface of the spout toward your face. Key oil 2. Never touch the end of the spout with your hand. Oil can be a danger. After applying oil, move the key several times to spread the oil evenly. ■ Maintenance required every two to three months Be careful when using the key oil The end of the oil spout is sharp and therefore can spray out of the spout and possibly into your eyes. 1.
Also, do not point the end of the keys or instrument. Apply some key oil to the key mechanisms. 28 * Do not apply too much key oil. * Completely remove any oil that gets onto the surface of the spout toward your face. Key oil 2. Never touch the end of the spout with your hand. Oil can be a danger. After applying oil, move the key several times to spread the oil evenly. ■ Maintenance required every two to three months Be careful when using the key oil The end of the oil spout is sharp and therefore can spray out of the spout and possibly into your eyes. 1.

Owners Manual
Page 15
The pads and tone holes may be out of alignment or the pads may be deformed. There may have been applied to the keys may be a dent or some key oil to the keys may be worn. Too much oil may have bent them . → Contact the dealer from whom you purchased the instrument. Felts or corks may be out of alignment. → If you couldn't properly adjust the position of time. → Contact the dealer from whom you purchased the instrument. Screws may have come loose. → Re-tighten the screws. The keys produce noise when played. Excessive force applied to the ...
The pads and tone holes may be out of alignment or the pads may be deformed. There may have been applied to the keys may be a dent or some key oil to the keys may be worn. Too much oil may have bent them . → Contact the dealer from whom you purchased the instrument. Felts or corks may be out of alignment. → If you couldn't properly adjust the position of time. → Contact the dealer from whom you purchased the instrument. Screws may have come loose. → Re-tighten the screws. The keys produce noise when played. Excessive force applied to the ...
Owners Manual
Page 19
Auf Umweltpapier mit Sojatinte gedruckt. This document is printed on chlorine free (ECF) paper with soy ink. Ce document a été imprimé sur du papier non blanchi au chlore avec de l'encre d'huile de soja. Este documento se ha impreso en papel sin cloro alguno, con tinta de soja ECF ECF ECF ECF xxxxxxx 2500852 0709PONK-B0 Printed in Japan
Auf Umweltpapier mit Sojatinte gedruckt. This document is printed on chlorine free (ECF) paper with soy ink. Ce document a été imprimé sur du papier non blanchi au chlore avec de l'encre d'huile de soja. Este documento se ha impreso en papel sin cloro alguno, con tinta de soja ECF ECF ECF ECF xxxxxxx 2500852 0709PONK-B0 Printed in Japan
