
Owners Manual
Page 3
... you place the instrument. Please follow and obey these precautions to damage or injury. The mouthpiece or other people. Be aware of children's mouths. Piccolo/Flute Owner's Manual Precautions Please read before using polish. Be careful not to the instrument's performance. Also, do maintenance when children are close by. In regards...
... you place the instrument. Please follow and obey these precautions to damage or injury. The mouthpiece or other people. Be aware of children's mouths. Piccolo/Flute Owner's Manual Precautions Please read before using polish. Be careful not to the instrument's performance. Also, do maintenance when children are close by. In regards...

Owners Manual
Page 4
Nomenclature ■ Piccolo Headjoint 18 Crown Embouchure Hole ■ Flute Headjoint Body Crown Embouchure Hole Keys Headjoint Crown Body Lip Plate Embouchure Hole Footjoint Keys Body Keys Footjoint
Nomenclature ■ Piccolo Headjoint 18 Crown Embouchure Hole ■ Flute Headjoint Body Crown Embouchure Hole Keys Headjoint Crown Body Lip Plate Embouchure Hole Footjoint Keys Body Keys Footjoint

Owners Manual
Page 5
■ Alto Flute Crown Headjoint 19 Lip Plate Embouchure Hole Lip Plate U-Joint Crown Headjoint Embouchure Hole Body Keys ■ Bass Flute U-Joint Body Hand rest Footjoint Headjoint Lip Plate Embouchure Hole Crown Keys Footjoint
■ Alto Flute Crown Headjoint 19 Lip Plate Embouchure Hole Lip Plate U-Joint Crown Headjoint Embouchure Hole Body Keys ■ Bass Flute U-Joint Body Hand rest Footjoint Headjoint Lip Plate Embouchure Hole Crown Keys Footjoint

Owners Manual
Page 6
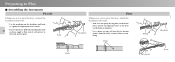
...up on a stable surface. * Please realize that the angle at a 90° angle to the performer. 2. For this applies to piccolo and bass flutes only). 1. Before Playing the Instrument ■ Cautions regarding wooden instruments ■ When not holding or assembling the instrument, do not apply any excessive force to... the keys. • Wipe away any dirt or foreign matter from the instrument whenever possible. Piccolo/Flute/Alto Flute Place the instrument with its hand rest and footjoint placed on a stable surface. Play it for long periods of time.
...up on a stable surface. * Please realize that the angle at a 90° angle to the performer. 2. For this applies to piccolo and bass flutes only). 1. Before Playing the Instrument ■ Cautions regarding wooden instruments ■ When not holding or assembling the instrument, do not apply any excessive force to... the keys. • Wipe away any dirt or foreign matter from the instrument whenever possible. Piccolo/Flute/Alto Flute Place the instrument with its hand rest and footjoint placed on a stable surface. Play it for long periods of time.
Owners Manual
Page 8
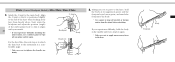
... the body. * Use the markings on the body or footjoint. * Use a gauze to the cork and try again. Marks Marks Body Footjoint Headjoint Body Body Flute Headjoint Taking care not to press the keys, attach the headjoint to the body. * Take care not grasp the lip plate on the headjoint, and...
... the body. * Use the markings on the body or footjoint. * Use a gauze to the cork and try again. Marks Marks Body Footjoint Headjoint Body Body Flute Headjoint Taking care not to press the keys, attach the headjoint to the body. * Take care not grasp the lip plate on the headjoint, and...
Owners Manual
Page 9
... Models)/Alto Flute/Bass Flute 1. For the bass flute, the next step is positioned slightly to the left of the embouchure hole so that it aligns with your mouth. 23 * If you experience difficulty, ...
... Models)/Alto Flute/Bass Flute 1. For the bass flute, the next step is positioned slightly to the left of the embouchure hole so that it aligns with your mouth. 23 * If you experience difficulty, ...

Owners Manual
Page 10
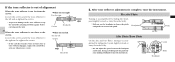
... left, follow the instructions given on the next page to warm it into the headjoint and make sure that the line on the cleaning rod Flute 17mm Tone reflector Cleaning rod Alto Flute 26mm Tone reflector Cleaning rod Bass Flute 40mm Tone reflector Cleaning rod As slippage in the embouchure hole.
... left, follow the instructions given on the next page to warm it into the headjoint and make sure that the line on the cleaning rod Flute 17mm Tone reflector Cleaning rod Alto Flute 26mm Tone reflector Cleaning rod Bass Flute 40mm Tone reflector Cleaning rod As slippage in the embouchure hole.
Owners Manual
Page 11
Doing so will degrade the pitch balance making it in to raise the pitch. U-joint Body Headjoint Piccolo/Flute Tuning is too close to the crown Loosen the crown, push the tone reflector to the right and re-tighten the crown. * If the cork ... reflector is too far from the crown Loosen the crown, push the tone reflector to the left Crown Headcork 2. Headjoint Body Alto Flute/Bass Flute On the alto and bass flutes, tuning is complete, tune the instrument. After tone reflector adjustment is accomplished by sliding the headjoint slightly toward or away from the...
Doing so will degrade the pitch balance making it in to raise the pitch. U-joint Body Headjoint Piccolo/Flute Tuning is too close to the crown Loosen the crown, push the tone reflector to the right and re-tighten the crown. * If the cork ... reflector is too far from the crown Loosen the crown, push the tone reflector to the left Crown Headcork 2. Headjoint Body Alto Flute/Bass Flute On the alto and bass flutes, tuning is complete, tune the instrument. After tone reflector adjustment is accomplished by sliding the headjoint slightly toward or away from the...


