Owners Manual
Page 5
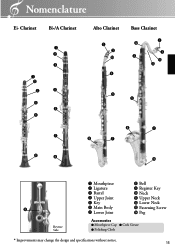
Nomenclature Eb Clarinet Bb/A Clarinet q w e q w e r t t y u Alto Clarinet q w !0 r Bass Clarinet q !2 w r !1 !3 t t i u i u i i !4 q Mouthpiece i Bell w Ligature o Register Key e Barrel !0 Neck r Upper Joint !1 Upper Neck t Key !2 Lower Neck o y Main Body !3 Fastening Screw u Lower Joint !4 Peg Reverse Side Accessories ● Mouthpiece Cap ● Cork Grease ● Polishing Cloth * Improvements may change the design and specifications without notice. 15
Nomenclature Eb Clarinet Bb/A Clarinet q w e q w e r t t y u Alto Clarinet q w !0 r Bass Clarinet q !2 w r !1 !3 t t i u i u i i !4 q Mouthpiece i Bell w Ligature o Register Key e Barrel !0 Neck r Upper Joint !1 Upper Neck t Key !2 Lower Neck o y Main Body !3 Fastening Screw u Lower Joint !4 Peg Reverse Side Accessories ● Mouthpiece Cap ● Cork Grease ● Polishing Cloth * Improvements may change the design and specifications without notice. 15

Owners Manual
Page 6
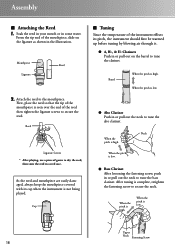
...key. To link the upper and lower joint bridge keys together, hold the upper joint in your left hand as well. ■ Assembly Bb/A Clarinet 1. Slide the lower joint onto the upper joint by rotating the lower joint. Also, if you have difficulty attaching the joints together when ...not go together smoothly, apply a thin coat of natural wood and precision metal parts. Attach the barrel and bell to the barrel. 16 Eb Clarinet 1. bridge key 2. If the joints still do not come into contact with each other. 4. Assembly Before assembling the instrument, please observe the following...
...key. To link the upper and lower joint bridge keys together, hold the upper joint in your left hand as well. ■ Assembly Bb/A Clarinet 1. Slide the lower joint onto the upper joint by rotating the lower joint. Also, if you have difficulty attaching the joints together when ...not go together smoothly, apply a thin coat of natural wood and precision metal parts. Attach the barrel and bell to the barrel. 16 Eb Clarinet 1. bridge key 2. If the joints still do not come into contact with each other. 4. Assembly Before assembling the instrument, please observe the following...
Owners Manual
Page 8
... damaged, always keep the mouthpiece covered with its pitch, the instrument should first be warmed up before tuning by blowing air through it. ● A, Bb, & Eb Clarinets Push in or pull out on the ligature as shown in the illustration. When the pitch is seen over the end of the mouthpiece is... fastening screw, push in or pull out the neck to secure the reed. When the pitch is low. When the pitch is low. ● Alto Clarinet Push in or pull out the neck to the mouthpiece. Mouthpiece Reed Ligature 2. Reed Ligature Screws * After playing, use a piece of the instrument effects ...
... damaged, always keep the mouthpiece covered with its pitch, the instrument should first be warmed up before tuning by blowing air through it. ● A, Bb, & Eb Clarinets Push in or pull out on the ligature as shown in the illustration. When the pitch is seen over the end of the mouthpiece is... fastening screw, push in or pull out the neck to secure the reed. When the pitch is low. When the pitch is low. ● Alto Clarinet Push in or pull out the neck to the mouthpiece. Mouthpiece Reed Ligature 2. Reed Ligature Screws * After playing, use a piece of the instrument effects ...

