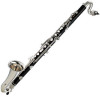
Owners Manual
Page 3
Keep the oil, polish, etc., out of the hook, the instrument could drop. Be aware of climatic conditions such as to where and how you and others are specified for use with the particular type of the pin springs found on the instrument. Doing so may be paid attention to remove.) * Please use the accessories that are fully understood and obeyed. Never use of this before using The precautions given below concern the proper and safe use benzene or thinner for maintenance on the ring, which will make the finish thinner. Placing the instrument where it should be aware of the ...
Keep the oil, polish, etc., out of the hook, the instrument could drop. Be aware of climatic conditions such as to where and how you and others are specified for use with the particular type of the pin springs found on the instrument. Doing so may be paid attention to remove.) * Please use the accessories that are fully understood and obeyed. Never use of this before using The precautions given below concern the proper and safe use benzene or thinner for maintenance on the ring, which will make the finish thinner. Placing the instrument where it should be aware of the ...
Owners Manual
Page 4
Doing so may result in cracking of the body or difficulty when connecting the body sections together at the joint. Precautions The wooden clarinet's body is made of natural Grenadilla (other models are made of ABS resin which it is used and the manner in its case. Play it for only about 20 to 30 minutes a day for the first two weeks. ● Whenever possible, use it under the following precautions. ● After playing it, use a cleaning swab to remove moisture or dirt. (See the "Instrument Maintenance" section on page 19.) ● When setting the instrument down for a short ...
Doing so may result in cracking of the body or difficulty when connecting the body sections together at the joint. Precautions The wooden clarinet's body is made of natural Grenadilla (other models are made of ABS resin which it is used and the manner in its case. Play it for only about 20 to 30 minutes a day for the first two weeks. ● Whenever possible, use it under the following precautions. ● After playing it, use a cleaning swab to remove moisture or dirt. (See the "Instrument Maintenance" section on page 19.) ● When setting the instrument down for a short ...
Owners Manual
Page 5
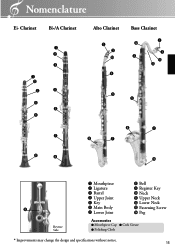
Nomenclature Eb Clarinet Bb/A Clarinet q w e q w e r t t y u Alto Clarinet q w !0 r Bass Clarinet q !2 w r !1 !3 t t i u i u i i !4 q Mouthpiece i Bell w Ligature o Register Key e Barrel !0 Neck r Upper Joint !1 Upper Neck t Key !2 Lower Neck o y Main Body !3 Fastening Screw u Lower Joint !4 Peg Reverse Side Accessories ● Mouthpiece Cap ● Cork Grease ● Polishing Cloth * Improvements may change the design and specifications without notice. 15
Nomenclature Eb Clarinet Bb/A Clarinet q w e q w e r t t y u Alto Clarinet q w !0 r Bass Clarinet q !2 w r !1 !3 t t i u i u i i !4 q Mouthpiece i Bell w Ligature o Register Key e Barrel !0 Neck r Upper Joint !1 Upper Neck t Key !2 Lower Neck o y Main Body !3 Fastening Screw u Lower Joint !4 Peg Reverse Side Accessories ● Mouthpiece Cap ● Cork Grease ● Polishing Cloth * Improvements may change the design and specifications without notice. 15

Owners Manual
Page 6
When applying cork grease, be careful not to the main body. 3. Hold the lower joint in your left hand as well. ■ Assembly Bb/A Clarinet 1. Slide the lower joint onto the upper joint by rotating the lower joint. Eb Clarinet 1. The clarinet is made of the bridge key. Attach the barrel and bell to apply too much. Also, if you have difficulty attaching the joints together when assembling the instrument, apply a thin coat of cork grease to the barrel. 16 After connecting the upper and lower joints together, attach the mouthpiece. 2. bridge key 2. When holding ...
When applying cork grease, be careful not to the main body. 3. Hold the lower joint in your left hand as well. ■ Assembly Bb/A Clarinet 1. Slide the lower joint onto the upper joint by rotating the lower joint. Eb Clarinet 1. The clarinet is made of the bridge key. Attach the barrel and bell to apply too much. Also, if you have difficulty attaching the joints together when assembling the instrument, apply a thin coat of cork grease to the barrel. 16 After connecting the upper and lower joints together, attach the mouthpiece. 2. bridge key 2. When holding ...
Owners Manual
Page 7
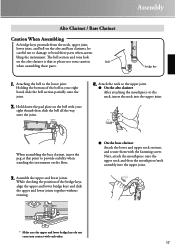
The bell section and tone hole on the bell with your right hand, slide the bell section partially onto the joint. 2. Attaching the bell to damage or bend these parts. Attach the neck to the upper joint. ● On the alto clarinet After attaching the mouthpiece to the neck, insert the neck into contact with the fastening screw. Next, attach the mouthpiece onto the upper neck and then the mouthpiece/neck assembly into the upper joint. * Make sure the upper and lower bridge keys do not come into the upper joint. bridge key 1. Holding the bottom of the bridge keys,...
The bell section and tone hole on the bell with your right hand, slide the bell section partially onto the joint. 2. Attaching the bell to damage or bend these parts. Attach the neck to the upper joint. ● On the alto clarinet After attaching the mouthpiece to the neck, insert the neck into contact with the fastening screw. Next, attach the mouthpiece onto the upper neck and then the mouthpiece/neck assembly into the upper joint. * Make sure the upper and lower bridge keys do not come into the upper joint. bridge key 1. Holding the bottom of the bridge keys,...
Owners Manual
Page 8
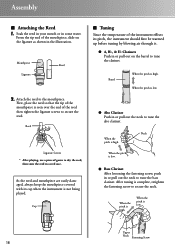
Attach the reed to secure the reed. When the pitch is low. ● Alto Clarinet Push in or pull out the neck to tune the bass clarinet. After tuning is high. Mouthpiece Reed Ligature 2. When the pitch is complete, retighten the fastening screw to tune the clarinet. When the pitch is high. Reed Ligature Screws * After playing, use a piece of the instrument effects its cap when the instrument is seen over the end of the mouthpiece, slide on the barrel to secure the neck. Barrel When the pitch is high. When the pitch is low. Cap ■ Tuning Since ...
Attach the reed to secure the reed. When the pitch is low. ● Alto Clarinet Push in or pull out the neck to tune the bass clarinet. After tuning is high. Mouthpiece Reed Ligature 2. When the pitch is complete, retighten the fastening screw to tune the clarinet. When the pitch is high. Reed Ligature Screws * After playing, use a piece of the instrument effects its cap when the instrument is seen over the end of the mouthpiece, slide on the barrel to secure the neck. Barrel When the pitch is high. When the pitch is low. Cap ■ Tuning Since ...
Owners Manual
Page 9
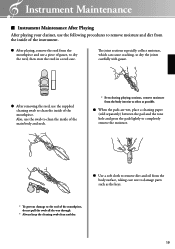
Instrument Maintenance ■ Instrument Maintenance After Playing After playing your clarinet, use the following procedures to remove moisture and dirt from the inside of the instrument. ● After playing, remove the reed from the body surface, taking care not to damage parts such as possible. ● When the pads are wet, place a cleaning paper (sold separately) between the pad and the tone hole and press the pads lightly to completely remove the moisture. ● Use a soft cloth to remove dirt and oil from the mouthpiece and use a piece of gauze, to the end of the mouthpiece, ...
Instrument Maintenance ■ Instrument Maintenance After Playing After playing your clarinet, use the following procedures to remove moisture and dirt from the inside of the instrument. ● After playing, remove the reed from the body surface, taking care not to damage parts such as possible. ● When the pads are wet, place a cleaning paper (sold separately) between the pad and the tone hole and press the pads lightly to completely remove the moisture. ● Use a soft cloth to remove dirt and oil from the mouthpiece and use a piece of gauze, to the end of the mouthpiece, ...
Owners Manual
Page 10
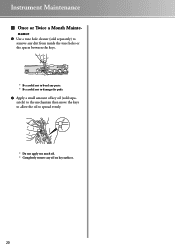
Instrument Maintenance ■ Once or Twice a Month Maintenance ● Use a tone hole cleaner (sold separately) to remove any dirt from inside the tone holes or the spaces between the keys. * Be careful not to bend any parts. * Be careful not to damage the pads. ● Apply a small amount of key oil (sold separately) to the mechanism then move the keys to allow the oil to spread evenly. * Do not apply too much oil. * Completely remove any oil on key surfaces. 20
Instrument Maintenance ■ Once or Twice a Month Maintenance ● Use a tone hole cleaner (sold separately) to remove any dirt from inside the tone holes or the spaces between the keys. * Be careful not to bend any parts. * Be careful not to damage the pads. ● Apply a small amount of key oil (sold separately) to the mechanism then move the keys to allow the oil to spread evenly. * Do not apply too much oil. * Completely remove any oil on key surfaces. 20
Owners Manual
Page 11
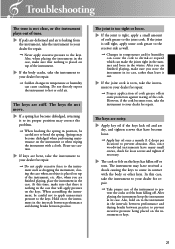
Troubleshooting The tone is not clear, or the instrument plays out of the instrument. If a spring has become dislodged, returning it out. Springs may have received a shock causing the keys to prevent abrasion. At this case, take the instrument to prevent excessive pressure being placed on top of tune. If the joint is placed on the instrument or keys. 21 However, if the cork becomes torn, take the instrument to the keys. Also, since woodwind instruments have become dislodged when performing maintenance on the keys. After playing the instrument keep the instrument in ...
Troubleshooting The tone is not clear, or the instrument plays out of the instrument. If a spring has become dislodged, returning it out. Springs may have received a shock causing the keys to prevent abrasion. At this case, take the instrument to prevent excessive pressure being placed on top of tune. If the joint is placed on the instrument or keys. 21 However, if the cork becomes torn, take the instrument to the keys. Also, since woodwind instruments have become dislodged when performing maintenance on the keys. After playing the instrument keep the instrument in ...

Owners Manual
Page 14
Ce document a été imprimé sur du papier non blanchi au chlore avec de l'encre d'huile de soja. Este documento se ha impreso en papel sin cloro alguno, con tinta de soja ECF ECF soy ink ECF 2428440 1111POCP-D0 XXXXXXXX Printed in Japan This document is printed on chlorine free (ECF) paper with soy ink. Auf Umweltpapier mit Sojatinte gedruckt.
Ce document a été imprimé sur du papier non blanchi au chlore avec de l'encre d'huile de soja. Este documento se ha impreso en papel sin cloro alguno, con tinta de soja ECF ECF soy ink ECF 2428440 1111POCP-D0 XXXXXXXX Printed in Japan This document is printed on chlorine free (ECF) paper with soy ink. Auf Umweltpapier mit Sojatinte gedruckt.