
Owner's Manual
Page 3
... in regards to brass instruments with this manual, please keep it is unstable may result in any damage or injuries. Do not modify the instrument. Trombone Owner's Manual Precautions Please read before using polish. 17 After reading this mark may make the finish thinner. Keep the oil, polish, etc., out of...
... in regards to brass instruments with this manual, please keep it is unstable may result in any damage or injuries. Do not modify the instrument. Trombone Owner's Manual Precautions Please read before using polish. 17 After reading this mark may make the finish thinner. Keep the oil, polish, etc., out of...
Owner's Manual
Page 4
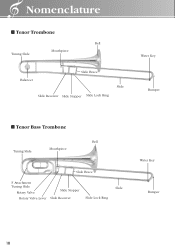
Nomenclature ■ Tenor Trombone Bell Tuning Slide Mouthpiece Balancer Slide Brace Slide Receiver Slide Stopper Slide Lock Ring Slide Water Key Bumper ■ Tenor Bass Trombone Bell Tuning Slide Mouthpiece Slide Brace F Attachment Tuning Slide Rotary Valve Rotary Valve Lever Slide Stopper Slide Receiver Slide Lock Ring Slide Water Key Bumper 18
Nomenclature ■ Tenor Trombone Bell Tuning Slide Mouthpiece Balancer Slide Brace Slide Receiver Slide Stopper Slide Lock Ring Slide Water Key Bumper ■ Tenor Bass Trombone Bell Tuning Slide Mouthpiece Slide Brace F Attachment Tuning Slide Rotary Valve Rotary Valve Lever Slide Stopper Slide Receiver Slide Lock Ring Slide Water Key Bumper 18
Owner's Manual
Page 5
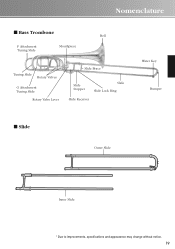
Nomenclature ■ Bass Trombone Bell F Attachment Tuning Slide Mouthpiece Tuning Slide Rotary Valves G Attachment Tuning Slide Rotary Valve Lever Slide Brace Slide Stopper Slide Slide Lock Ring Slide Receiver Water Key Bumper ■ Slide Outer Slide Inner Slide * Due to improvements, specifications and appearance may change without notice. 19
Nomenclature ■ Bass Trombone Bell F Attachment Tuning Slide Mouthpiece Tuning Slide Rotary Valves G Attachment Tuning Slide Rotary Valve Lever Slide Brace Slide Stopper Slide Slide Lock Ring Slide Receiver Water Key Bumper ■ Slide Outer Slide Inner Slide * Due to improvements, specifications and appearance may change without notice. 19
Owner's Manual
Page 6
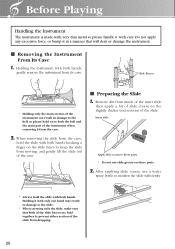
Holding the instrument with both hands, gently remove the instrument from inside of the inner slide then apply a bit of the slide. Holding it from the case. 2. When removing the slide from the case, hold the slide with both hands. Before Playing Handling the Instrument The instrument is made with very thin metal so please handle it in damage to the slide. * When carrying only the slide, make sure that will dent or damage the instrument. ■ Removing the Instrument From Its Case 1. Slide Braces * Holding only the main section of the instrument can result in damage to the bell, ...
Holding the instrument with both hands, gently remove the instrument from inside of the inner slide then apply a bit of the slide. Holding it from the case. 2. When removing the slide from the case, hold the slide with both hands. Before Playing Handling the Instrument The instrument is made with very thin metal so please handle it in damage to the slide. * When carrying only the slide, make sure that will dent or damage the instrument. ■ Removing the Instrument From Its Case 1. Slide Braces * Holding only the main section of the instrument can result in damage to the bell, ...
Owner's Manual
Page 7
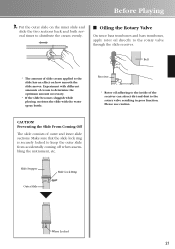
... slide and slide the two sections back and forth several times to distribute the cream evenly. ■ Oiling the Rotary Valve On tenor bass trombones and bass trombones, apply rotor oil directly to the rotary valve through the slide receiver. CAUTION! Bell * The amount of cream to the inside of outer and...
... slide and slide the two sections back and forth several times to distribute the cream evenly. ■ Oiling the Rotary Valve On tenor bass trombones and bass trombones, apply rotor oil directly to the rotary valve through the slide receiver. CAUTION! Bell * The amount of cream to the inside of outer and...
Owner's Manual
Page 8
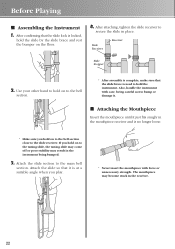
Also, handle the instrument with force or unnecessary strength. Slide Receiver Receiver Slide Stopper 2. Use your other hand to hold on to the bell section. * After assembly is complete, make sure that the slide brace is used to hold on to the tuning slide, the tuning slide may come off or poor stability may become stuck in place. Before Playing ■ Assembling the Instrument 1. Attach the slide so that the slide lock is locked, hold on the floor. 4. After attaching, tighten the slide receiver to the main bell section. The mouthpiece may result in the mouthpiece ...
Also, handle the instrument with force or unnecessary strength. Slide Receiver Receiver Slide Stopper 2. Use your other hand to hold on to the bell section. * After assembly is complete, make sure that the slide brace is used to hold on to the tuning slide, the tuning slide may come off or poor stability may become stuck in place. Before Playing ■ Assembling the Instrument 1. Attach the slide so that the slide lock is locked, hold on the floor. 4. After attaching, tighten the slide receiver to the main bell section. The mouthpiece may result in the mouthpiece ...
Owner's Manual
Page 9
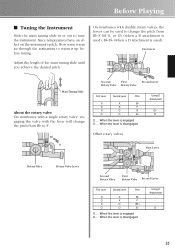
... Lever Pitch X X Bb O X F X O G O O Eb O ... Adjust the length of the main tuning slide until you achieve the desired pitch. On trombones with the lever will change the pitch from Bb to F. When the lever is used ), Bb-Eb (when a D attachment is engaged X .... First Lever Main Tuning... Slide About the rotary valve On trombones with a single rotary valve, engaging the valve with double rotary valves, the levers can be used to change the pitch from Bb-F, Bb-G, or...
... Lever Pitch X X Bb O X F X O G O O Eb O ... Adjust the length of the main tuning slide until you achieve the desired pitch. On trombones with the lever will change the pitch from Bb to F. When the lever is used ), Bb-Eb (when a D attachment is engaged X .... First Lever Main Tuning... Slide About the rotary valve On trombones with a single rotary valve, engaging the valve with double rotary valves, the levers can be used to change the pitch from Bb-F, Bb-G, or...
Owner's Manual
Page 10
Caring for an extended period of the slide. 24 Cleaning Rod Leadpipe Gauze * Exposed metal can damage the interior of time. Open the water key to let the gauze become stuck in the leadpipe. Please use caution. 2. Take Care When Cleaning A leadpipe is removed from the instrument using materials that moisture or dirt is fitted inside the slide stopper so take care not to remove moisture from coming off the slide cream and moisture on the inner slide. * Firmly hold on to the gauze to prevent the gauze from inside the slide section. 4. Use a gauze cloth to clean off the ...
Caring for an extended period of the slide. 24 Cleaning Rod Leadpipe Gauze * Exposed metal can damage the interior of time. Open the water key to let the gauze become stuck in the leadpipe. Please use caution. 2. Take Care When Cleaning A leadpipe is removed from the instrument using materials that moisture or dirt is fitted inside the slide stopper so take care not to remove moisture from coming off the slide cream and moisture on the inner slide. * Firmly hold on to the gauze to prevent the gauze from inside the slide section. 4. Use a gauze cloth to clean off the ...
Owner's Manual
Page 11
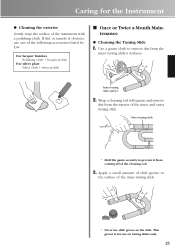
Use a gauze cloth to remove dirt from coming off of the following accessories listed below. Inner tuning slide surface 2. This grease is obvious, use one of the cleaning rod. 3. For lacquer finishes Polishing cloth + lacquer polish For silver plate Silver cloth + silver polish ■ Once or Twice a Month Maintenance ● Cleaning the Tuning Slide 1. Apply a small amount of slide grease to prevent it from the inner tuning slide's surfaces. Caring for use on the slide. If dirt or tarnish is for the Instrument ● Cleaning the exterior Gently wipe the surface of ...
Use a gauze cloth to remove dirt from coming off of the following accessories listed below. Inner tuning slide surface 2. This grease is obvious, use one of the cleaning rod. 3. For lacquer finishes Polishing cloth + lacquer polish For silver plate Silver cloth + silver polish ■ Once or Twice a Month Maintenance ● Cleaning the Tuning Slide 1. Apply a small amount of slide grease to prevent it from the inner tuning slide's surfaces. Caring for use on the slide. If dirt or tarnish is for the Instrument ● Cleaning the exterior Gently wipe the surface of ...
Owner's Manual
Page 12
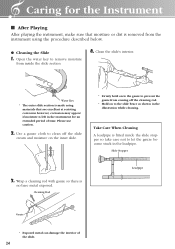
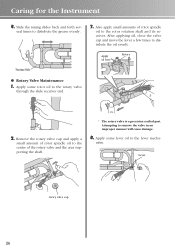
Apply oil here Rotary Tuning Slide ● Rotary Valve Maintenance 1. Caring for the Instrument 4. Attempting to distribute the oil evenly. Also apply small amounts of the rotary valve and the area supporting the shaft. * The rotary valve is a precision crafted part. After applying oil, close the valve cap and move the lever a few times to remove the valve in an improper manner will cause damage. 4. Remove the rotary valve cap and apply a small amount of rotor spindle oil to the center of rotor spindle oil to the rotary valve through the slide receiver end. 2. Lever...
Apply oil here Rotary Tuning Slide ● Rotary Valve Maintenance 1. Caring for the Instrument 4. Attempting to distribute the oil evenly. Also apply small amounts of the rotary valve and the area supporting the shaft. * The rotary valve is a precision crafted part. After applying oil, close the valve cap and move the lever a few times to remove the valve in an improper manner will cause damage. 4. Remove the rotary valve cap and apply a small amount of rotor spindle oil to the center of rotor spindle oil to the rotary valve through the slide receiver end. 2. Lever...
Owner's Manual
Page 13
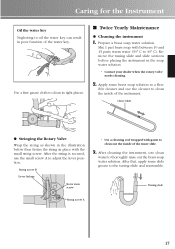
Outer Slide ● Stringing the Rotary Valve Wrap the string as shown in the illustration below then fasten the string in place with between 10 and 15 parts warm water (30° C to 40° C). Remove the tuning slide and slide sections before placing the instrument in poor function of the instrument. After the string is secured, use the small screw A to thoroughly rinse out the brass soap water solution. Tuning slide String screw A 27 Apply some slide grease to a flex- Mix 1 part brass soap with the small string screw. After that, apply some brass soap solution to the ...
Outer Slide ● Stringing the Rotary Valve Wrap the string as shown in the illustration below then fasten the string in place with between 10 and 15 parts warm water (30° C to 40° C). Remove the tuning slide and slide sections before placing the instrument in poor function of the instrument. After the string is secured, use the small screw A to thoroughly rinse out the brass soap water solution. Tuning slide String screw A 27 Apply some slide grease to a flex- Mix 1 part brass soap with the small string screw. After that, apply some brass soap solution to the ...
Owner's Manual
Page 14
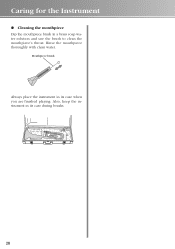
Rinse the mouthpiece thoroughly with clean water. Mouthpiece brush Always place the instrument in its case during breaks. 28 Also, keep the instrument in a brass soap water solution and use the brush to clean the mouthpiece's throat. Caring for the Instrument ● Cleaning the mouthpiece Dip the mouthpiece brush in its case when you are finished playing.
Rinse the mouthpiece thoroughly with clean water. Mouthpiece brush Always place the instrument in its case during breaks. 28 Also, keep the instrument in a brass soap water solution and use the brush to clean the mouthpiece's throat. Caring for the Instrument ● Cleaning the mouthpiece Dip the mouthpiece brush in its case when you are finished playing.
Owner's Manual
Page 15
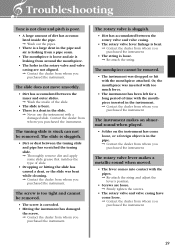
The tuning slide is stuck can not be removed. • The instrument was dropped or hit with the mouthpiece inserted in the instrument. ➞ Contact the dealer from whom you purchased the instrument. The screw is too tight and cannot be removed. • The screw is corroded. • Hitting the instrument has damaged the screw. ➞ Contact the dealer from whom you purchased the instrument. The instrument makes an abnormal sound when played. • Solder on the instrument has come loose. ➞ Contact the dealer from whom you purchased the instrument. 29 The mouthpiece ...
The tuning slide is stuck can not be removed. • The instrument was dropped or hit with the mouthpiece inserted in the instrument. ➞ Contact the dealer from whom you purchased the instrument. The screw is too tight and cannot be removed. • The screw is corroded. • Hitting the instrument has damaged the screw. ➞ Contact the dealer from whom you purchased the instrument. The instrument makes an abnormal sound when played. • Solder on the instrument has come loose. ➞ Contact the dealer from whom you purchased the instrument. 29 The mouthpiece ...

Owner's Manual
Page 18
Ce document a été imprimé sur du papier non blanchi au chlore avec de l'encre d'huile de soja. Este documento se ha impreso en papel sin cloro alguno, con tinta de soja ECF ECF ECF YYYYYYY 2434850 0708PONK-A0 Printed in Japan Auf Umweltpapier mit Sojatinte gedruckt. This document is printed on chlorine free (ECF) paper with soy ink.
Ce document a été imprimé sur du papier non blanchi au chlore avec de l'encre d'huile de soja. Este documento se ha impreso en papel sin cloro alguno, con tinta de soja ECF ECF ECF YYYYYYY 2434850 0708PONK-A0 Printed in Japan Auf Umweltpapier mit Sojatinte gedruckt. This document is printed on chlorine free (ECF) paper with soy ink.
