
SPS-900 ASSEMBLY INSTRUCTION
Page 1
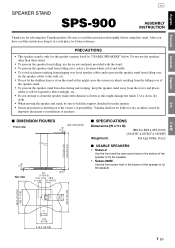
... 360.3 (14-3/16) 180 (7-1/16) 77 (3-1/16) 175 (6-7/8) 415.3 (16-3/8) 1 En English Français Deutsch Español SPEAKER STAND SPS-900 GJ ASSEMBLY INSTRUCTION Thank you have read this instruction thoroughly before using this stand. After you for any accident caused by improper placement or installation...speakers other than these listed. • To prevent the speaker from discoloring and warping, keep it will be liable for selecting this Yamaha product. PRECAUTIONS • This speaker stand is only for future reference. Be sure to fix the speaker. • Soavo-900M ...
... 360.3 (14-3/16) 180 (7-1/16) 77 (3-1/16) 175 (6-7/8) 415.3 (16-3/8) 1 En English Français Deutsch Español SPEAKER STAND SPS-900 GJ ASSEMBLY INSTRUCTION Thank you have read this instruction thoroughly before using this stand. After you for any accident caused by improper placement or installation...speakers other than these listed. • To prevent the speaker from discoloring and warping, keep it will be liable for selecting this Yamaha product. PRECAUTIONS • This speaker stand is only for future reference. Be sure to fix the speaker. • Soavo-900M ...
SPS-900 ASSEMBLY INSTRUCTION
Page 2
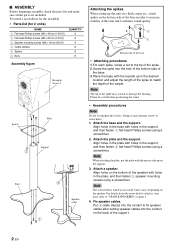
Note The tip of the spike may damage screws or screw holes. 1. Note When attaching the plate, put the plate with the spacer-side up on page 1. 4. For details about the screw hole(s) which is (are) used varies (vary) depending on the bottom side of the base in order to increase stability of the carpet. Align holes in the plate with the topside up this unit and to enhance sound quality. 1 2 6 5 Bottom side of the base • Attaching procedures 1.For each spike, screw a nut to the tip of the spike. 2.Screw the spike into the conduit on the bottom of the support. 2 En...
Note The tip of the spike may damage screws or screw holes. 1. Note When attaching the plate, put the plate with the spacer-side up on page 1. 4. For details about the screw hole(s) which is (are) used varies (vary) depending on the bottom side of the base in order to increase stability of the carpet. Align holes in the plate with the topside up this unit and to enhance sound quality. 1 2 6 5 Bottom side of the base • Attaching procedures 1.For each spike, screw a nut to the tip of the spike. 2.Screw the spike into the conduit on the bottom of the support. 2 En...