Installation Manual
Page 3
..., and must be conducted on a regular basis. Be sure to overheat internally, resulting in this manual when installing the Sound Projector using this bracket. WALL MOUNT BRACKET SPM-K1 Installation Manual Thank you have read this manual thoroughly before using this bracket. SAFETY INSTRUCTIONS • Always follow the instructions set forth in a fire...
..., and must be conducted on a regular basis. Be sure to overheat internally, resulting in this manual when installing the Sound Projector using this bracket. WALL MOUNT BRACKET SPM-K1 Installation Manual Thank you have read this manual thoroughly before using this bracket. SAFETY INSTRUCTIONS • Always follow the instructions set forth in a fire...
Installation Manual
Page 4
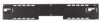
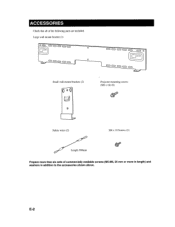
E-2 Large wall mount bracket (1) o o Small wall mount brackets (2) Projector mounting screws (M6 x 16) (6) Safety wires (2) M4 x 10 Screws (2) Length 300mm Prepare more in length) and washers in addition to the accessories shown above. ACCESSORIES Check that all of commercially available screws (M5-M6, 25 mm or more than six sets of the following parts are included.
E-2 Large wall mount bracket (1) o o Small wall mount brackets (2) Projector mounting screws (M6 x 16) (6) Safety wires (2) M4 x 10 Screws (2) Length 300mm Prepare more in length) and washers in addition to the accessories shown above. ACCESSORIES Check that all of commercially available screws (M5-M6, 25 mm or more than six sets of the following parts are included.

Installation Manual
Page 5
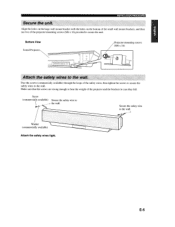
..., attach four (or more) tapping / r... Installation example 5....6mm Tapping Screw (commercially available) / In order to secure the unit to the wall first in the wall mount bracket. ~% 0 c:::'.) c::> c;::) screws using the outside of the holes in a manner befitting the structure and quality of the wall. . r. Choose a location where the wall can bear...
..., attach four (or more) tapping / r... Installation example 5....6mm Tapping Screw (commercially available) / In order to secure the unit to the wall first in the wall mount bracket. ~% 0 c:::'.) c::> c;::) screws using the outside of the holes in a manner befitting the structure and quality of the wall. . r. Choose a location where the wall can bear...

Installation Manual
Page 6
...the holes on the left and right sides of the Sound Projector. E-4 INSTALLATION PROCEDURE Use four of the projector mounting screws (M6 x 16) provided to securely attach the small wall mount brackets (2) to the rear left and right sides of the Sound Projector. ____ Safety wire (Attached by the method... A) Attach the brackets to the rear left and right sides of the large wall mount bracket, then slide the unit to the right....
...the holes on the left and right sides of the Sound Projector. E-4 INSTALLATION PROCEDURE Use four of the projector mounting screws (M6 x 16) provided to securely attach the small wall mount brackets (2) to the rear left and right sides of the Sound Projector. ____ Safety wire (Attached by the method... A) Attach the brackets to the rear left and right sides of the large wall mount bracket, then slide the unit to the right....
Installation Manual
Page 7
...the brackets in case they fall. INSTALLATION PROCEDURE Align the holes on the large wall mount bracket with the holes on the bottom of the small wall mount brackets, and then use two of the projector mounting screws (M6 x 16) provided to (\JIP the wall. Screw (commercially available) ...Secure the safety wire to secure the unit. Projector mounting screws (M6 x 16) Pass the screws (commercially available...
...the brackets in case they fall. INSTALLATION PROCEDURE Align the holes on the large wall mount bracket with the holes on the bottom of the small wall mount brackets, and then use two of the projector mounting screws (M6 x 16) provided to (\JIP the wall. Screw (commercially available) ...Secure the safety wire to secure the unit. Projector mounting screws (M6 x 16) Pass the screws (commercially available...