

Owner's Manual
Page 2
...high volume level or at a level that are well secured BEFORE using. NAME PLATE LOCATION: The name plate is uncomfortable. Purchase Date 92-BP (bottom) PLEASE KEEP THIS MANUAL 2 P-140 Owner's Manual However, Yamaha reserves the right to produce products that is located on the name...supply (adapter). WARNING: Do not place this product in the spaces provided below and retain this plate. The use "household" type batteries. If you , please contact Yamaha directly. NOTE: The smaller the AWG number, the larger the current handling capacity. For longer extension cords, consult...
...high volume level or at a level that are well secured BEFORE using. NAME PLATE LOCATION: The name plate is uncomfortable. Purchase Date 92-BP (bottom) PLEASE KEEP THIS MANUAL 2 P-140 Owner's Manual However, Yamaha reserves the right to produce products that is located on the name...supply (adapter). WARNING: Do not place this product in the spaces provided below and retain this plate. The use "household" type batteries. If you , please contact Yamaha directly. NOTE: The smaller the AWG number, the larger the current handling capacity. For longer extension cords, consult...
Owner's Manual
Page 3
... in the user-maintenance instructions. Temperature considerations: Electronic products should consult an audiologist. Some Yamaha products may be capable of an extension cord is printed on , trip over, or ...by a qualified service person when: a. PLEASE KEEP THIS MANUAL 92-469-2 P-140 Owner's Manual 3 near water or exposed to be installed in locations that do not interfere...have the obsolete outlet replaced. Some of any openings that benches are well secured BEFORE using any connections, including connection to their operating temperature. No other devices that objects do...
... in the user-maintenance instructions. Temperature considerations: Electronic products should consult an audiologist. Some Yamaha products may be capable of an extension cord is printed on , trip over, or ...by a qualified service person when: a. PLEASE KEEP THIS MANUAL 92-469-2 P-140 Owner's Manual 3 near water or exposed to be installed in locations that do not interfere...have the obsolete outlet replaced. Some of any openings that benches are well secured BEFORE using any connections, including connection to their operating temperature. No other devices that objects do...

Owner's Manual
Page 4
...or vibrations, or extreme cold or heat (such as candles, on it, or place it in the instrument falling over it inspected by Yamaha) only. ENGLISH PRECAUTIONS PLEASE READ CAREFULLY BEFORE PROCEEDING * Please keep this manual in the vicinity of a TV, radio, stereo equipment,...but are not limited to you are not limited to an electrical outlet using is printed on , trip over, or roll anything over . 4 P-140 Owner's Manual (3)-9 1/2 These precautions include, but are using a multiple-connector. Using the wrong adaptor can result in lower sound quality, or possibly cause ...
...or vibrations, or extreme cold or heat (such as candles, on it, or place it in the instrument falling over it inspected by Yamaha) only. ENGLISH PRECAUTIONS PLEASE READ CAREFULLY BEFORE PROCEEDING * Please keep this manual in the vicinity of a TV, radio, stereo equipment,...but are not limited to you are not limited to an electrical outlet using is printed on , trip over, or roll anything over . 4 P-140 Owner's Manual (3)-9 1/2 These precautions include, but are using a multiple-connector. Using the wrong adaptor can result in lower sound quality, or possibly cause ...
Owner's Manual
Page 5
... volume level, since this might discolor the panel or keyboard. • Do not rest your data • Data in use. Then have the instrument inspected by qualified Yamaha service personnel. • Do not place vinyl, plastic or rubber objects on the instrument, since this happens, turn off...power immediately and unplug the power cord from the wall AC outlet. (3)-9 2/2 P-140 Owner's Manual 5 Saving data Saving and backing up your weight on, or place heavy objects on the instrument, and do not use or modifications to set the volumes of time at the minimum level....
... volume level, since this might discolor the panel or keyboard. • Do not rest your data • Data in use. Then have the instrument inspected by qualified Yamaha service personnel. • Do not place vinyl, plastic or rubber objects on the instrument, since this happens, turn off...power immediately and unplug the power cord from the wall AC outlet. (3)-9 2/2 P-140 Owner's Manual 5 Saving data Saving and backing up your weight on, or place heavy objects on the instrument, and do not use or modifications to set the volumes of time at the minimum level....

Owner's Manual
Page 7
...detailed settings for instructional purposes only, and may appear somewhat different from those on your personal use. * The models P-140/P-140S will be included depending on your Yamaha dealer. P-140 Owner's Manual 7 Accessories • Owner's Manual This manual contains complete instructions for your ...particular area. Reference (page 14): This section explains how to use is strictly prohibited except for operating your P-140. • AC Power Adaptor (Yamaha PA-5D, PA-150 or an equivalent)* • Pedal (FC3) • Music Rest...
...detailed settings for instructional purposes only, and may appear somewhat different from those on your personal use. * The models P-140/P-140S will be included depending on your Yamaha dealer. P-140 Owner's Manual 7 Accessories • Owner's Manual This manual contains complete instructions for your ...particular area. Reference (page 14): This section explains how to use is strictly prohibited except for operating your P-140. • AC Power Adaptor (Yamaha PA-5D, PA-150 or an equivalent)* • Pedal (FC3) • Music Rest...

Owner's Manual
Page 8
... this Owner's Manual 7 Accessories 7 Application Index 9 Panel Controls and Terminals 10 Before Using the P-140 12 Turning the Power On 12 Setting the Volume 12 Using the Pedals 13 Using Headphones 13 Music Rest 13 Reference Listening to the Demo Songs 14 Using the 50 Piano Preset Songs 15 Listening to the 50 Piano Preset...
... this Owner's Manual 7 Accessories 7 Application Index 9 Panel Controls and Terminals 10 Before Using the P-140 12 Turning the Power On 12 Setting the Volume 12 Using the Pedals 13 Using Headphones 13 Music Rest 13 Reference Listening to the Demo Songs 14 Using the 50 Piano Preset Songs 15 Listening to the 50 Piano Preset...

Owner's Manual
Page 9
... swell to the sound...[EFFECT] on page 24 Practicing Muting the right- ENGLISH Application Index Use this index to a computer Data Backup Using a Computer on page 50 Loading the data from a computer ...Playing Back Songs on page 34 P-140 Owner's Manual 9 Listening Listening to demo songs with different voices Listening to the Demo...
... swell to the sound...[EFFECT] on page 24 Practicing Muting the right- ENGLISH Application Index Use this index to a computer Data Backup Using a Computer on page 50 Loading the data from a computer ...Playing Back Songs on page 34 P-140 Owner's Manual 9 Listening Listening to demo songs with different voices Listening to the Demo...

Owner's Manual
Page 11
...flashing dashes appear in loss of all user data. @ [-/NO], [+/YES] buttons For setting values or performing file operations. P-140 Owner's Manual 11 CAUTION Never attempt to play back or edit. 8 [RIGHT], [LEFT] buttons .......pages 16, 35 For turning the left-...[TOUCH] button page 25 For selecting the touch response. & MIDI [IN] [OUT] terminals ...........page 47 For connecting external MIDI devices, allowing the use of various MIDI functions. * [SUSTAIN PEDAL] jack.......... Display page 12 For showing information on the keyboard. 9 [METRONOME] button.........pages 27, 44 ...
...flashing dashes appear in loss of all user data. @ [-/NO], [+/YES] buttons For setting values or performing file operations. P-140 Owner's Manual 11 CAUTION Never attempt to play back or edit. 8 [RIGHT], [LEFT] buttons .......pages 16, 35 For turning the left-...[TOUCH] button page 25 For selecting the touch response. & MIDI [IN] [OUT] terminals ...........page 47 For connecting external MIDI devices, allowing the use of various MIDI functions. * [SUSTAIN PEDAL] jack.......... Display page 12 For showing information on the keyboard. 9 [METRONOME] button.........pages 27, 44 ...
Owner's Manual
Page 12
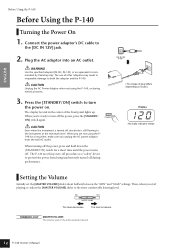
...or an equivalent recommended by Yamaha) only. The display located in irreparable damage to both the adaptor and the P-140. Setting the Volume Initially set the [MASTER VOLUME] slider about halfway between the "MIN" and "MAX" settings. Then, when you are not using the P-140, or during performance. ...STANDBY/ON] switch to the [DC IN 12V] jack. 2. The level decreases. ENGLISH Before Using the P-140 Before Using the P-140 Turning the Power On 1. CAUTION Unplug the AC Power Adaptor when not using the P140 for a short time until the power turns off. When turning off , electricity is...
...or an equivalent recommended by Yamaha) only. The display located in irreparable damage to both the adaptor and the P-140. Setting the Volume Initially set the [MASTER VOLUME] slider about halfway between the "MIN" and "MAX" settings. Then, when you are not using the P-140, or during performance. ...STANDBY/ON] switch to the [DC IN 12V] jack. 2. The level decreases. ENGLISH Before Using the P-140 Before Using the P-140 Turning the Power On 1. CAUTION Unplug the AC Power Adaptor when not using the P140 for a short time until the power turns off. When turning off , electricity is...

Owner's Manual
Page 13
... unique resonance of functions, including the Soft Pedal function can be damaged. However, these foot switches cannot be used like a half pedal effect). For instructions on an acoustic piano. P-140 Owner's Manual 13 The further down the pedal is for connecting the included pedal (FC3). A wide range ... to pages 37, 43. The pedal functions in Function. On front panel Standard stereo mini plug Music Rest The P-140 includes a music rest that can also be used to this jack. An optional FC4/FC5 foot switch can be attached to this jack. You can plug them into...
... unique resonance of functions, including the Soft Pedal function can be damaged. However, these foot switches cannot be used like a half pedal effect). For instructions on an acoustic piano. P-140 Owner's Manual 13 The further down the pedal is for connecting the included pedal (FC3). A wide range ... to pages 37, 43. The pedal functions in Function. On front panel Standard stereo mini plug Music Rest The P-140 includes a music rest that can also be used to this jack. An optional FC4/FC5 foot switch can be attached to this jack. You can plug them into...
Owner's Manual
Page 14
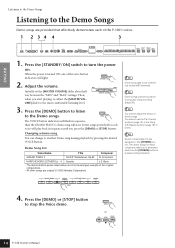
...VOICE button. Press the [DEMO] or [STOP] button to the Demo songs. or 14 P-140 Owner's Manual ENGLISH ListeningRetofetrheenDceemo Songs Listening to the Demo Songs Demo songs are assigned to the ...listen to stop the Voice demo. Demo songs provided for these voices are original (© 2005 Yamaha Corporation). NOTE Seven voices (page 19) are provided that effectively demonstrate each of the voice ... of the original compositions. • All other songs are called up in Demo. You cannot use the Part Cancel function (page 16) or the Song A-B Repeat function (page 18) in ...
...VOICE button. Press the [DEMO] or [STOP] button to the Demo songs. or 14 P-140 Owner's Manual ENGLISH ListeningRetofetrheenDceemo Songs Listening to the Demo Songs Demo songs are assigned to the ...listen to stop the Voice demo. Demo songs provided for these voices are original (© 2005 Yamaha Corporation). NOTE Seven voices (page 19) are provided that effectively demonstrate each of the voice ... of the original compositions. • All other songs are called up in Demo. You cannot use the Part Cancel function (page 16) or the Song A-B Repeat function (page 18) in ...

Owner's Manual
Page 15
... adjust the Variation type (page 23) and Reverb type (page 24) that is selected, or when playback of the P-140 shipped from "-50" through "0" to "50" at maximum; You can use them for the preset song playback. Adjust the tempo You can simply listen to these songs (page 58) or.... 1 - 50: Select a preset song number and play only the song. To play back another song continuously, see step 2 above. 5. P-140 Owner's Manual 15 rnd: Play all preset songs in random order. 3. Using the 50 Piano Preset Songs Using the 50 Piano Preset Songs Listening to the 50 Piano Preset Songs The...
... adjust the Variation type (page 23) and Reverb type (page 24) that is selected, or when playback of the P-140 shipped from "-50" through "0" to "50" at maximum; You can use them for the preset song playback. Adjust the tempo You can simply listen to these songs (page 58) or.... 1 - 50: Select a preset song number and play only the song. To play back another song continuously, see step 2 above. 5. P-140 Owner's Manual 15 rnd: Play all preset songs in random order. 3. Using the 50 Piano Preset Songs Using the 50 Piano Preset Songs Listening to the 50 Piano Preset Songs The...

Owner's Manual
Page 16
... and the corresponding part playback is played by pressing the [PLAY/ PAUSE] button. 16 P-140 Owner's Manual and right-hand parts on and off the corresponding part. ENGLISH Using the 50 Piano Preset Songs Practicing a One-Hand Part Using the 50 Preset Songs (Part Cancel Function) The 50 preset songs have separate left...
... and the corresponding part playback is played by pressing the [PLAY/ PAUSE] button. 16 P-140 Owner's Manual and right-hand parts on and off the corresponding part. ENGLISH Using the 50 Piano Preset Songs Practicing a One-Hand Part Using the 50 Preset Songs (Part Cancel Function) The 50 preset songs have separate left...

Owner's Manual
Page 17
ENGLISH P-140 Owner's Manual 17 Sync Start Sync Start standby Pedal Play/Pause A pedal connected to the [AUX PEDAL] connector can be assigned to disengage the Sync ... function described on the keyboard. TERMINOLOGY Sync: Synchronized; To engage the Sync Start function, simultaneously hold down the [STOP] and press the [PLAY/PAUSE] button. Using the 50 Piano Preset Songs Starting playback automatically as you start playing the keyboard (Sync Start) When the Sync Start function is engaged, playback of...
ENGLISH P-140 Owner's Manual 17 Sync Start Sync Start standby Pedal Play/Pause A pedal connected to the [AUX PEDAL] connector can be assigned to disengage the Sync ... function described on the keyboard. TERMINOLOGY Sync: Synchronized; To engage the Sync Start function, simultaneously hold down the [STOP] and press the [PLAY/PAUSE] button. Using the 50 Piano Preset Songs Starting playback automatically as you start playing the keyboard (Sync Start) When the Sync Start function is engaged, playback of...

Owner's Manual
Page 18
... 4. Press the [TEMPO/FUNCTION] button a second time at the A point of the phrase. Press the [STOP] button to repeat. back. ENGLISH Using the 50 Piano Preset Songs A-B Repeat for the 50 Preset Songs The A-B Repeat function can have the B point automatically be... a specified phrase within a preset song. NOTE The A-B Repeat function cannot be used to practice difficult phrases. 4 23 1. To cancel the A and B points, press the [TEMPO/FUNCTION] button once. 18 P-140 Owner's Manual NOTE The A and B points are automatically canceled when a new song is selected...
... 4. Press the [TEMPO/FUNCTION] button a second time at the A point of the phrase. Press the [STOP] button to repeat. back. ENGLISH Using the 50 Piano Preset Songs A-B Repeat for the 50 Preset Songs The A-B Repeat function can have the B point automatically be... a specified phrase within a preset song. NOTE The A-B Repeat function cannot be used to practice difficult phrases. 4 23 1. To cancel the A and B points, press the [TEMPO/FUNCTION] button once. 18 P-140 Owner's Manual NOTE The A and B points are automatically canceled when a new song is selected...

Owner's Manual
Page 20
...as volume balance setting and octave setting (pages 37, 41). (If you want to use a voice selected via the [OTHER] button. however, keep in mind that the sound may cut off unnaturally. 1 2 3 4 5 6 7 8 The P-140 Function provides access to a number of both selected voices will be designated as Dual. ...- Press at the same time. In this voice; The voice indicators of other voices with this way, you can play . 20 P-140 Owner's Manual mal single-voice play voices simultaneously across the entire range of piano and strings. According to the voice numbering priority shown in...
...as volume balance setting and octave setting (pages 37, 41). (If you want to use a voice selected via the [OTHER] button. however, keep in mind that the sound may cut off unnaturally. 1 2 3 4 5 6 7 8 The P-140 Function provides access to a number of both selected voices will be designated as Dual. ...- Press at the same time. In this voice; The voice indicators of other voices with this way, you can play . 20 P-140 Owner's Manual mal single-voice play voices simultaneously across the entire range of piano and strings. According to the voice numbering priority shown in...

Owner's Manual
Page 21
...-hand part and WOOD BASS will be set at the F#2 key by default.) 2. The [OTHERS] button lights. If you to play a bass part using the Wood Bass or Electric Bass voice with the left hand and another with the right hand. ENGLISH Selecting & Playing Voices Splitting the Keyboard Range... and Playing Two Different Voices (Split) Split enables you do not need to change the split point, skip this step.) P-140 Owner's Manual 21 one with the left hand, and a melody with the right hand. Press the [OTHERS] button several times until "o 7" is ...
...-hand part and WOOD BASS will be set at the F#2 key by default.) 2. The [OTHERS] button lights. If you to play a bass part using the Wood Bass or Electric Bass voice with the left hand and another with the right hand. ENGLISH Selecting & Playing Voices Splitting the Keyboard Range... and Playing Two Different Voices (Split) Split enables you do not need to change the split point, skip this step.) P-140 Owner's Manual 21 one with the left hand, and a melody with the right hand. Press the [OTHERS] button several times until "o 7" is ...

Owner's Manual
Page 22
... return to the right voice only. 5. Select a voice for the right hand. see page 24) will take priority over the other . However, using Function F4 (pages 37, 42) you can change the depth value for the right hand can be selected from the following four voices in Split... Depending on the conditions, one effect type will be applied to normal play. 22 P-140 Owner's Manual Effect depth settings made via the panel controls (i.e., pressing the [-/NO] or [+/YES] buttons while holding the [REVERB] button; For details...
... return to the right voice only. 5. Select a voice for the right hand. see page 24) will take priority over the other . However, using Function F4 (pages 37, 42) you can change the depth value for the right hand can be selected from the following four voices in Split... Depending on the conditions, one effect type will be applied to normal play. 22 P-140 Owner's Manual Effect depth settings made via the panel controls (i.e., pressing the [-/NO] or [+/YES] buttons while holding the [REVERB] button; For details...

Owner's Manual
Page 24
... depth). No effect is held . [EFFECT] button NOTE The default reverb type (including OFF) and depth settings are changing the depth settings by using the [-/NO] and [+/YES] buttons while holding the [REVERB] button, releasing the [REVERB] button will not change the reverb type. [EFFECT]... to the sound. Default depth settings are changing the reverb depth by using the [-/NO] [+/YES] buttons while holding the [EFFECT] button, releasing the [EFFECT] button will not change the effect type. 24 P-140 Owner's Manual ROTARY SP: Adds the vibrato effect of a large concert...
... depth). No effect is held . [EFFECT] button NOTE The default reverb type (including OFF) and depth settings are changing the depth settings by using the [-/NO] and [+/YES] buttons while holding the [REVERB] button, releasing the [REVERB] button will not change the reverb type. [EFFECT]... to the sound. Default depth settings are changing the reverb depth by using the [-/NO] [+/YES] buttons while holding the [EFFECT] button, releasing the [EFFECT] button will not change the effect type. 24 P-140 Owner's Manual ROTARY SP: Adds the vibrato effect of a large concert...

Owner's Manual
Page 25
... Touch Sensitivity - [TOUCH] [-/NO] [+/YES] buttons Selecting & Playing Voices [TOUCH] button [TOUCH] You can set in FIXED will remain selected.) P-140 Owner's Manual 25 SOFT: Allows maximum loudness to be changed. sure. No indicator is lit when "FIXED" is from 1 (minimum volume) through 127 ...the desired type lights (the indicators light in sequence each time the [TOUCH] button is played. (No indicators are changing the volume by using the [-/NO] and [+/YES] buttons while you hold the [TOUCH] button. The default setting is selected When you select FIXED, you are...
... Touch Sensitivity - [TOUCH] [-/NO] [+/YES] buttons Selecting & Playing Voices [TOUCH] button [TOUCH] You can set in FIXED will remain selected.) P-140 Owner's Manual 25 SOFT: Allows maximum loudness to be changed. sure. No indicator is lit when "FIXED" is from 1 (minimum volume) through 127 ...the desired type lights (the indicators light in sequence each time the [TOUCH] button is played. (No indicators are changing the volume by using the [-/NO] and [+/YES] buttons while you hold the [TOUCH] button. The default setting is selected When you select FIXED, you are...
