

Owner's Manual
Page 4
... Avoid installing the speakers where foreign objects may fall onto them and/or where they are continuously output at least 20 cm of space above, behind and on switches, controls or connection wires. Never allow your amplifier to lower setting. For the SW-P270 1 Do not ... outlet. 14 Install this unit, reduce the volume level. Stable placement will also ensure better sound performance. 7 Placing the speakers on a TV. Contact qualified YAMAHA service personnel when service is still a chance that specified on your amplifier to be driven into a wall...
... Avoid installing the speakers where foreign objects may fall onto them and/or where they are continuously output at least 20 cm of space above, behind and on switches, controls or connection wires. Never allow your amplifier to lower setting. For the SW-P270 1 Do not ... outlet. 14 Install this unit, reduce the volume level. Stable placement will also ensure better sound performance. 7 Placing the speakers on a TV. Contact qualified YAMAHA service personnel when service is still a chance that specified on your amplifier to be driven into a wall...

Owner's Manual
Page 5
... the front and surround speakers (NX-E270 3 Positioning the center speaker (NX-C270 4 Positioning the subwoofer (SW-P270 4 Mounting the front and surround speakers 5 Connections 6 Basic connection example 6 Connecting speaker cables 7 Connecting components and the subwoofer to AC power 7 Using the subwoofer (SW-P270 8 Pre-adjusting the subwoofer volume 8 Advanced YAMAHA Active Servo Technology (on the rear...
... the front and surround speakers (NX-E270 3 Positioning the center speaker (NX-C270 4 Positioning the subwoofer (SW-P270 4 Mounting the front and surround speakers 5 Connections 6 Basic connection example 6 Connecting speaker cables 7 Connecting components and the subwoofer to AC power 7 Using the subwoofer (SW-P270 8 Pre-adjusting the subwoofer volume 8 Advanced YAMAHA Active Servo Technology (on the rear...

Owner's Manual
Page 6
... that features a built-in NS-P276) NX-E270 Speaker cables [4 m] [10 m] X 4 X 5 Center speaker NX-C270 Subwoofer SW-P270 X 3 Subwoofer cable X 2 X 3 Fasteners (for NX-C270) Non-skid pads [1 set, 8 pcs] (for NX-E270) X 2 Non-skid pads [1 set, 4 pcs] (for choosing a YAMAHA NS-P270 or NS-P276 Home Cinema 5.1/6.1 Channel Speaker System. Introduction Thank you for SW-P270) X2 X3 2 Each of...
... that features a built-in NS-P276) NX-E270 Speaker cables [4 m] [10 m] X 4 X 5 Center speaker NX-C270 Subwoofer SW-P270 X 3 Subwoofer cable X 2 X 3 Fasteners (for NX-C270) Non-skid pads [1 set, 8 pcs] (for NX-E270) X 2 Non-skid pads [1 set, 4 pcs] (for choosing a YAMAHA NS-P270 or NS-P276 Home Cinema 5.1/6.1 Channel Speaker System. Introduction Thank you for SW-P270) X2 X3 2 Each of...

Owner's Manual
Page 7
...) above the floor. Refer to the illustration below. Refer to "Positioning the subwoofer (SW-P270)" on page 4 for NS-P276) Surround L Positioning the front and surround speakers (NX-E270) Non-skid pad Front speakers: Place the two front speakers on a flat approximately the same height as the position of the other supports, or...
...) above the floor. Refer to the illustration below. Refer to "Positioning the subwoofer (SW-P270)" on page 4 for NS-P276) Surround L Positioning the front and surround speakers (NX-E270) Non-skid pad Front speakers: Place the two front speakers on a flat approximately the same height as the position of the other supports, or...
Owner's Manual
Page 8
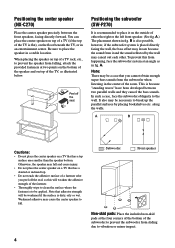
... the wall, the bass effect may cause the center speaker to fall and cause injury. • Do not place the center speaker on the floor beneath the TV, or in fig. along the walls. Positioning the subwoofer (SW-P270) It is flat an angle as illustrated below.... To prevent this will be applied. A. You can place the center speaker on top of a TV rack, etc., to prevent the speaker from falling, attach the provided fasteners at the four ...
... the wall, the bass effect may cause the center speaker to fall and cause injury. • Do not place the center speaker on the floor beneath the TV, or in fig. along the walls. Positioning the subwoofer (SW-P270) It is flat an angle as illustrated below.... To prevent this will be applied. A. You can place the center speaker on top of a TV rack, etc., to prevent the speaker from falling, attach the provided fasteners at the four ...

Owner's Manual
Page 9
... out of the holes. To mount the speakers on commercially available speaker stand, you need to attach a bracket to result in diameter.) Wall/ wall support Rear view Installing the speakers on commercially available speaker stands: You can place the front and surround speakers (and surround back speaker in an NS-P276 system) on a shelf or rack, set...
... out of the holes. To mount the speakers on commercially available speaker stand, you need to attach a bracket to result in diameter.) Wall/ wall support Rear view Installing the speakers on commercially available speaker stands: You can place the front and surround speakers (and surround back speaker in an NS-P276 system) on a shelf or rack, set...

Owner's Manual
Page 10
Basic connection example Front speakers Right Left Surround speakers Right Left Note: The rear panel of various amplifiers may differ in NS-P276 systems) Connections Caution: Plug the power cables for the subwoofer and other audio/video components into an AC outlet only after you complete all other connections. Amplifier Subwoofer To AC outlet 6 Center speaker Surround back speaker (in appearance.
Basic connection example Front speakers Right Left Surround speakers Right Left Note: The rear panel of various amplifiers may differ in NS-P276 systems) Connections Caution: Plug the power cables for the subwoofer and other audio/video components into an AC outlet only after you complete all other connections. Amplifier Subwoofer To AC outlet 6 Center speaker Surround back speaker (in appearance.

Owner's Manual
Page 11
...below. 2. Good Not Good One side of appropriate voltage. Connections: • Connect the front, center and surround speakers (and surround back speaker for NS-P276). If the speaker is marked with the broken white line. Black: negative (-) Red: positive (+) Note: Do not insert 1 the... core. 3. Make sure the subwoofer's VOLUME control is unlined. Connect each speaker cable. Connecting components and the subwoofer to reverse the polarity (+, -). the other as possible. To connect to a YAMAHA DSP amplifier (or AV receiver), connect the SUBWOOFER (or LOW ...
...below. 2. Good Not Good One side of appropriate voltage. Connections: • Connect the front, center and surround speakers (and surround back speaker for NS-P276). If the speaker is marked with the broken white line. Black: negative (-) Red: positive (+) Note: Do not insert 1 the... core. 3. Make sure the subwoofer's VOLUME control is unlined. Connect each speaker cable. Connecting components and the subwoofer to reverse the polarity (+, -). the other as possible. To connect to a YAMAHA DSP amplifier (or AV receiver), connect the SUBWOOFER (or LOW ...

Owner's Manual
Page 12
... amplifier's volume control. • If you use the subwoofer, first adjust the volume balance between the subwoofer and the other speakers. Set the VOLUME control to the desired listening level. 5. Adjust the amplifier's volume control to minimum (0). 2. Turn the control clockwise... to turn on the power to a level at which you must again balance the subwoofer and surround speaker volume. • For more bass than when the subwoofer is turned ON; Using the subwoofer (SW-P270) 2 VOLUME 1 3 INPUT 4 POWER ON OFF Rear panel 1Power indicator Lights up in green. ...
... amplifier's volume control. • If you use the subwoofer, first adjust the volume balance between the subwoofer and the other speakers. Set the VOLUME control to the desired listening level. 5. Adjust the amplifier's volume control to minimum (0). 2. Turn the control clockwise... to turn on the power to a level at which you must again balance the subwoofer and surround speaker volume. • For more bass than when the subwoofer is turned ON; Using the subwoofer (SW-P270) 2 VOLUME 1 3 INPUT 4 POWER ON OFF Rear panel 1Power indicator Lights up in green. ...

Owner's Manual
Page 13
... Converter (ANIC) circuits, which is a port or opening is resolved by employing the negativeimpedance output drive amplifier and a speaker cabinet featuring a Helmholtz resonator, reproduce an extremely wide range of , a woofer in the cabinet. High-amplitude bass sound Cabinet Port...to Helmholtz resonance theory, be reduced to zero, the movement of the amplifier. Advanced YAMAHA Active Servo Technology (on the SW-P270) The theory behind YAMAHA Active Servo Technology is able to generate precise, lowamplitude, low frequency waves with respect to signal voltage...
... Converter (ANIC) circuits, which is a port or opening is resolved by employing the negativeimpedance output drive amplifier and a speaker cabinet featuring a Helmholtz resonator, reproduce an extremely wide range of , a woofer in the cabinet. High-amplitude bass sound Cabinet Port...to Helmholtz resonance theory, be reduced to zero, the movement of the amplifier. Advanced YAMAHA Active Servo Technology (on the SW-P270) The theory behind YAMAHA Active Servo Technology is able to generate precise, lowamplitude, low frequency waves with respect to signal voltage...

Owner's Manual
Page 14
... level is not connected Connect the subwoofer cable securely. Speaker cables are not connected securely. Connect the speaker cables correctly: L (left) to L, R (right) to R, "+" to "+" and "-" to Do Connect the speaker cables securely. For the Subwoofer (SW-P270) only Problem Power is not supplied even though the POWER... to the right (clockwise). No sound. If the problem you resolve the problem, disconnect the power cord and contact your authorized YAMAHA dealer or service center. Sound level is not listed, or if the instructions fail to the ON position. Cause What to Do...
... level is not connected Connect the subwoofer cable securely. Speaker cables are not connected securely. Connect the speaker cables correctly: L (left) to L, R (right) to R, "+" to "+" and "-" to Do Connect the speaker cables securely. For the Subwoofer (SW-P270) only Problem Power is not supplied even though the POWER... to the right (clockwise). No sound. If the problem you resolve the problem, disconnect the power cord and contact your authorized YAMAHA dealer or service center. Sound level is not listed, or if the instructions fail to the ON position. Cause What to Do...

Owner's Manual
Page 15
Specifications Frequency characteristics The following graph displays the frequency characteristics of the SW-P270 subwoofer. 100 dB 90 80 70 60 50 40 20 50 100 200 500 Hz The following graph displays the frequency characteristics of the SW-P270 subwoofer combined with NX-E270 speakers. 100 dB 90 VOLUME 80 70 60 50 40 20 SW-P270 NX-E270 50 100 200 500 Hz NX-E270/NX-C270 Type .........Full-range acoustic-suspension speaker system, Magnetically shielded type Driver
Specifications Frequency characteristics The following graph displays the frequency characteristics of the SW-P270 subwoofer. 100 dB 90 80 70 60 50 40 20 50 100 200 500 Hz The following graph displays the frequency characteristics of the SW-P270 subwoofer combined with NX-E270 speakers. 100 dB 90 VOLUME 80 70 60 50 40 20 SW-P270 NX-E270 50 100 200 500 Hz NX-E270/NX-C270 Type .........Full-range acoustic-suspension speaker system, Magnetically shielded type Driver


