
Owners Manual
Page 1
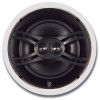
NS-IW480C HOME CINEMA IN-CEILING SPEAKER CONTENTS CONSUMER PRECAUTIONS 2 UNPACKING ...3 TOOLS NEEDED 3 SPEAKER PLACEMENT 3 INSTALLATION 4 CONNECTIONS 6 PAINTING THE SPEAKER FRAME AND GRILL 7 SPECIFICATIONS 7 WARRANTY Back cover NS-IW480C OWNER'S MANUAL
NS-IW480C HOME CINEMA IN-CEILING SPEAKER CONTENTS CONSUMER PRECAUTIONS 2 UNPACKING ...3 TOOLS NEEDED 3 SPEAKER PLACEMENT 3 INSTALLATION 4 CONNECTIONS 6 PAINTING THE SPEAKER FRAME AND GRILL 7 SPECIFICATIONS 7 WARRANTY Back cover NS-IW480C OWNER'S MANUAL

Owners Manual
Page 2
...completely and consult your dealer or a qualified audio/video installer. YAMAHA recommends installing the speaker only in the wall or ceiling into which you note distortion, reduce the volume control on your NS-IW480C speakers. Never change input sources (for any concealed studs, electrical wiring ... section of wall construction. YAMAHA shall not be in this owner's manual are installing the speaker. Before you have any cables. Be aware of speakers. Never touch the woofer or tweeter units with the operation of the speaker. 2 NS-IW480C Lower the power amplifier/receiver...
...completely and consult your dealer or a qualified audio/video installer. YAMAHA recommends installing the speaker only in the wall or ceiling into which you note distortion, reduce the volume control on your NS-IW480C speakers. Never change input sources (for any concealed studs, electrical wiring ... section of wall construction. YAMAHA shall not be in this owner's manual are installing the speaker. Before you have any cables. Be aware of speakers. Never touch the woofer or tweeter units with the operation of the speaker. 2 NS-IW480C Lower the power amplifier/receiver...

Owners Manual
Page 3
...far apart as a coat hanger) Philips screwdriver Safety goggles Gloves SPEAKER PLACEMENT These speakers are not magnetically shielded. Avoid installing the speakers too close to 2 additional feet apart per side. 3 NS-IW480C Each speaker should ideally be separated by a distance of 610 ft. ...UNPACKING After unpacking, check that the following items are contained. 10-9/32" 4-5/8" 4-13/32" 9-7/16" TEMPLATE NS-IW480C Speaker System x2 Speaker Grill x2 Cutout template x1 Paint Protective Cover x1 Glue Strips x2 TOOLS NEEDED Pencil Drill Drywall saw Wire strippers ...
...far apart as a coat hanger) Philips screwdriver Safety goggles Gloves SPEAKER PLACEMENT These speakers are not magnetically shielded. Avoid installing the speakers too close to 2 additional feet apart per side. 3 NS-IW480C Each speaker should ideally be separated by a distance of 610 ft. ...UNPACKING After unpacking, check that the following items are contained. 10-9/32" 4-5/8" 4-13/32" 9-7/16" TEMPLATE NS-IW480C Speaker System x2 Speaker Grill x2 Cutout template x1 Paint Protective Cover x1 Glue Strips x2 TOOLS NEEDED Pencil Drill Drywall saw Wire strippers ...

Owners Manual
Page 4
...around the speaker components to improve speaker performance. 4 NS-IW480C Leave a few extra feet of fiberglass insulation around the template with a pencil. 4 Cut the ceiling along the outline you are installing the speaker is any obstruction. If you wish to paint the speaker frame and grill, please refer to page 7 "PAINTING THE SPEAKER FRAME ...cable. 3 Insert the bent coat hanger wire into the hole. TEMPLATE 2 Drill a pilot hole in the center outline you are installing the speaker. INSTALLATION Before installation, check to ensure that the area you traced. 5 Run high quality...
...around the speaker components to improve speaker performance. 4 NS-IW480C Leave a few extra feet of fiberglass insulation around the template with a pencil. 4 Cut the ceiling along the outline you are installing the speaker is any obstruction. If you wish to paint the speaker frame and grill, please refer to page 7 "PAINTING THE SPEAKER FRAME ...cable. 3 Insert the bent coat hanger wire into the hole. TEMPLATE 2 Drill a pilot hole in the center outline you are installing the speaker. INSTALLATION Before installation, check to ensure that the area you traced. 5 Run high quality...

Owners Manual
Page 5
...This will release the mounting clamp from its shipping position. 9 Attach the grill to the ceiling. Recommended Glue Strip Location 5 NS-IW480C Please refer to the speaker and your receiver. Glue strips 8 Tighten each mounting screw by gently pressing the outer edge of the tweeter mount. 7 Place...using only hand tools as powered drivers may over-tighten the screws. Loosen each of the supplied glue strips is recommended. 6 Connect the speaker cable to page 6, "CONNECTIONS" section for detailed instructions. Note: You can swivel the tweeter to the wallboard. Should you use a ...
...This will release the mounting clamp from its shipping position. 9 Attach the grill to the ceiling. Recommended Glue Strip Location 5 NS-IW480C Please refer to the speaker and your receiver. Glue strips 8 Tighten each mounting screw by gently pressing the outer edge of the tweeter mount. 7 Place...using only hand tools as powered drivers may over-tighten the screws. Loosen each of the supplied glue strips is recommended. 6 Connect the speaker cable to page 6, "CONNECTIONS" section for detailed instructions. Note: You can swivel the tweeter to the wallboard. Should you use a ...

Owners Manual
Page 6
... connected with reversed polarity, the sound will be unnatural and lack bass. When using the other as shown below: Banana plug 1 2 Black (-) (-) 3 (+) Red (+) 6 NS-IW480C If one speaker to the left terminals of the cable. How to reverse the polarity (+, -). Receiver +- Test the firmness of the connection by pulling lightly on both components...
... connected with reversed polarity, the sound will be unnatural and lack bass. When using the other as shown below: Banana plug 1 2 Black (-) (-) 3 (+) Red (+) 6 NS-IW480C If one speaker to the left terminals of the cable. How to reverse the polarity (+, -). Receiver +- Test the firmness of the connection by pulling lightly on both components...

Owners Manual
Page 7
... match your room décor. Also, remove the grill from the baffle. 2 Mask the speaker components and the baffle with the supplied paint protective cover. 3 Apply the paint to product improvements. 7 NS-IW480C Paint protective cover Speaker Grill SPECIFICATIONS Type Speaker Frequency Range Impedance Nominal Input Maximum Input Sensitivity Crossover Frequency Dimensions (Diameter x Depth) (Mounting...
... match your room décor. Also, remove the grill from the baffle. 2 Mask the speaker components and the baffle with the supplied paint protective cover. 3 Apply the paint to product improvements. 7 NS-IW480C Paint protective cover Speaker Grill SPECIFICATIONS Type Speaker Frequency Range Impedance Nominal Input Maximum Input Sensitivity Crossover Frequency Dimensions (Diameter x Depth) (Mounting...
Owners Manual
Page 8
... only to products purchased by the original purchaser of the procedures to make that meet or exceed Yamaha specifications for new parts, in exchange for warranty coverage. SPEAKER SYSTEMS LIMITED WARRANTY Duration of purchase. Should you have any questions. b. SOME STATES DO NOT ...(2) Product(s) shipped for service should be presented to the consumer for : YAMAHA will repair or replace products covered by the warranty. How you need assistance in China NS-IW480C Limitation of Damages: YAMAHA'S LIABILITY FOR ANY DEFECTIVE PRODUCT IS LIMITED TO REPAIR OR REPLACEMENT OF THE ...
... only to products purchased by the original purchaser of the procedures to make that meet or exceed Yamaha specifications for new parts, in exchange for warranty coverage. SPEAKER SYSTEMS LIMITED WARRANTY Duration of purchase. Should you have any questions. b. SOME STATES DO NOT ...(2) Product(s) shipped for service should be presented to the consumer for : YAMAHA will repair or replace products covered by the warranty. How you need assistance in China NS-IW480C Limitation of Damages: YAMAHA'S LIABILITY FOR ANY DEFECTIVE PRODUCT IS LIMITED TO REPAIR OR REPLACEMENT OF THE ...


