
Owner's Manual
Page 2
...knocked over or struck by improper placement or installation of purchase, product code and dealer's name) MUST accompany the defective product, along with general household waste. Yamaha may not be liable for any difficulty, please contact Yamaha representative office in workmanship or materials for ...in accordance with that your waste disposal service or the point of salewhere you wish to discard these items, please contact your NS-IC600/NS-IC800 speakers. • When mounting these speakers, be mixed with a statement detailing the fault. CONSUMER PRECAUTIONS Read these ...
...knocked over or struck by improper placement or installation of purchase, product code and dealer's name) MUST accompany the defective product, along with general household waste. Yamaha may not be liable for any difficulty, please contact Yamaha representative office in workmanship or materials for ...in accordance with that your waste disposal service or the point of salewhere you wish to discard these items, please contact your NS-IC600/NS-IC800 speakers. • When mounting these speakers, be mixed with a statement detailing the fault. CONSUMER PRECAUTIONS Read these ...
Owner's Manual
Page 3
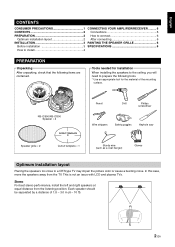
NS-IC600/NS-IC800 Speaker × 2 Pencil Drill Philips screwdriver Wire strippers Safety goggles Keyhole saw Speaker grille × 2 Cutout template × 1 Sturdy wire (such as a coat hanger) Gloves Optimum installation layout Placing ... AMPLIFIER/RECEIVER .......... 6 CONTENTS 2 Connections 6 PREPARATION 2 How to connect 6 Optimum installation layout 2 After connecting 6 INSTALLATION 3 PAINTING THE SPEAKER GRILLE 6 Before installation 3 SPECIFICATIONS 6 How to install 4 PREPARATION Unpacking After unpacking, check that the following tools. * Use an appropriate ...
NS-IC600/NS-IC800 Speaker × 2 Pencil Drill Philips screwdriver Wire strippers Safety goggles Keyhole saw Speaker grille × 2 Cutout template × 1 Sturdy wire (such as a coat hanger) Gloves Optimum installation layout Placing ... AMPLIFIER/RECEIVER .......... 6 CONTENTS 2 Connections 6 PREPARATION 2 How to connect 6 Optimum installation layout 2 After connecting 6 INSTALLATION 3 PAINTING THE SPEAKER GRILLE 6 Before installation 3 SPECIFICATIONS 6 How to install 4 PREPARATION Unpacking After unpacking, check that the following tools. * Use an appropriate ...
Owner's Manual
Page 4
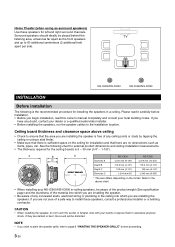
... When installing your local building codes. NS-IC600/NS-IC800 NS-IC600/NS-IC800 INSTALLATION Before installation The following chart for external product dimensions and ceiling installation measurements. • The thickness required for installation and that the area you are installing the speakers. If they are installing the ...weight (See specification page) and the sturdiness of the material into which you begin installation, read this owner's manual completely and consult your NS-IC600/NS-IC800 in the ceiling into which you wish to paint the speaker grille, refer ...
... When installing your local building codes. NS-IC600/NS-IC800 NS-IC600/NS-IC800 INSTALLATION Before installation The following chart for external product dimensions and ceiling installation measurements. • The thickness required for installation and that the area you are installing the speakers. If they are installing the ...weight (See specification page) and the sturdiness of the material into which you begin installation, read this owner's manual completely and consult your NS-IC600/NS-IC800 in the ceiling into which you wish to paint the speaker grille, refer ...
Owner's Manual
Page 5
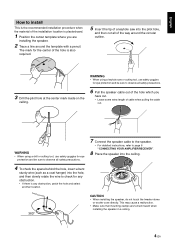
...and be sure to observe all of the way around the template with a pencil. English How to install This is the recommended installation procedure when the material of the installation location is plasterboard. 1 Position the cutout template where you have cut all safety precautions. 3 Drill ...ceiling. 6 Pull the speaker cable out of the hole which you are turned inward when installing the speaker in a ceiling. 4 En This may cause a malfunction. • Make sure that mounting clamps are installing the speaker. 2 Trace a line around the circular outline. WARNING • When using ...
...and be sure to observe all of the way around the template with a pencil. English How to install This is the recommended installation procedure when the material of the installation location is plasterboard. 1 Position the cutout template where you have cut all safety precautions. 3 Drill ...ceiling. 6 Pull the speaker cable out of the hole which you are turned inward when installing the speaker in a ceiling. 4 En This may cause a malfunction. • Make sure that mounting clamps are installing the speaker. 2 Trace a line around the circular outline. WARNING • When using ...
Owner's Manual
Page 7
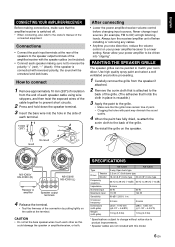
... can be driven into the hole in place is switched off when installing or removing any cables. • Anytime you note distortion, reduce the volume control on the speaker. 3 No Good Good -+ -+ NS-IC600/ NS-IC800 (R) Receiver or amplifier R +- Use high quality spray paint .... SPECIFICATIONS Type Tweeter Driver Woofer Frequency response Impedance Nominal input Maximum input Sensitivity Crossover frequency Dimensions (with grille) Weight (with grille) NS-IC600 NS-IC800 2-way Open back type 2.5 cm (1") Soft dome type 16 cm (6.5") Cone type 20 cm (8") Cone type 65 Hz ...
... can be driven into the hole in place is switched off when installing or removing any cables. • Anytime you note distortion, reduce the volume control on the speaker. 3 No Good Good -+ -+ NS-IC600/ NS-IC800 (R) Receiver or amplifier R +- Use high quality spray paint .... SPECIFICATIONS Type Tweeter Driver Woofer Frequency response Impedance Nominal input Maximum input Sensitivity Crossover frequency Dimensions (with grille) Weight (with grille) NS-IC600 NS-IC800 2-way Open back type 2.5 cm (1") Soft dome type 16 cm (6.5") Cone type 20 cm (8") Cone type 65 Hz ...

