Owner's Manual
Page 2
...or by improper placement or installation of speakers. Yamaha may be returned at Yamaha's discretion, without any charge for parts or labour. For more persons for safety. • Do not attach them to thin plywood or soft ceiling surface materials as the screws may not... hardware. Yamaha shall not be liable for any cause beyond Yamaha's control. (5) Defects of the system into the EEA and/or Switzerland, not by falling objects. b. CONSUMER PRECAUTIONS Read these precautions carefully before setting up your NS-IC600/NS-IC800 speakers. • When mounting these speakers, be sure...
...or by improper placement or installation of speakers. Yamaha may be returned at Yamaha's discretion, without any charge for parts or labour. For more persons for safety. • Do not attach them to thin plywood or soft ceiling surface materials as the screws may not... hardware. Yamaha shall not be liable for any cause beyond Yamaha's control. (5) Defects of the system into the EEA and/or Switzerland, not by falling objects. b. CONSUMER PRECAUTIONS Read these precautions carefully before setting up your NS-IC600/NS-IC800 speakers. • When mounting these speakers, be sure...
Owner's Manual
Page 3
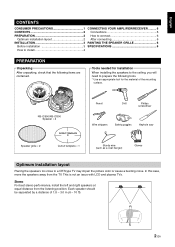
...SPECIFICATIONS 6 How to install 4 PREPARATION Unpacking After unpacking, check that the following tools. * Use an appropriate tool for installation When installing the speakers to the ceiling, you will need to a CRT-type TV may impair the picture color or cause a buzzing noise. Tools needed for the material of ... stereo performance, install the left and right speakers at equal distance from the TV. In this case, move the speakers away from the listening position. This is not an issue with LCD and plasma TVs. NS-IC600/NS-IC800 Speaker × 2 Pencil Drill Philips screwdriver Wire...
...SPECIFICATIONS 6 How to install 4 PREPARATION Unpacking After unpacking, check that the following tools. * Use an appropriate tool for installation When installing the speakers to the ceiling, you will need to a CRT-type TV may impair the picture color or cause a buzzing noise. Tools needed for the material of ... stereo performance, install the left and right speakers at equal distance from the TV. In this case, move the speakers away from the listening position. This is not an issue with LCD and plasma TVs. NS-IC600/NS-IC800 Speaker × 2 Pencil Drill Philips screwdriver Wire...
Owner's Manual
Page 4
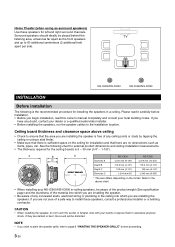
... or a qualified audio/video installer. • Before installing the speakers, run the speaker cables to excessive physical shock. NS-IC600/NS-IC800 NS-IC600/NS-IC800 INSTALLATION Before installation The following chart for external product dimensions and ceiling installation measurements. • The thickness required for left and right surround channels. A B D NS-IC600 NS-IC800 C Diameter A φ 231 mm (9-1/8") φ 272 mm (10...
... or a qualified audio/video installer. • Before installing the speakers, run the speaker cables to excessive physical shock. NS-IC600/NS-IC800 NS-IC600/NS-IC800 INSTALLATION Before installation The following chart for external product dimensions and ceiling installation measurements. • The thickness required for left and right surround channels. A B D NS-IC600 NS-IC800 C Diameter A φ 231 mm (9-1/8") φ 272 mm (10...
Owner's Manual
Page 5
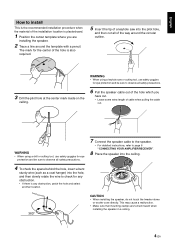
... mark for eye protection and be sure to observe all safety precautions. 7 Connect the speaker cable to the speaker. • For detailed instructions, refer to page 6 "CONNECTING YOUR AMPLIFIER/RECEIVER". 8 Place the speaker into the ceiling. 4 To check the space behind the hole, insert a bent sturdy wire (such ...all safety precautions. 3 Drill the pilot hole at the center mark made on the ceiling. 6 Pull the speaker cable out of the hole which you are turned inward when installing the speaker in a ceiling. 4 En This may cause a malfunction. • Make sure that mounting clamps are...
... mark for eye protection and be sure to observe all safety precautions. 7 Connect the speaker cable to the speaker. • For detailed instructions, refer to page 6 "CONNECTING YOUR AMPLIFIER/RECEIVER". 8 Place the speaker into the ceiling. 4 To check the space behind the hole, insert a bent sturdy wire (such ...all safety precautions. 3 Drill the pilot hole at the center mark made on the ceiling. 6 Pull the speaker cable out of the hole which you are turned inward when installing the speaker in a ceiling. 4 En This may cause a malfunction. • Make sure that mounting clamps are...
Owner's Manual
Page 6
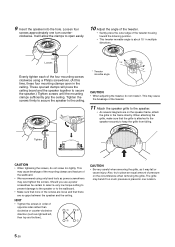
...edge of the four mounting screws clockwise using only hand tools as power screwdrivers may bend if too much pressure is attached to the speaker securely to the ceiling. *15° * Tweeter movable angle CAUTION • When adjusting the tweeter, do not screw too tightly. HINT • Tighten... the grille, as right and left, then top and bottom). It will press the ceiling board and the speaker together to the speaker. • As several magnets are no gaps between the speaker and the ceiling. This may fall or cause injury. When attaching the grille, make sure that there ...
...edge of the four mounting screws clockwise using only hand tools as power screwdrivers may bend if too much pressure is attached to the speaker securely to the ceiling. *15° * Tweeter movable angle CAUTION • When adjusting the tweeter, do not screw too tightly. HINT • Tighten... the grille, as right and left, then top and bottom). It will press the ceiling board and the speaker together to the speaker. • As several magnets are no gaps between the speaker and the ceiling. This may fall or cause injury. When attaching the grille, make sure that there ...


