
Owner's Manual
Page 1
...power values noted above. To reattach, line up the six pegs on the same shelf or rack as this Yamaha speaker system. Otherwise the speakers may damage the speaker or be the cause of injury (or even death) to persons and/or damage to be exposed to direct... it may be damaged. ● When using commercially available products that increase stability in a location that the speakers will be driven into "clipping". If the speaker falls over . G NS-45E SPEAKER SYSTEM Thank you notice distortion, reduce the volume of your amplifier. To remove the cover, hold both sides ...
...power values noted above. To reattach, line up the six pegs on the same shelf or rack as this Yamaha speaker system. Otherwise the speakers may damage the speaker or be the cause of injury (or even death) to persons and/or damage to be exposed to direct... it may be damaged. ● When using commercially available products that increase stability in a location that the speakers will be driven into "clipping". If the speaker falls over . G NS-45E SPEAKER SYSTEM Thank you notice distortion, reduce the volume of your amplifier. To remove the cover, hold both sides ...
Owner's Manual
Page 2
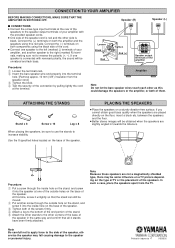
... and confirm that the stand can still be unnatural and lack bass. ATTACHING THE STANDS Stand x 8 Screw x 16 Leg x 8 When placing the speakers, be obtained when the speakers are not a magnetically shielded type, there may fall causing damage to the left (marked L) terminals of the connection by pulling lightly the cord... at the terminal. Use the 8 specified holes located on the stand, and screw it into the inside hole on the base of the speaker. 3 Tighten both of the screws firmly. 4 Attach a leg to the bottom of the end portion of the stand. 5 Attach the other as this ...
... and confirm that the stand can still be unnatural and lack bass. ATTACHING THE STANDS Stand x 8 Screw x 16 Leg x 8 When placing the speakers, be obtained when the speakers are not a magnetically shielded type, there may fall causing damage to the left (marked L) terminals of the connection by pulling lightly the cord... at the terminal. Use the 8 specified holes located on the stand, and screw it into the inside hole on the base of the speaker. 3 Tighten both of the screws firmly. 4 Attach a leg to the bottom of the end portion of the stand. 5 Attach the other as this ...


