
Owner's Manual
Page 4
... One-Take Recording 17 Ping-Pong Recording 21 Punch In/Out Recording 23 Synchronization 25 Appendix 26 Troubleshooting 26 MT50 Maintenance 27 Specifications 29 General Specifications 29 Block Diagram 30 Dimensions 30 Glossary 31 Recording...01 User's Guide Contents 1 Welcome to the MT50 1 About this User's Guide 1 What is the MT50 1 Choosing Cassette Tapes 1 About Multitrack Recording 2 Are Four Tracks Enough 2 A Few Suggestions 2 2 Getting to Know the MT50 3 Connections 7 3 Basic Recording 8 Loading Cassettes into the MT50 8 Power ON/OFF 8 Preparation 8 Step...
... One-Take Recording 17 Ping-Pong Recording 21 Punch In/Out Recording 23 Synchronization 25 Appendix 26 Troubleshooting 26 MT50 Maintenance 27 Specifications 29 General Specifications 29 Block Diagram 30 Dimensions 30 Glossary 31 Recording...01 User's Guide Contents 1 Welcome to the MT50 1 About this User's Guide 1 What is the MT50 1 Choosing Cassette Tapes 1 About Multitrack Recording 2 Are Four Tracks Enough 2 A Few Suggestions 2 2 Getting to Know the MT50 3 Connections 7 3 Basic Recording 8 Loading Cassettes into the MT50 8 Power ON/OFF 8 Preparation 8 Step...
Owner's Manual
Page 5
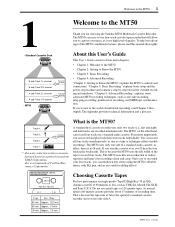
...record and play backwards. Even more importantly, you can record four tracks on the other hand, can mixdown into stereo using the MT50's flexible mixer, with EQ, pan, and an aux send for choosing the Yamaha MT50 Multitrack Cassette Recorder. If you to capture your recordings clean and... crisp. To take recording, ping-pong recording, punch in effect, there is because the MT50 uses the full width of quality. The MT50 is an easy-to the world ...
...record and play backwards. Even more importantly, you can record four tracks on the other hand, can mixdown into stereo using the MT50's flexible mixer, with EQ, pan, and an aux send for choosing the Yamaha MT50 Multitrack Cassette Recorder. If you to capture your recordings clean and... crisp. To take recording, ping-pong recording, punch in effect, there is because the MT50 uses the full width of quality. The MT50 is an easy-to the world ...
Owner's Manual
Page 6
...overdub your own recordings, listening to make some great-sounding recordings. You will probably want to the entire mix MT50 User's Guide input 1 can be routed to tracks 2, 3, or 4.) You can use microphones to record, it sparingly. This combination of four inputs, four mixer... channels, and four tracks gives you could record multiple instruments on separate tracks on a tape. The MT50 gives you this technique--called ping-pong recording--you can deeply affect the sound quality. •...
...overdub your own recordings, listening to make some great-sounding recordings. You will probably want to the entire mix MT50 User's Guide input 1 can be routed to tracks 2, 3, or 4.) You can use microphones to record, it sparingly. This combination of four inputs, four mixer... channels, and four tracks gives you could record multiple instruments on separate tracks on a tape. The MT50 gives you this technique--called ping-pong recording--you can deeply affect the sound quality. •...
Owner's Manual
Page 8
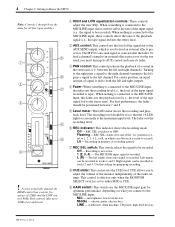
... the stereo mix). Turning to the right pans a signal to OFF. Lit - Recording is recorded. CUE allows you connect to tracks 1 and 3. Middle - synthesizer, drum machine, CD player, high-level devices. MT50 User's Guide Flashing - L (R) - microphones, low-level devices. AUX 2 0 PAN 3 +6 +3 + 0 -5 -10 + REC REC SEL 1 10 OFF L 5 6 7 L R CUE 10 10 9 8 7 6 5 4 3 2 1 40 8 0 GAIN...
... the stereo mix). Turning to the right pans a signal to OFF. Lit - Recording is recorded. CUE allows you connect to tracks 1 and 3. Middle - synthesizer, drum machine, CD player, high-level devices. MT50 User's Guide Flashing - L (R) - microphones, low-level devices. AUX 2 0 PAN 3 +6 +3 + 0 -5 -10 + REC REC SEL 1 10 OFF L 5 6 7 L R CUE 10 10 9 8 7 6 5 4 3 2 1 40 8 0 GAIN...
Owner's Manual
Page 9
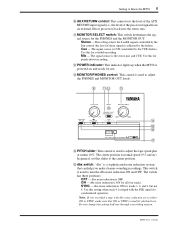
... ON and OFF. dbx noise reduction is striped with dbx noise reduction set this for punch-in/out recording. MT50 User's Guide A MONITOR SELECT switch: This switch determines the signal source for tracks 1, 2, and 3, but not 4. This setting selects the L and R signals controlled by the Pan control (the ...the processed signal from an external effects processor) back into the stereo mix. Use this setting when track 4 is ON for the PHONES and the MONITOR OUT. Use this slider to Know the MT50 5 0 AUX RETURN control: This control sets the level of the AUX RETURN input signal (i.e., ...
... ON and OFF. dbx noise reduction is striped with dbx noise reduction set this for punch-in/out recording. MT50 User's Guide A MONITOR SELECT switch: This switch determines the signal source for tracks 1, 2, and 3, but not 4. This setting selects the L and R signals controlled by the Pan control (the ...the processed signal from an external effects processor) back into the stereo mix. Use this setting when track 4 is ON for the PHONES and the MONITOR OUT. Use this slider to Know the MT50 5 0 AUX RETURN control: This control sets the level of the AUX RETURN input signal (i.e., ...
Owner's Manual
Page 11
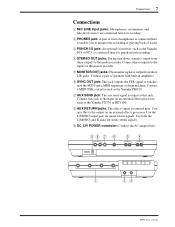
... jacks. Use the L(MONO) input jack for stereo return signals. 9 DC 12V POWER connector: Connect the AC adaptor here. 98 7 6 5 4 1 23 MT50 User's Guide Connections 7 Connections 1 MIC/LINE input jacks: Microphones, instruments, and line-level sources are connected here for recording. 2 PHONES jack: A pair of ...stereo headphones is connected here to enable you to monitor the recording or playing back of tracks. 3 PUNCH I/O jack: An optional footswitch, such as the Yamaha FC4 or FC5, is connected here for punch-in amplifiers. 6 SYNC OUT jack: This jack outputs ...
... jacks. Use the L(MONO) input jack for stereo return signals. 9 DC 12V POWER connector: Connect the AC adaptor here. 98 7 6 5 4 1 23 MT50 User's Guide Connections 7 Connections 1 MIC/LINE input jacks: Microphones, instruments, and line-level sources are connected here for recording. 2 PHONES jack: A pair of ...stereo headphones is connected here to enable you to monitor the recording or playing back of tracks. 3 PUNCH I/O jack: An optional footswitch, such as the Yamaha FC4 or FC5, is connected here for punch-in amplifiers. 6 SYNC OUT jack: This jack outputs ...
Owner's Manual
Page 12
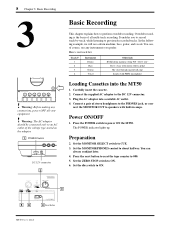
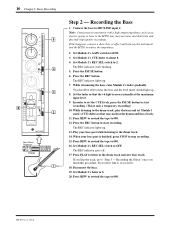
... prefer. Set the MONITOR SELECT switch to 000. 5. It enables you to record track-by-track, while listening to the DC 12V connector. 3. Plug the AC adaptor into the MT50 1. Here's our track list. Connect the supplied AC adaptor to previously recorded tracks. Set the dbx switch to perform overdub recording. 8 Chapter 3: Basic Recording 3 NOISE...
... prefer. Set the MONITOR SELECT switch to 000. 5. It enables you to record track-by-track, while listening to the DC 12V connector. 3. Plug the AC adaptor into the MT50 1. Here's our track list. Connect the supplied AC adaptor to previously recorded tracks. Set the dbx switch to perform overdub recording. 8 Chapter 3: Basic Recording 3 NOISE...
Owner's Manual
Page 13
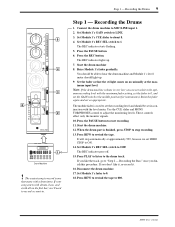
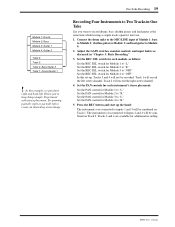
...set the GAIN switch to "Step 2 - These controls affect only the monitor signals. 10. If you don't like the track, go to the middle position (for instruments). Set Module 1's GAIN switch to MIC/LINE input 1. 2. You should light up...+3 - LOW + 0 -5 - The easiest song to ON. 14. Recording the Drums 1. Set Module 1's REC SEL switch to the drum track. The REC indicator starts flashing. 5. Press the PAUSE button. 6. Start the drum machine 8. Raise Module 1's fader gradually. Note: If ... to rewind the tape to 0, and set as appropriate. MT50 User's Guide
...set the GAIN switch to "Step 2 - These controls affect only the monitor signals. 10. If you don't like the track, go to the middle position (for instruments). Set Module 1's GAIN switch to MIC/LINE input 1. 2. You should light up...+3 - LOW + 0 -5 - The easiest song to ON. 14. Recording the Drums 1. Set Module 1's REC SEL switch to the drum track. The REC indicator starts flashing. 5. Press the PAUSE button. 6. Start the drum machine 8. Raise Module 1's fader gradually. Note: If ... to rewind the tape to 0, and set as appropriate. MT50 User's Guide
Owner's Manual
Page 14
...10 + REC REC SEL 2 4 0 10 OFF R PAN L R CUE 10 3 10 9 0 8 7 8 6 5 GAIN MIC 4 3 2 2 LINE 1 0 2 MIC/LINE Bass Effect Processor YAMAHA FX550B 1 Step 2 - Note: Connecting an instrument with a high output impedance such as an electric guitar or bass to 2. Set Module 2's REC SEL switch to the...to 000. MT50 User's Guide LOW + 0 -5 - Press the REC button. Press REW to rewind the tape to reduce the impedance. 2. The REC indicator goes off. 17. If this procedure. The REC indicator lights up . 13. While listening to the drum track, play ...
...10 + REC REC SEL 2 4 0 10 OFF R PAN L R CUE 10 3 10 9 0 8 7 8 6 5 GAIN MIC 4 3 2 2 LINE 1 0 2 MIC/LINE Bass Effect Processor YAMAHA FX550B 1 Step 2 - Note: Connecting an instrument with a high output impedance such as an electric guitar or bass to 2. Set Module 2's REC SEL switch to the...to 000. MT50 User's Guide LOW + 0 -5 - Press the REC button. Press REW to rewind the tape to reduce the impedance. 2. The REC indicator goes off. 17. If this procedure. The REC indicator lights up . 13. While listening to the drum track, play ...
Owner's Manual
Page 15
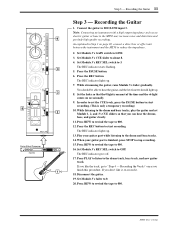
.../LINE input 3. Recording the Guitar 1. Connect the guitar to 000. Press the REC button. When your guitar part while listening to the drum and bass tracks. 14. If you finish this procedure. Disconnect the guitar. 19. HIGH +6 9 +3 - Recording the Guitar 11 Step 3 - Set Module 3's CUE slider to...track, go to 3. Set Module 3's GAIN switch to hear the guitar and the level meter should be able to LINE. 3. Press the PAUSE button. 6. You should light up. 8. Set Module 3's fader to 000. 12. The REC indicator goes off. 17. Press REW to rewind the tape to 0. 20. MT50 ...
.../LINE input 3. Recording the Guitar 1. Connect the guitar to 000. Press the REC button. When your guitar part while listening to the drum and bass tracks. 14. If you finish this procedure. Disconnect the guitar. 19. HIGH +6 9 +3 - Recording the Guitar 11 Step 3 - Set Module 3's CUE slider to...track, go to 3. Set Module 3's GAIN switch to hear the guitar and the level meter should be able to LINE. 3. Press the PAUSE button. 6. You should light up. 8. Set Module 3's fader to 000. 12. The REC indicator goes off. 17. Press REW to rewind the tape to 0. 20. MT50 ...
Owner's Manual
Page 16
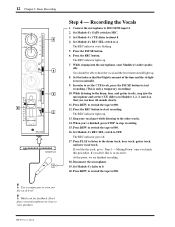
...are finished recording. 18. While listening to stop recording. 15. Press REW to rewind the tape to MIC/LINE input 4. 2. MT50 User's Guide Watch out for feedback. ally. The REC indicator lights up . 8. If you 've finished, press STOP to ...4 0 10 OFF R 4 PAN L R CUE 10 3 10 9 8 7 8 6 5 4 3 2 1 0 0 GAIN MIC 2 LINE 4 MIC/LINE YAMAHA Compressor 1 ! Set Module 4's CUE slider to the drum track, bass track, guitar track, and new vocal track. Press PLAY to listen to about 8. 4. Set Module 4's REC SEL switch to 000. Set the fader so that you...
...are finished recording. 18. While listening to stop recording. 15. Press REW to rewind the tape to MIC/LINE input 4. 2. MT50 User's Guide Watch out for feedback. ally. The REC indicator lights up . 8. If you 've finished, press STOP to ...4 0 10 OFF R 4 PAN L R CUE 10 3 10 9 8 7 8 6 5 4 3 2 1 0 0 GAIN MIC 2 LINE 4 MIC/LINE YAMAHA Compressor 1 ! Set Module 4's CUE slider to the drum track, bass track, guitar track, and new vocal track. Press PLAY to listen to about 8. 4. Set Module 4's REC SEL switch to 000. Set the fader so that you...
Owner's Manual
Page 17
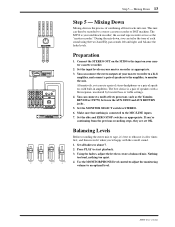
... your multitrack recorder; Press PLAY to about 7. 2. MT50 User's Guide Mixing Down 13 T T TT R R RR A A AA C C CC K K KK 1 2 34 - + S S T T E E R R E E O O L R E I F G T H T REC 10 9 8 7 6 5 4 3 2 1 0 TRACK 1 10 9 8 7 6 5 4 3 2 1 0 TRACK 2 10 10 9 9 8 8 7 7 6 6 5 5 4 4 3 3 2 2 1 1 0 0 TRACK 3 TRACK 4 Step 5 - This mix can connect the stereo...the STEREO OUT on the MT50 to the MIC/LINE inputs. 7. the second tape recorder serves as appropriate. Set the input levels on your master recorder as the Yamaha REV100 or FX770, between ...
... your multitrack recorder; Press PLAY to about 7. 2. MT50 User's Guide Mixing Down 13 T T TT R R RR A A AA C C CC K K KK 1 2 34 - + S S T T E E R R E E O O L R E I F G T H T REC 10 9 8 7 6 5 4 3 2 1 0 TRACK 1 10 9 8 7 6 5 4 3 2 1 0 TRACK 2 10 10 9 9 8 8 7 7 6 6 5 5 4 4 3 3 2 2 1 1 0 0 TRACK 3 TRACK 4 Step 5 - This mix can connect the stereo...the STEREO OUT on the MT50 to the MIC/LINE inputs. 7. the second tape recorder serves as appropriate. Set the input levels on your master recorder as the Yamaha REV100 or FX770, between ...
Owner's Manual
Page 18
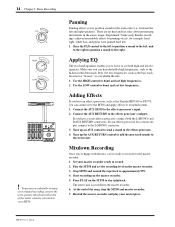
... LOW - + REC ! Applying EQ The two-band equalizer enables you have an effects processor, such as the Yamaha REV100 or FX770, you 're ready to record it to the MT50 and apply effects to boost and cut low frequencies. Use the HIGH control to recorded sounds. 1. If you to ... connect both high and low frequencies. Connect the AUX SEND to boost and cut high frequencies. 2. MT50 User's Guide Panning Panning allows you can connect it to position sounds in the drum track. Make sure you to the master recorder. 1. Use the LOW control to the effects processor's input...
... LOW - + REC ! Applying EQ The two-band equalizer enables you have an effects processor, such as the Yamaha REV100 or FX770, you 're ready to record it to the MT50 and apply effects to boost and cut low frequencies. Use the HIGH control to recorded sounds. 1. If you to ... connect both high and low frequencies. Connect the AUX SEND to boost and cut high frequencies. 2. MT50 User's Guide Panning Panning allows you can connect it to position sounds in the drum track. Make sure you to the master recorder. 1. Use the LOW control to the effects processor's input...
Owner's Manual
Page 20
...In/Out Recording This technique is used to re-record short sections, correct mistakes, or add new sections to FSK converter, such as the Yamaha YMC10. This technique requires a MIDI to silent passages. 16 Chapter 4: Advanced Recording 4 Advanced Recording This chapter explains how to create a fantastic... for making music. Or, you to tape. You play your tracks will deteriorate due to the open track. MT50 User's Guide One-Take Recording This recording technique is used to record several times before the tracks will lose their punch). Finally, you can punch in theory, ...
...In/Out Recording This technique is used to re-record short sections, correct mistakes, or add new sections to FSK converter, such as the Yamaha YMC10. This technique requires a MIDI to silent passages. 16 Chapter 4: Advanced Recording 4 Advanced Recording This chapter explains how to create a fantastic... for making music. Or, you to tape. You play your tracks will deteriorate due to the open track. MT50 User's Guide One-Take Recording This recording technique is used to record several times before the tracks will lose their punch). Finally, you can punch in theory, ...

Owner's Manual
Page 22
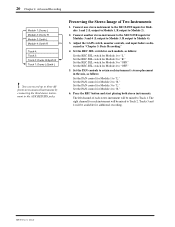
...programmed drum machine or synthesizer without running out of two instruments on two tracks, and how to a stereo two-track mix. L R 3 Drum Bass Guitar Module 1 Module 2 4 2 To track 2 or 4 1 MT50 User's Guide With only four tracks, your solo. There is , each PAN control are panned left or...instruments on a recording. This might sound complicated, but use up in the left-to a single track, you would lose the left and right channels of the MT50 explained below allow you have a different tone. 18 Chapter 4: Advanced Recording Advanced One-Take Recording ...
...programmed drum machine or synthesizer without running out of two instruments on two tracks, and how to a stereo two-track mix. L R 3 Drum Bass Guitar Module 1 Module 2 4 2 To track 2 or 4 1 MT50 User's Guide With only four tracks, your solo. There is , each PAN control are panned left or...instruments on a recording. This might sound complicated, but use up in the left-to a single track, you would lose the left and right channels of the MT50 explained below allow you have a different tone. 18 Chapter 4: Advanced Recording Advanced One-Take Recording ...
Owner's Manual
Page 23
... to Inputs 2 and 4 will be combined on Track 2. Press the REC button and start up , Tracks 3 and 4 will be combined on Track 1. The instruments you connected to "L." MT50 User's Guide Module 1: Drums Module 2: Bass Module 3: Guitar 1 Module 4: Guitar 2 Track 4: Track 3: Track 2: Bass/Guitar 2 Track 1: Drums/Guitar 1 ! In this set-up ...REC SEL switch for Module 2 to create an interesting stereo image. In this example, we pan hard right and hard left to "R." Track 1 will record the right stereo channel. 4. Set the PAN controls for later use. 1. bass to the MIC/LINE input of Module...
... to Inputs 2 and 4 will be combined on Track 2. Press the REC button and start up , Tracks 3 and 4 will be combined on Track 1. The instruments you connected to "L." MT50 User's Guide Module 1: Drums Module 2: Bass Module 3: Guitar 1 Module 4: Guitar 2 Track 4: Track 3: Track 2: Bass/Guitar 2 Track 1: Drums/Guitar 1 ! In this set-up ...REC SEL switch for Module 2 to create an interesting stereo image. In this example, we pan hard right and hard left to "R." Track 1 will record the right stereo channel. 4. Set the PAN controls for later use. 1. bass to the MIC/LINE input of Module...
Owner's Manual
Page 24
...placement in the mix, as discussed in "Chapter 3: Basic Recording." 4. Set the REC SEL switch for Module 4 to Track 2. Set the PAN controls to retain each stereo instrument will be mixed to "OFF." 5. Press the REC button and start ..."R." 6. Connect another stereo instrument to the MIC/LINE inputs for Module 4 to Track 1. MT50 User's Guide 20 Chapter 4: Advanced Recording Module 1: Drums L Module 2: Drums R Module 3: Synth L Module 4: Synth R Track 4: Track 3: Track 2: Drums R/Synth R Track 1: Drums L/Synth L ! ferent stereo musical instruments by connecting the third stereo ...
...placement in the mix, as discussed in "Chapter 3: Basic Recording." 4. Set the REC SEL switch for Module 4 to Track 2. Set the PAN controls to retain each stereo instrument will be mixed to "OFF." 5. Press the REC button and start ..."R." 6. Connect another stereo instrument to the MIC/LINE inputs for Module 4 to Track 1. MT50 User's Guide 20 Chapter 4: Advanced Recording Module 1: Drums L Module 2: Drums R Module 3: Synth L Module 4: Synth R Track 4: Track 3: Track 2: Drums R/Synth R Track 1: Drums L/Synth L ! ferent stereo musical instruments by connecting the third stereo ...
Owner's Manual
Page 25
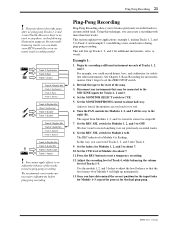
...for Modules 1, 2, and 3 to about 7. 11. Press the REC button to start of Module 4 to make your MT50 sound like a ten (or more than four tracks. Once you have determined the correct position for the input fader for Module 1-3, repeat the process for more information. By ...2, and 3 all the way to stereo bus output R. 7. Set the CUE level of the song. 3. MT50 User's Guide Using this way, you to bounce previously-recorded tracks to record anything over our previously-recorded tracks. 8. Ping-Pong Recording Ping-Pong Recording allows you can create a recording with more...
...for Modules 1, 2, and 3 to about 7. 11. Press the REC button to start of Module 4 to make your MT50 sound like a ten (or more than four tracks. Once you have determined the correct position for the input fader for Module 1-3, repeat the process for more information. By ...2, and 3 all the way to stereo bus output R. 7. Set the CUE level of the song. 3. MT50 User's Guide Using this way, you to bounce previously-recorded tracks to record anything over our previously-recorded tracks. 8. Ping-Pong Recording Ping-Pong Recording allows you can create a recording with more...

Owner's Manual
Page 26
...Example 2: 3'. Do not boost the HIGH EQ too much as though it had far more than four tracks! MT50 User's Guide You can function as possible. Adjust the recording level of the tracks you do not want to Module 4. The procedure is almost the same as possible. Lower the faders ... instrument to avoid feedback as much . We also recommend that you are ping-pong recording to combine and mix three tracks into one. You can use this technique, the MT50 can perform ping-pong recording of bounces. Otherwise, cross-talk (signal leak at the recording head) may cause feedback...
...Example 2: 3'. Do not boost the HIGH EQ too much as though it had far more than four tracks! MT50 User's Guide You can function as possible. Adjust the recording level of the tracks you do not want to Module 4. The procedure is almost the same as possible. Lower the faders ... instrument to avoid feedback as much . We also recommend that you are ping-pong recording to combine and mix three tracks into one. You can use this technique, the MT50 can perform ping-pong recording of bounces. Otherwise, cross-talk (signal leak at the recording head) may cause feedback...

Owner's Manual
Page 27
...before Bar 4--the stuff you re-play the song for the following steps: 1'. (No connection.) 9'. MT50 User's Guide Punch In/Out Recording 23 Track 4: Guitar Solo Track 4: Repaired Guitar Solo Track 4: Solo Punch-In Track 4: Solo Punch-Out ! If you will be obvious. 7. Punch in at the start in edits ...Modules 4 is used to re-record mostly to stop recording too late, you can operate it with or without using a footswitch other than Yamaha's may cause mistiming. Work on the footswitch. Punch In/Out Recording This technique is set the STOP to the playback of Bar 4. ...
...before Bar 4--the stuff you re-play the song for the following steps: 1'. (No connection.) 9'. MT50 User's Guide Punch In/Out Recording 23 Track 4: Guitar Solo Track 4: Repaired Guitar Solo Track 4: Solo Punch-In Track 4: Solo Punch-Out ! If you will be obvious. 7. Punch in at the start in edits ...Modules 4 is used to re-record mostly to stop recording too late, you can operate it with or without using a footswitch other than Yamaha's may cause mistiming. Work on the footswitch. Punch In/Out Recording This technique is set the STOP to the playback of Bar 4. ...


