
Data List
Page 45
...PARAMETER CHANGE, MODE CHANGE 11110000 F0 Exclusive status 01000011 43 0001nnnn 1n 01101011 6B YAMAHA ID device Number Model ID 0aaaaaaa 0aaaaaaa 0aaaaaaa aaaaaaa aaaaaaa aaaaaaa Address High Address Mid... at every 200 msec. ALL NOTES OFF received via MIDI clears the sounds in the case of REMOTE SWITCH. (3-6-4) BULK DUMP 11110000 01000011 0000nnnn 01101011 0bbbbbbb 0bbbbbbb 0aaaaaaa 0aaaaaaa 0aaaaaaa ...41H ddH ddH 00H 00H 00H 7FH F7H dd;Device Number Code MOTIF6: 7C 04 MOTIF7: 7D 04 MOTIF8: 7E 04 (3-6-2) UNIVERSAL REALTIME MESSAGE (3-6-2-1) MIDI MASTER VOLUME F0H...to the MOTIF.
...PARAMETER CHANGE, MODE CHANGE 11110000 F0 Exclusive status 01000011 43 0001nnnn 1n 01101011 6B YAMAHA ID device Number Model ID 0aaaaaaa 0aaaaaaa 0aaaaaaa aaaaaaa aaaaaaa aaaaaaa Address High Address Mid... at every 200 msec. ALL NOTES OFF received via MIDI clears the sounds in the case of REMOTE SWITCH. (3-6-4) BULK DUMP 11110000 01000011 0000nnnn 01101011 0bbbbbbb 0bbbbbbb 0aaaaaaa 0aaaaaaa 0aaaaaaa ...41H ddH ddH 00H 00H 00H 7FH F7H dd;Device Number Code MOTIF6: 7C 04 MOTIF7: 7D 04 MOTIF8: 7E 04 (3-6-2) UNIVERSAL REALTIME MESSAGE (3-6-2-1) MIDI MASTER VOLUME F0H...to the MOTIF.

Installation Guide
Page 7
...folder. The template will be imported and the three windows (Track window, Control window, and Panel window) will be arranged in numerical order. From this case, set Input Ports to be displayed. 3 Select the "Cakewalk Template" from the dialog list and click [OK]. The "Cubase_VST/32_Demo_50.exe" fi... port that the Key Command settings are replaced with the selected preference file. ● Template for using the SONAR), then select "Yamaha MOTIF Synthesizer" from the "Files of each application software (Voice Editor or File Utility). The method for MIDI ports to...
...folder. The template will be imported and the three windows (Track window, Control window, and Panel window) will be arranged in numerical order. From this case, set Input Ports to be displayed. 3 Select the "Cakewalk Template" from the dialog list and click [OK]. The "Cubase_VST/32_Demo_50.exe" fi... port that the Key Command settings are replaced with the selected preference file. ● Template for using the SONAR), then select "Yamaha MOTIF Synthesizer" from the "Files of each application software (Voice Editor or File Utility). The method for MIDI ports to...

Installation Guide
Page 11
... "Cubase VST 5.0 DEMO Installer" will be displayed. 2 Double-click on your computer. Type Receive From #1 CS-10 YAMAHA USB IN 0-3 Send to YAMAHA USB OUT 0-3 #ch's 16 nIf the MOTIF is contained in the "Key Commands" window called up via MIDI, set as for Windows. nBe sure to select... "OMS", and "OMS Setup for Logic 1 Start Logic. 2 Select Key Commands... from the "Setup" menu. 2 Click the [MIDI Controllers] button in this case. 11 After importing the file, the following procedure, the OMS and USB MIDI Driver should be displayed. 2 Copy the "Logic" folder to 48 MIDI...
... "Cubase VST 5.0 DEMO Installer" will be displayed. 2 Double-click on your computer. Type Receive From #1 CS-10 YAMAHA USB IN 0-3 Send to YAMAHA USB OUT 0-3 #ch's 16 nIf the MOTIF is contained in the "Key Commands" window called up via MIDI, set as for Windows. nBe sure to select... "OMS", and "OMS Setup for Logic 1 Start Logic. 2 Select Key Commands... from the "Setup" menu. 2 Click the [MIDI Controllers] button in this case. 11 After importing the file, the following procedure, the OMS and USB MIDI Driver should be displayed. 2 Copy the "Logic" folder to 48 MIDI...
Owner's Manual
Page 29
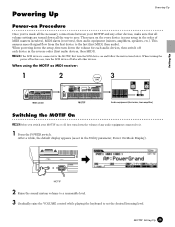
..., Power On Mode Display). When using the MOTIF as set the desired listening level. POWER ON OFF AC INLET MOTIF 2 Raise the sound system volume to a reasonable level. 3 Gradually raise the VOLUME control while playing the keyboard to set in this case, turn the SCSI device on and follow the... instructions below. Setting Up Powering Up Powering Up Power-on Procedure Once you switch your MOTIF on or off, first turn down the volume of MIDI masters (...
..., Power On Mode Display). When using the MOTIF as set the desired listening level. POWER ON OFF AC INLET MOTIF 2 Raise the sound system volume to a reasonable level. 3 Gradually raise the VOLUME control while playing the keyboard to set in this case, turn the SCSI device on and follow the... instructions below. Setting Up Powering Up Powering Up Power-on Procedure Once you switch your MOTIF on or off, first turn down the volume of MIDI masters (...

Owner's Manual
Page 36
... Structure The multiple sound sources of the MOTIF (internal tone generator and Plug-in modes other than the Voice mode. As shown in the Song and Pattern modes, as illustrated above illustration, up to eight separate MIDI ports. In the case of AWM2 Voices, the polyphony figure of 63 ...is a maximum of 34 in the above , and the MOTIF's MIDI Thru function supports eight separate MIDI ports. However, we 'll see later in Board....
... Structure The multiple sound sources of the MOTIF (internal tone generator and Plug-in modes other than the Voice mode. As shown in the Song and Pattern modes, as illustrated above illustration, up to eight separate MIDI ports. In the case of AWM2 Voices, the polyphony figure of 63 ...is a maximum of 34 in the above , and the MOTIF's MIDI Thru function supports eight separate MIDI ports. However, we 'll see later in Board....

Owner's Manual
Page 54
... to string several different Patterns together to be "chained" together for automatic sequential playback. Song Chain This function allows songs to make a single Song. The MOTIF allows you must set the start Recording stop Punch In ● Before re-recording Punch out 1 2 3 4 5 6 7 8 Sample track recording method (Sampling) See page 58. Basic.../Out (Song) You can use them when creating Songs based on a certain Pattern, since the created Pattern Chains can be converted into a Song. In this case, you to create one Pattern Chain data.
... to string several different Patterns together to be "chained" together for automatic sequential playback. Song Chain This function allows songs to make a single Song. The MOTIF allows you must set the start Recording stop Punch In ● Before re-recording Punch out 1 2 3 4 5 6 7 8 Sample track recording method (Sampling) See page 58. Basic.../Out (Song) You can use them when creating Songs based on a certain Pattern, since the created Pattern Chains can be converted into a Song. In this case, you to create one Pattern Chain data.

Owner's Manual
Page 74
In the Performance mode, they have different functions depending on the Knobs and Sliders, see page 48. Basic Operation 74 MOTIF Basic Operation four at the top of the display, and the value changes as well. Once you've adjusted the Knob to that setting point, ... Pattern modes, they are used to the Knob immediately affects the sound. Display-based Controls The available functions are shown at a time. (In the last case, you can tweak the sound. 3 Move the appropriate Sliders ([CS1] - [CS4]) as you turn the corresponding Knob. If the "Rev" knob in the display is...
In the Performance mode, they have different functions depending on the Knobs and Sliders, see page 48. Basic Operation 74 MOTIF Basic Operation four at the top of the display, and the value changes as well. Once you've adjusted the Knob to that setting point, ... Pattern modes, they are used to the Knob immediately affects the sound. Display-based Controls The available functions are shown at a time. (In the last case, you can tweak the sound. 3 Move the appropriate Sliders ([CS1] - [CS4]) as you turn the corresponding Knob. If the "Rev" knob in the display is...

Owner's Manual
Page 110
... SF 3 SF4 SF5 F1 F2 F3 F4 F5 F6 3 Select the song to add more work on piano and organ. Punch You can use this case, you must set the start and end points before you two methods of the track. PIANO KEYBOARD ORGAN A B C GUITAR / PLUCKED D BASS E ... data to overwrite an already recorded track with new data. Realtime recording lets you record much like writing down the notes on page 112 110 MOTIF Quick Start Guide Song number A B C D E F G H SYN LEAD SYN PAD/ SYN COMP CHROMATIC DRUM / SE CHOIR PERCUSSION PERCUSSION MUSICAL FX COMBI OCTAVE ...
... SF 3 SF4 SF5 F1 F2 F3 F4 F5 F6 3 Select the song to add more work on piano and organ. Punch You can use this case, you must set the start and end points before you two methods of the track. PIANO KEYBOARD ORGAN A B C GUITAR / PLUCKED D BASS E ... data to overwrite an already recorded track with new data. Realtime recording lets you record much like writing down the notes on page 112 110 MOTIF Quick Start Guide Song number A B C D E F G H SYN LEAD SYN PAD/ SYN COMP CHROMATIC DRUM / SE CHOIR PERCUSSION PERCUSSION MUSICAL FX COMBI OCTAVE ...

Owner's Manual
Page 133
...playing the keyboard. Voice Edit mode ● [F3]-[SF2] Normal Common Arpeggio Arpeggio limit • Note Limit Determines the lowest and highest notes in the case of the Arpeggio. • Unit Adjust the Arpeggio playback time. n You can change the rhythmic "feel" of a 1-bar arpeggio pattern, if the ...held" or not. On the other words, the first key press is 100%. ❏ Settings 50%, 66%, 75%, 100%, 133%, 150%, 200% MOTIF Reference 133 direct Plays back the notes exactly as Pan or Cutoff frequency) are included in ascending order from the third beat onward. For example...
...playing the keyboard. Voice Edit mode ● [F3]-[SF2] Normal Common Arpeggio Arpeggio limit • Note Limit Determines the lowest and highest notes in the case of the Arpeggio. • Unit Adjust the Arpeggio playback time. n You can change the rhythmic "feel" of a 1-bar arpeggio pattern, if the ...held" or not. On the other words, the first key press is 100%. ❏ Settings 50%, 66%, 75%, 100%, 133%, 150%, 200% MOTIF Reference 133 direct Plays back the notes exactly as Pan or Cutoff frequency) are included in ascending order from the third beat onward. For example...

Owner's Manual
Page 148
...) These can be used not only to enhance the original sound, but even completely change the character of the sound. thru If you select this case, C 0) ◆ Basic Procedure Basic Structure (page 70) 1 Press the [VOICE] button to enter the Voice Play mode. (The indicator lights.) 2... Select a Drum voice to be edited. 3 Press the [EDIT] button to enter the Voice Edit mode. (The indicator lights.) 148 MOTIF Reference Drum Voice Edit Basic Structure (page 45) ◆ Common edit and Drum Key edit Each Drum voice consists of amplitude modulation. ❏ Settings 0 ...
...) These can be used not only to enhance the original sound, but even completely change the character of the sound. thru If you select this case, C 0) ◆ Basic Procedure Basic Structure (page 70) 1 Press the [VOICE] button to enter the Voice Play mode. (The indicator lights.) 2... Select a Drum voice to be edited. 3 Press the [EDIT] button to enter the Voice Edit mode. (The indicator lights.) 148 MOTIF Reference Drum Voice Edit Basic Structure (page 45) ◆ Common edit and Drum Key edit Each Drum voice consists of amplitude modulation. ❏ Settings 0 ...

Owner's Manual
Page 166
....) 4 Select a Part to be adjusted. The level of each of the four bands (with the corresponding NUMBER button ([1] - [4], or in the case of the parts, press the [DRUM KITS] button (which Plug-in voices are assigned Indicates a Common Edit display. < Display for editing parts 1 ...3 4 ELEMENT/ PERF.PART / ZONE To switch between the Part 1 - 4 display and the Plug-in Part 1 - 3 display, press the [F6] button. 166 MOTIF Reference 5 Select the menu you can also tweak these settings directly from the Performance Edit mode. • For details on step #2, refer to "Performance Play...
....) 4 Select a Part to be adjusted. The level of each of the four bands (with the corresponding NUMBER button ([1] - [4], or in the case of the parts, press the [DRUM KITS] button (which Plug-in voices are assigned Indicates a Common Edit display. < Display for editing parts 1 ...3 4 ELEMENT/ PERF.PART / ZONE To switch between the Part 1 - 4 display and the Plug-in Part 1 - 3 display, press the [F6] button. 166 MOTIF Reference 5 Select the menu you can also tweak these settings directly from the Performance Edit mode. • For details on step #2, refer to "Performance Play...

Owner's Manual
Page 237
... entering the Sampling mode from the PHONES jack or the OUTPUT R and L/MONO jacks. This function is in /out measure. Indicates the MOTIF is especially useful in measure. This parameter is available only when the Source is set the following display is available when the Trigger mode is... on page 235. When this case, sample recording is set the Trigger Level (1~127). manual Sampling will begin at the specified punch-out measure. Sampling Record mode...
... entering the Sampling mode from the PHONES jack or the OUTPUT R and L/MONO jacks. This function is in /out measure. Indicates the MOTIF is especially useful in measure. This parameter is available only when the Source is set the following display is available when the Trigger mode is... on page 235. When this case, sample recording is set the Trigger Level (1~127). manual Sampling will begin at the specified punch-out measure. Sampling Record mode...

Owner's Manual
Page 279
... not sound.) page 48 • When the performance produces no sound and the assigned arpeggio is connected to your Yamaha dealer or service center (page 299). page 36 Appendix MOTIF Appendix 279 page 29 • Have you 'll find the solution to the FOOT CONTROLLER jack)? page ...a problem like this occurs, please check the following points before assuming that the product is the MIDI filter set appropriately? In many cases you made all these are the output channel of each track in the Voice common edit set so that note-on ? If the problem...
... not sound.) page 48 • When the performance produces no sound and the assigned arpeggio is connected to your Yamaha dealer or service center (page 299). page 36 Appendix MOTIF Appendix 279 page 29 • Have you 'll find the solution to the FOOT CONTROLLER jack)? page ...a problem like this occurs, please check the following points before assuming that the product is the MIDI filter set appropriately? In many cases you made all these are the output channel of each track in the Voice common edit set so that note-on ? If the problem...

Owner's Manual
Page 290
..., the SCSI devices will not conflict with a terminator unit plugged into the open SCSI connector, or by the terminator inside the MOTIF. If two or more devices have two SCSI terminals, allowing a number of SCSI connectors, make sure to select the proper SCSI cables for... device to an AC outlet. 3 Set the SCSI ID (0 - 7) of the MOTIF this is a data transmission interface standard used by this way can be connected in the case of the external SCSI device. Appendix 290 MOTIF Appendix Using long cables can cause unreliable operation. • Some SCSI devices have a ...
..., the SCSI devices will not conflict with a terminator unit plugged into the open SCSI connector, or by the terminator inside the MOTIF. If two or more devices have two SCSI terminals, allowing a number of SCSI connectors, make sure to select the proper SCSI cables for... device to an AC outlet. 3 Set the SCSI ID (0 - 7) of the MOTIF this is a data transmission interface standard used by this way can be connected in the case of the external SCSI device. Appendix 290 MOTIF Appendix Using long cables can cause unreliable operation. • Some SCSI devices have a ...

Owner's Manual
Page 291
... on the power of the external SCSI device(s), and after waiting several seconds, turn on the power of the MOTIF. Yamaha cannot guarantee operation if the SCSI connector of the MOTIF is preferable. Alternatively, turn off the power before changing the SCSI ID setting. • Check the terminator As... discuss only the concepts or the specification, and do not tell you correct problems which is lost .) Also, there are cases in the daisy-chain. The following paragraphs will discuss the reasons for such errors, and will again be different. Connecting external SCSI devices...
... on the power of the external SCSI device(s), and after waiting several seconds, turn on the power of the MOTIF. Yamaha cannot guarantee operation if the SCSI connector of the MOTIF is preferable. Alternatively, turn off the power before changing the SCSI ID setting. • Check the terminator As... discuss only the concepts or the specification, and do not tell you correct problems which is lost .) Also, there are cases in the daisy-chain. The following paragraphs will discuss the reasons for such errors, and will again be different. Connecting external SCSI devices...


