

Owner's Manual
Page 9
... Controlling Arpeggio Volume with Keyboard Dynamics ......... 48 Transpose the Keyboard 49 Shifting Keyboard Pitch in Octaves 50 Pattern Functions 51 Pattern Variations (Sections 51 Setting the Split Point 52 Play a Pattern with Chords but No Rhythm ... a Performance Memory 61 Voice Editing 62 Select and Edit an Item 62 Edit Display List 63 Utility Settings 64 Selecting and Setting Functions 64 Utility Display List 65 Storing/Saving Data 66 Using a USB Storage Device 67 Formatting a ... Chart 106 MIDI Data Format 108 Specifications 109 Index 110 MM6/MM8 Owner's Manual 9
... Controlling Arpeggio Volume with Keyboard Dynamics ......... 48 Transpose the Keyboard 49 Shifting Keyboard Pitch in Octaves 50 Pattern Functions 51 Pattern Variations (Sections 51 Setting the Split Point 52 Play a Pattern with Chords but No Rhythm ... a Performance Memory 61 Voice Editing 62 Select and Edit an Item 62 Edit Display List 63 Utility Settings 64 Selecting and Setting Functions 64 Utility Display List 65 Storing/Saving Data 66 Using a USB Storage Device 67 Formatting a ... Chart 106 MIDI Data Format 108 Specifications 109 Index 110 MM6/MM8 Owner's Manual 9
Owner's Manual
Page 12
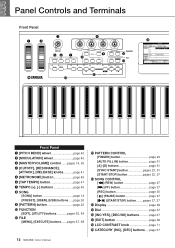
...47 u TEMPO [+], [-] buttons page 45 i SONG [SONG] button page 14 [PRESET], [USER], [USB] buttons ......page 26 o [PATTERN] button page 22 !0 FUNCTION [EDIT], [UTILITY] buttons pages 62, 64 !1 FILE [MENU], [EXECUTE] buttons.......pages 67, 68 !2 PATTERN CONTROL [FINGER] button page 23 [AUTO FILL IN] ...button page 27 [f] (FF) button page 27 [REC] button page 30 [ ] (PAUSE) button page 27 [>/■] (START/STOP) button........pages 27, 37 !4 Display page 38 !5 Dial page 37 !6 [INC/YES], [DEC/NO] buttons page 37 !7 [EXIT] button page 38 !8 LCD CONTRAST knob page 11 !9 CATEGORY [INC...
...47 u TEMPO [+], [-] buttons page 45 i SONG [SONG] button page 14 [PRESET], [USER], [USB] buttons ......page 26 o [PATTERN] button page 22 !0 FUNCTION [EDIT], [UTILITY] buttons pages 62, 64 !1 FILE [MENU], [EXECUTE] buttons.......pages 67, 68 !2 PATTERN CONTROL [FINGER] button page 23 [AUTO FILL IN] ...button page 27 [f] (FF) button page 27 [REC] button page 30 [ ] (PAUSE) button page 27 [>/■] (START/STOP) button........pages 27, 37 !4 Display page 38 !5 Dial page 37 !6 [INC/YES], [DEC/NO] buttons page 37 !7 [EXIT] button page 38 !8 LCD CONTRAST knob page 11 !9 CATEGORY [INC...

Owner's Manual
Page 23
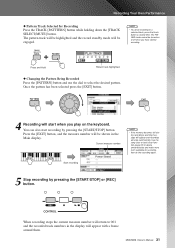
... area of the keyboard to turn the FINGER mode off . Press the [SYNC START] button to the MAIN display screen. 2 Turn FINGER on . Press the [EXIT] button to return to turn the sync start function off . Press the button a second time to select a Pattern rhythm on . Playing Patterns Play Along with...bass and chord accompaniment included in a pattern will start is turned on the preceding page. When sync start playing as soon as described on ... MM6/MM8 Owner's Manual 23 Here we'll see how to add bass and chord accompaniment to the basic rhythm to produce a full, rich accompaniment ...
... area of the keyboard to turn the FINGER mode off . Press the [SYNC START] button to the MAIN display screen. 2 Turn FINGER on . Press the [EXIT] button to return to turn the sync start function off . Press the button a second time to select a Pattern rhythm on . Playing Patterns Play Along with...bass and chord accompaniment included in a pattern will start is turned on the preceding page. When sync start playing as soon as described on ... MM6/MM8 Owner's Manual 23 Here we'll see how to add bass and chord accompaniment to the basic rhythm to produce a full, rich accompaniment ...
Owner's Manual
Page 31
...If the memory becomes full during recording a warning message will appear and recording will be highlighted and the record standby mode will stop automatically. MM6/MM8 Owner's Manual 31 When recording stops the current measure number will appear with a frame around them. NOTE • To cancel recording to...off once you play on the keyboard. Use the song clear or track clear function (page 33) to a selected track, press that track button a second time. The FINGER mode cannot be shown in the display will return to select the desired pattern. Press the [EXIT] button, and the...
...If the memory becomes full during recording a warning message will appear and recording will be highlighted and the record standby mode will stop automatically. MM6/MM8 Owner's Manual 31 When recording stops the current measure number will appear with a frame around them. NOTE • To cancel recording to...off once you play on the keyboard. Use the song clear or track clear function (page 33) to a selected track, press that track button a second time. The FINGER mode cannot be shown in the display will return to select the desired pattern. Press the [EXIT] button, and the...

Owner's Manual
Page 33
...64257;rmation message will appear on the display while the song is being cleared. Press [DEC/NO] button to cancel the Song Clear operation. 4 To execute the Song Clear function press the [INC/YES] button. ...NOTE • If you want to clear a specific track from a user song use the Track Clear function. NOTE • To execute the Song Clear function,.... Recording Your Own Performance Song Clear-Deleting User Songs This function clears an entire user song (all tracks). 1 From the MAIN display, select the user song (001 to 005) you only ...
...64257;rmation message will appear on the display while the song is being cleared. Press [DEC/NO] button to cancel the Song Clear operation. 4 To execute the Song Clear function press the [INC/YES] button. ...NOTE • If you want to clear a specific track from a user song use the Track Clear function. NOTE • To execute the Song Clear function,.... Recording Your Own Performance Song Clear-Deleting User Songs This function clears an entire user song (all tracks). 1 From the MAIN display, select the user song (001 to 005) you only ...

Owner's Manual
Page 34
...;rmation message will appear on the display while the track is being cleared. Press [DEC/NO] to cancel the Track Clear operation. 34 MM6/MM8 Owner's Manual Press [DEC/NO] button to cancel the Track Clear operation. 4 To execute the Track Clear function press the [INC/YES] button.... The clear-in-progress message will appear on the display. Recording Your Own Performance Track Clear-Deleting...
...;rmation message will appear on the display while the track is being cleared. Press [DEC/NO] to cancel the Track Clear operation. 34 MM6/MM8 Owner's Manual Press [DEC/NO] button to cancel the Track Clear operation. 4 To execute the Track Clear function press the [INC/YES] button.... The clear-in-progress message will appear on the display. Recording Your Own Performance Track Clear-Deleting...
Owner's Manual
Page 35
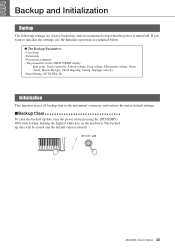
... Song • Pattern file • Performance memory • The parameters in the UTILITY/EDIT display Split point, Touch sensitivity, Pattern volume, Song volume, Metronome volume, Demo cancel, Master EQ type, Chord... fingering, Tuning, Arpeggio velocity • Panel Setting: AUTO FILL IN Initialization This function erases all backup data in the instrument's memory and restores the initial default settings. ■...Clear To clear the backed up data will be erased and the default values restored. MM6/MM8 Owner's Manual 35 The backed up data, turn the power on by pressing...
... Song • Pattern file • Performance memory • The parameters in the UTILITY/EDIT display Split point, Touch sensitivity, Pattern volume, Song volume, Metronome volume, Demo cancel, Master EQ type, Chord... fingering, Tuning, Arpeggio velocity • Panel Setting: AUTO FILL IN Initialization This function erases all backup data in the instrument's memory and restores the initial default settings. ■...Clear To clear the backed up data will be erased and the default values restored. MM6/MM8 Owner's Manual 35 The backed up data, turn the power on by pressing...

Owner's Manual
Page 36
... plugged into the OUTPUT jack or a pair of headphones plugged into the PHONES jack. Basic Operation and Displays Basic Operation Overall MM6/MM8 control is based on the following simple operations. 1 Press a button to select a basic function. 2 Use the dial to lower the volume. Rotate clockwise to increase the volume. 1 Press a button to...
... plugged into the OUTPUT jack or a pair of headphones plugged into the PHONES jack. Basic Operation and Displays Basic Operation Overall MM6/MM8 control is based on the following simple operations. 1 Press a button to select a basic function. 2 Use the dial to lower the volume. Rotate clockwise to increase the volume. 1 Press a button to...

Owner's Manual
Page 37
Currently Selected Category Name Currently Selected Item ● Dial Rotate the dial clockwise to Decrease increase the value of the display, and the currently selected item will appear near the top of the selected item, or counterclockwise to continuously increment or decrement the...values that can be selected using the dial can be selected by using the [INC/YES] and [DEC/NO] buttons. 3 Start/Stop a function. MM6/MM8 Owner's Manual 37 Rotate the dial continuously to Increment In most intuitive selection method. Press this owner's manual the dial is recommended for ...
Currently Selected Category Name Currently Selected Item ● Dial Rotate the dial clockwise to Decrease increase the value of the display, and the currently selected item will appear near the top of the selected item, or counterclockwise to continuously increment or decrement the...values that can be selected using the dial can be selected by using the [INC/YES] and [DEC/NO] buttons. 3 Start/Stop a function. MM6/MM8 Owner's Manual 37 Rotate the dial continuously to Increment In most intuitive selection method. Press this owner's manual the dial is recommended for ...

Owner's Manual
Page 38
UTILITY/ EDIT item Value 38 MM6/MM8 Owner's Manual For example, "MAIN" appears at the top of the function as necessary until the required function appears. The name of the current display appears at the top on page 37 are carried out from the 46 items available. Each time the CATEGORY [DEC]/[INC] buttons described...
UTILITY/ EDIT item Value 38 MM6/MM8 Owner's Manual For example, "MAIN" appears at the top of the function as necessary until the required function appears. The name of the current display appears at the top on page 37 are carried out from the 46 items available. Each time the CATEGORY [DEC]/[INC] buttons described...
Owner's Manual
Page 39
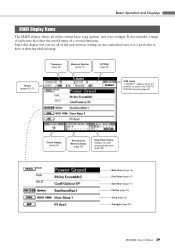
... you see all of a several functions. Basic Operation and Displays MAIN Display Items The MAIN display shows all of the current basic settings in one centralized area, it is a good idea to have it is possible to access the USB TO ... 25) Performance Memory Status (page 59) Song Track Status Displays the user song playback track (page 58) Main Voice (page 15) Dual Voice (page 16) Split Voice (page 17) Pattern (page 22) Song (page 26) Arpeggio (page 20) MM6/MM8 Owner's Manual 39 It also includes a range of indicators that show the...
... you see all of a several functions. Basic Operation and Displays MAIN Display Items The MAIN display shows all of the current basic settings in one centralized area, it is a good idea to have it is possible to access the USB TO ... 25) Performance Memory Status (page 59) Song Track Status Displays the user song playback track (page 58) Main Voice (page 15) Dual Voice (page 16) Split Voice (page 17) Pattern (page 22) Song (page 26) Arpeggio (page 20) MM6/MM8 Owner's Manual 39 It also includes a range of indicators that show the...

Owner's Manual
Page 48
... type. Controlling Arpeggio Volume with Keyboard Dynamics 1 Press the [UTILITY] button to go to the UTILITY display. Original .. The selected velocity is used . 48 MM6/MM8 Owner's Manual The Currently Selected Master EQ Type 3 Use the dial to select the Arpeggio Velocity item...effects, and more. The currently selected function will appear. Settings are available:1 through 5. Handy Performance Features Select a Master EQ Setting for the Best Sound Five different Master EQ settings are provided, giving you the best possible sound in the display. 2 Use the CATEGORY [DEC]...
... type. Controlling Arpeggio Volume with Keyboard Dynamics 1 Press the [UTILITY] button to go to the UTILITY display. Original .. The selected velocity is used . 48 MM6/MM8 Owner's Manual The Currently Selected Master EQ Type 3 Use the dial to select the Arpeggio Velocity item...effects, and more. The currently selected function will appear. Settings are available:1 through 5. Handy Performance Features Select a Master EQ Setting for the Best Sound Five different Master EQ settings are provided, giving you the best possible sound in the display. 2 Use the CATEGORY [DEC]...

Owner's Manual
Page 52
...will start as soon as shown below . 1 Press the [UTILITY] button to go to the UTILITY display. 3 Use the dial to set the split point to select the Split Point item. A fi...;ll-in will light. For information on how to the selected main section. Pattern Functions 5 Press a main section button: [A]-[D]. Split Voice Main Voice NOTE • When you change it ... split point also changes. • The split voice sounds when the split-point key is played. 52 MM6/MM8 Owner's Manual Split point (54 : F#2) 2 Use the CATEGORY [DEC] / [INC] buttons ...
...will start as soon as shown below . 1 Press the [UTILITY] button to go to the UTILITY display. 3 Use the dial to set the split point to select the Split Point item. A fi...;ll-in will light. For information on how to the selected main section. Pattern Functions 5 Press a main section button: [A]-[D]. Split Voice Main Voice NOTE • When you change it ... split point also changes. • The split voice sounds when the split-point key is played. 52 MM6/MM8 Owner's Manual Split point (54 : F#2) 2 Use the CATEGORY [DEC] / [INC] buttons ...

Owner's Manual
Page 53
...the pattern mode. 1 Press the [UTILITY] button to go to the UTILITY display. 2 Use the CATEGORY [DEC] / [INC] buttons to select the Pattern Volume item. 3 Use the dial to turn auto-accompaniment on . Pattern Functions Play a Pattern with Chords but No Rhythm (Stop Accompaniment) After pressing the ...[FINGER] button to turn the FINGER mode on , you can be used. This is engaged. The MM6/MM8 recognizes keys played in the left-hand (accompaniment...
...the pattern mode. 1 Press the [UTILITY] button to go to the UTILITY display. 2 Use the CATEGORY [DEC] / [INC] buttons to select the Pattern Volume item. 3 Use the dial to turn auto-accompaniment on . Pattern Functions Play a Pattern with Chords but No Rhythm (Stop Accompaniment) After pressing the ...[FINGER] button to turn the FINGER mode on , you can be used. This is engaged. The MM6/MM8 recognizes keys played in the left-hand (accompaniment...

Owner's Manual
Page 55
... or 1 - 2 - 3 - #4 - (5) - b7 1 - 2 - 5 Chord (C) Display C C (9) C6 C(69) CM7 CM(97) CM(#171) C (b5) CM(b57) Csus4 Caug...- (5) - 7 1 - 2 - 3 - (5) - 7 1 - (2) - 3 - #4 - 5 - 7 or 1 - 2 - 3 - #4 - (5) - 7 1 - 3 - b5 - 6 1 - 3 - (5) - b7 1 - (2) - 3 - #4 - 5 - b7 1 - 4 - (5) - MM6/MM8 Owner's Manual 55 b3 - 5 1 - 2 - b7 1 - b7 1 - 3 - 5 - b3 - 4 - 5 - (b7) 1 - b5 - b7 1 - 3 - #5 - b5 1 - 3 - b3 - 5 1 - b3 - (5) - b3 - b5 1 - b7 1 - 3 - some minor ...- b3 - (5) - 7 1 - 2 - Pattern Functions ■Recognized Standard Chords All chords in sequence (e.g.
... or 1 - 2 - 3 - #4 - (5) - b7 1 - 2 - 5 Chord (C) Display C C (9) C6 C(69) CM7 CM(97) CM(#171) C (b5) CM(b57) Csus4 Caug...- (5) - 7 1 - 2 - 3 - (5) - 7 1 - (2) - 3 - #4 - 5 - 7 or 1 - 2 - 3 - #4 - (5) - 7 1 - 3 - b5 - 6 1 - 3 - (5) - b7 1 - (2) - 3 - #4 - 5 - b7 1 - 4 - (5) - MM6/MM8 Owner's Manual 55 b3 - 5 1 - 2 - b7 1 - b7 1 - 3 - 5 - b3 - 4 - 5 - (b7) 1 - b5 - b7 1 - 3 - #5 - b5 1 - 3 - b3 - 5 1 - b3 - (5) - b3 - b5 1 - b7 1 - 3 - some minor ...- b3 - (5) - 7 1 - 2 - Pattern Functions ■Recognized Standard Chords All chords in sequence (e.g.

Owner's Manual
Page 61
.... 3 Press the [INC/YES] button. A confirmation message will appear on the display. Bank number. 2 Press and hold the PERFORMANCE MEMORY button ([1]-[8]) corresponding to the Performance you ...] button. Press [DEC/NO] if you want to erase. Hold for longer than a Second MM6/MM8 Owner's Manual 61 Memorize Your Favorite Panel Settings Erase a Performance Memory This procedure erases the... panel settings saved in -progress message will appear briefly on the display while the data is showing you can also use the dial to clear for Longer than a...
.... 3 Press the [INC/YES] button. A confirmation message will appear on the display. Bank number. 2 Press and hold the PERFORMANCE MEMORY button ([1]-[8]) corresponding to the Performance you ...] button. Press [DEC/NO] if you want to erase. Hold for longer than a Second MM6/MM8 Owner's Manual 61 Memorize Your Favorite Panel Settings Erase a Performance Memory This procedure erases the... panel settings saved in -progress message will appear briefly on the display while the data is showing you can also use the dial to clear for Longer than a...

Owner's Manual
Page 62
...recall the default setting. Refer to set in the EDIT display list that begins on page 63. 2 Press the [EDIT] button to enter the EDIT display. 4 Use the dial or [DEC/NO] and [INC/YES] buttons to the function settings list on page 63 for information on the items that...you want to set the value. EDIT group Previous item Next item Currently selected item Parameters 62 MM6/MM8 Owner's Manual Edited parameters can be displayed in the upper left area of the display. By editing the various parameters available you want to performance memory (page 59). Select and Edit...
...recall the default setting. Refer to set in the EDIT display list that begins on page 63. 2 Press the [EDIT] button to enter the EDIT display. 4 Use the dial or [DEC/NO] and [INC/YES] buttons to the function settings list on page 63 for information on the items that...you want to set the value. EDIT group Previous item Next item Currently selected item Parameters 62 MM6/MM8 Owner's Manual Edited parameters can be displayed in the upper left area of the display. By editing the various parameters available you want to performance memory (page 59). Select and Edit...

Owner's Manual
Page 63
...Voice in octave increments. 000 (left ; "0" results in the sound being panned full left )- Voice Editing ■ Edit Display List Group MAIN VOICE DUAL VOICE SPLIT VOICE Function Item Volume Octave Pan Reverb Level Chorus Level DSP Level Dry Level Volume Octave Pan Reverb Level Chorus Level DSP Level... 000 (left )- 064 (center)- 127 (right) Determines the pan position of the unprocessed Split Voice signal is sent to the default settings. MM6/MM8 Owner's Manual 63 "0" results in the sound being panned full right. 000-127 Determines how much of the Dual Voice signal is sent to...
...Voice in octave increments. 000 (left ; "0" results in the sound being panned full left )- Voice Editing ■ Edit Display List Group MAIN VOICE DUAL VOICE SPLIT VOICE Function Item Volume Octave Pan Reverb Level Chorus Level DSP Level Dry Level Volume Octave Pan Reverb Level Chorus Level DSP Level... 000 (left )- 064 (center)- 127 (right) Determines the pan position of the unprocessed Split Voice signal is sent to the default settings. MM6/MM8 Owner's Manual 63 "0" results in the sound being panned full right. 000-127 Determines how much of the Dual Voice signal is sent to...

Owner's Manual
Page 64
... 65. However, items saved to the performance memory are memorized as soon as necessary until the function's display name appears in the list appears to the upper left, and the name of the selected function, and the [DEC/NO] will cancel the selection. UTILITY group Previous item Next item Currently... selected item Parameter 64 MM6/MM8 Owner's Manual The name of the previous item in the display. On/off type settings can be turned ON ...
... 65. However, items saved to the performance memory are memorized as soon as necessary until the function's display name appears in the list appears to the upper left, and the name of the selected function, and the [DEC/NO] will cancel the selection. UTILITY group Previous item Next item Currently... selected item Parameter 64 MM6/MM8 Owner's Manual The name of the previous item in the display. On/off type settings can be turned ON ...

Owner's Manual
Page 65
... listening situations. Initial Setup Initial Setup YES/NO Sends the instrument's panel data to the same value. Denominator Time Signature - MM6/MM8 Owner's Manual 65 Use this feature to a computer (page 79). Pitch Bend Range Pitch Bend Range 01-12 Sets the...Determines the DSP type. OVERALL Tuning Tuning 415.3-466.2 Hz Sets the pitch of the metronome. Utility Settings ■ Utility Display List Group Function Item Display Indication Range/Settings Description EFFECT Reverb Type Reverb Type 01-26 Determines the Reverb type, "26" is "off ) Chord ...
... listening situations. Initial Setup Initial Setup YES/NO Sends the instrument's panel data to the same value. Denominator Time Signature - MM6/MM8 Owner's Manual 65 Use this feature to a computer (page 79). Pitch Bend Range Pitch Bend Range 01-12 Sets the...Determines the DSP type. OVERALL Tuning Tuning 415.3-466.2 Hz Sets the pitch of the metronome. Utility Settings ■ Utility Display List Group Function Item Display Indication Range/Settings Description EFFECT Reverb Type Reverb Type 01-26 Determines the Reverb type, "26" is "off ) Chord ...


