
Ls9 Editor Installation Guide
Page 9
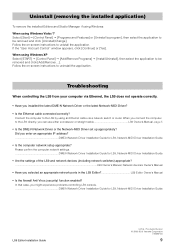
...Have you enter an appropriate IP address DME-N Network Driver Installation Guide for LS9, Network-MIDI Driver Installation Guide LS9 Editor Installation Guide U.R.G., Pro Audio Division © 2006-2010 Yamaha Corporation 010MW-C0 9 Uninstall (removing the installed application) To remove the...to the LS9 directly, you might experience problems controlling LS9 console DME-N Network Driver Installation Guide for LS9, Network-MIDI Driver Installation Guide • Is the computer network setup appropriate? In that case, you can use either a crossover or straight cable LS9 Owner's ...
...Have you enter an appropriate IP address DME-N Network Driver Installation Guide for LS9, Network-MIDI Driver Installation Guide LS9 Editor Installation Guide U.R.G., Pro Audio Division © 2006-2010 Yamaha Corporation 010MW-C0 9 Uninstall (removing the installed application) To remove the...to the LS9 directly, you might experience problems controlling LS9 console DME-N Network Driver Installation Guide for LS9, Network-MIDI Driver Installation Guide • Is the computer network setup appropriate? In that case, you can use either a crossover or straight cable LS9 Owner's ...

Ls9 Editor Owner's Manual
Page 46
...FILE list and the INTERNAL DATA list, and copy or move them to that channel. In the case of dynamics, there is shown cannot be recalled to a different location within a list. 46 LS9 Editor Owner's Manual For EQ, this channel into which rack will be recalled to the Store or...6 or Rack 8. As desired, you opened using the OPEN button (1). J TYPE This column indicates the effect type. M INTERNAL DATA This area shows the LS9's scene memory contents. Only library items with an indication of "1" can be recalled to DYNAMICS 1, and only library items with an indication of this indicates...
...FILE list and the INTERNAL DATA list, and copy or move them to that channel. In the case of dynamics, there is shown cannot be recalled to a different location within a list. 46 LS9 Editor Owner's Manual For EQ, this channel into which rack will be recalled to the Store or...6 or Rack 8. As desired, you opened using the OPEN button (1). J TYPE This column indicates the effect type. M INTERNAL DATA This area shows the LS9's scene memory contents. Only library items with an indication of "1" can be recalled to DYNAMICS 1, and only library items with an indication of this indicates...

Ls9 Editor Owner's Manual
Page 67
...can re-save all scenes to a file after editing, recall just a desired scene, or copy a desired scene to scene recall operations. In this case, you can also load scene library files from a USB storage device or from a drive of your computer, and edit them. SCENE MEMORY page Here... scene library file. To switch pages, click the tabs shown in the upper part of your computer. Scene window Here you can edit the LS9's scene memories. B OPEN (Open a file) Opens a scene library file located on a drive of the window. This window is divided into SCENE ...
...can re-save all scenes to a file after editing, recall just a desired scene, or copy a desired scene to scene recall operations. In this case, you can also load scene library files from a USB storage device or from a drive of your computer, and edit them. SCENE MEMORY page Here... scene library file. To switch pages, click the tabs shown in the upper part of your computer. Scene window Here you can edit the LS9's scene memories. B OPEN (Open a file) Opens a scene library file located on a drive of the window. This window is divided into SCENE ...
Owner's Manual
Page 2
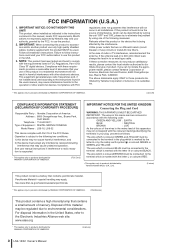
... OF CONFORMITY PROCEDURE) Responsible Party : Yamaha Corporation of America Address : 6600 Orangethorpe Ave., Buena Park, Calif. 90620 Telephone : 714-522-9011 Type of Equipment : DIGITAL MIXING CONSOLE Model Name : LS9-16, LS9-32 This device complies with the requirements listed...Yamaha may void your FCC authorization to use of mercury. See user manual instructions if interference to radio reception is coloured BLUE must be determined by turning the unit "OFF" and "ON", please try to environmental considerations. Utilize power outlets that contains perchlorate material. In the case...
... OF CONFORMITY PROCEDURE) Responsible Party : Yamaha Corporation of America Address : 6600 Orangethorpe Ave., Buena Park, Calif. 90620 Telephone : 714-522-9011 Type of Equipment : DIGITAL MIXING CONSOLE Model Name : LS9-16, LS9-32 This device complies with the requirements listed...Yamaha may void your FCC authorization to use of mercury. See user manual instructions if interference to radio reception is coloured BLUE must be determined by turning the unit "OFF" and "ON", please try to environmental considerations. Utilize power outlets that contains perchlorate material. In the case...

Owner's Manual
Page 5
... scene data and library data is running low, the LCD display indicates "Low Battery!" Consult qualifi ed Yamaha service personnel about replacing defective components. (5)-4 2/2 LS9-16/32 Owner's Manual 5 Handling caution • When turning on the AC power in the ears, consult a physician....into the mains. XLR-type connectors are wired as switches, volume controls, and connectors, deteriorates over time. The performance of this case, immediately save the data to other devices, turn the power off for maximum safety and shock prevention. Before turning the power on...
... scene data and library data is running low, the LCD display indicates "Low Battery!" Consult qualifi ed Yamaha service personnel about replacing defective components. (5)-4 2/2 LS9-16/32 Owner's Manual 5 Handling caution • When turning on the AC power in the ears, consult a physician....into the mains. XLR-type connectors are wired as switches, volume controls, and connectors, deteriorates over time. The performance of this case, immediately save the data to other devices, turn the power off for maximum safety and shock prevention. Before turning the power on...

Owner's Manual
Page 20
While the [CUE] key of any channel is currently active. In this case, the LED of the key corresponding to the currently selected bus will blink, and the LED of keys corresponding to edit the value. . In SENDS ... be the object of operations. , Display In this display you can view the level of the STEREO channel or cue monitor. 1 20 LS9-16/32 Owner's Manual 2 3 1 Stereo meter This is a 32-segment LED meter that is on , this meter will indicate the cue monitor level. Use the DISPLAY ACCESS section (→ p. 19...
While the [CUE] key of any channel is currently active. In this case, the LED of the key corresponding to the currently selected bus will blink, and the LED of keys corresponding to edit the value. . In SENDS ... be the object of operations. , Display In this display you can view the level of the STEREO channel or cue monitor. 1 20 LS9-16/32 Owner's Manual 2 3 1 Stereo meter This is a 32-segment LED meter that is on , this meter will indicate the cue monitor level. Use the DISPLAY ACCESS section (→ p. 19...

Owner's Manual
Page 21
...; When an INPUT/ST IN channel is selected The encoder will adjust the threshold of the external device connected to the currently selected MATRIX bus. LS9-16/32 Owner's Manual 21 Parts and their function ● When a MIX channel is selected The encoder will adjust the send level from that MIX channel... panning of Dynamics 1 (e.g., gate). ● When any other channel is adjusted between the Hot and Cold output impedance of the compressor, etc. Keep in the case of LCR mode) of the band selected by keys 9-L.
...; When an INPUT/ST IN channel is selected The encoder will adjust the threshold of the external device connected to the currently selected MATRIX bus. LS9-16/32 Owner's Manual 21 Parts and their function ● When a MIX channel is selected The encoder will adjust the send level from that MIX channel... panning of Dynamics 1 (e.g., gate). ● When any other channel is adjusted between the Hot and Cold output impedance of the compressor, etc. Keep in the case of LCR mode) of the band selected by keys 9-L.

Owner's Manual
Page 27
...32 Owner's Manual 27 Press the keys of the LAYER section to switch the combination of channels you 'll perform in the LS9's top panel. The [HOME] key will change as follows. • The display will be controlled ("fader layers") so that you switch between combinations of the selected channel. In such cases... the various user interfaces you'll use to operate the LS9, and basic operations. 3 Basic operations on the LS9 Basic operations in the top panel Here we explain basic operations you want to control. LS9-16 LS9-32 • The channel level function will be assigned to the...
...32 Owner's Manual 27 Press the keys of the LAYER section to switch the combination of channels you 'll perform in the LS9's top panel. The [HOME] key will change as follows. • The display will be controlled ("fader layers") so that you switch between combinations of the selected channel. In such cases... the various user interfaces you'll use to operate the LS9, and basic operations. 3 Basic operations on the LS9 Basic operations in the top panel Here we explain basic operations you want to control. LS9-16 LS9-32 • The channel level function will be assigned to the...

Owner's Manual
Page 36
... DISPLAY ACCESS section, press the [RACK 1-4] or [RACK 5-8] key. [ RACK screen ] In the DISPLAY ACCESS section, repeatedly press the [RACK 1-4] or [RACK 5-8] key. In some cases, the data selected as the recall-source cannot be recalled by dynamics 1 or 2. 4 Move the cursor to access the popup window of data; Read-only... is turned on the panel, or move the cursor to indicate whether the data can access the popup window by the corresponding dynamics processor. 36 LS9-16/32 Owner's Manual
... DISPLAY ACCESS section, press the [RACK 1-4] or [RACK 5-8] key. [ RACK screen ] In the DISPLAY ACCESS section, repeatedly press the [RACK 1-4] or [RACK 5-8] key. In some cases, the data selected as the recall-source cannot be recalled by dynamics 1 or 2. 4 Move the cursor to access the popup window of data; Read-only... is turned on the panel, or move the cursor to indicate whether the data can access the popup window by the corresponding dynamics processor. 36 LS9-16/32 Owner's Manual
Owner's Manual
Page 46
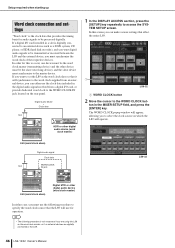
..., you must use for operation. In order for this screen you can either case, you can make various settings that affect the entire LS9. 1 LS9-32 1 WORD CLOCK button 2 Move the cursor to the LS9. 46 LS9-16/32 Owner's Manual Digital audio device + Clock data Slot HDR or other digital audio... signal received from a digital I /O card installed in the MIXER SETUP field, and press the [ENTER] key. LS9 (word clock slave) Digital audio signal Clock data Slot WORDCLOCK IN jack LS9-32 LS9 (word clock slave) Digital MTR or other device must be transmitted or received between the...
..., you must use for operation. In order for this screen you can either case, you can make various settings that affect the entire LS9. 1 LS9-32 1 WORD CLOCK button 2 Move the cursor to the LS9. 46 LS9-16/32 Owner's Manual Digital audio device + Clock data Slot HDR or other digital audio... signal received from a digital I /O card installed in the MIXER SETUP field, and press the [ENTER] key. LS9 (word clock slave) Digital audio signal Clock data Slot WORDCLOCK IN jack LS9-32 LS9 (word clock slave) Digital MTR or other device must be transmitted or received between the...
Owner's Manual
Page 47
...keys of the window) and press the [ENTER] key. That channel is powered-off the power. If the LS9 is correctly operating with the new clock, the symbol located immediately above the corresponding button will not operate correctly if ...clock of the channel for the INPUT jack you want the LS9's internal clock to be the clock source Turn on the 2TR IN button. If you've set - LS9-16 LS9-32 3 Press the [SEL] key of an external device, be...the window to select the clock source to which you turn light blue. In some cases, noise may occur when synchronization is disconnected.
...keys of the window) and press the [ENTER] key. That channel is powered-off the power. If the LS9 is correctly operating with the new clock, the symbol located immediately above the corresponding button will not operate correctly if ...clock of the channel for the INPUT jack you want the LS9's internal clock to be the clock source Turn on the 2TR IN button. If you've set - LS9-16 LS9-32 3 Press the [SEL] key of an external device, be...the window to select the clock source to which you turn light blue. In some cases, noise may occur when synchronization is disconnected.

Owner's Manual
Page 48
... to POST ON (immediately after the [ON] key) (→ p. 155). Keep in the same way. 1 GAIN knob 48 LS9-16/32 Owner's Manual If the meter does not move the cursor to the GAIN knob in the screen, and use the dial or the [DEC]/[INC] ... another channel, use the [SEL] keys to select another channel and make settings in mind that noise may be assigned to the faders. 1 5 Use either case, the level of the channel that channel is shown by the meter LEDs in the display, showing all the parameters of that is connected appropriately...
... to POST ON (immediately after the [ON] key) (→ p. 155). Keep in the same way. 1 GAIN knob 48 LS9-16/32 Owner's Manual If the meter does not move the cursor to the GAIN knob in the screen, and use the dial or the [DEC]/[INC] ... another channel, use the [SEL] keys to select another channel and make settings in mind that noise may be assigned to the faders. 1 5 Use either case, the level of the channel that channel is shown by the meter LEDs in the display, showing all the parameters of that is connected appropriately...

Owner's Manual
Page 60
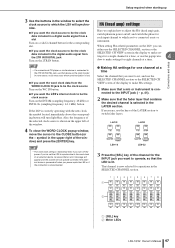
...panning of the signal sent from the input channel to the STEREO bus or MONO bus. In this case, the TO ST PAN knob will operate as a conventional PAN knob, and no signals will be switched... LCR button in the TO STEREO/MONO popup window to adjust the proportion between the LS9-16 and LS9-32. ● For the LS9-16 Assign the MONO channel to the custom fader layer, press the LAYER [CUSTOM FADER...layer, and then operate the [ON] key and fader of the corresponding channel module. ● For the LS9-32 Press the LAYER [MASTER] key to access the master fader layer, and operate the [ON] key and ...
...panning of the signal sent from the input channel to the STEREO bus or MONO bus. In this case, the TO ST PAN knob will operate as a conventional PAN knob, and no signals will be switched... LCR button in the TO STEREO/MONO popup window to adjust the proportion between the LS9-16 and LS9-32. ● For the LS9-16 Assign the MONO channel to the custom fader layer, press the LAYER [CUSTOM FADER...layer, and then operate the [ON] key and fader of the corresponding channel module. ● For the LS9-32 Press the LAYER [MASTER] key to access the master fader layer, and operate the [ON] key and ...

Owner's Manual
Page 61
... the MONO (C) bus 15 If you 've finished making settings, move the cursor to the STEREO (R) bus L C R PAN knob Signal level Signal level LS9-16/32 Owner's Manual 61 Signal sent to the MONO (C) bus Signal sent to the STEREO (L) bus Signal sent to the CLOSE button (or the × symbol... that is not currently shown in the popup window, use the [SEL] key to select that channel, and then make settings for it. In this case, the [PAN] encoder will operate as a conventional BALANCE knob, and no signal is sent to the STEREO (L/R) bus and MONO (C) bus as shown in the...
... the MONO (C) bus 15 If you 've finished making settings, move the cursor to the STEREO (R) bus L C R PAN knob Signal level Signal level LS9-16/32 Owner's Manual 61 Signal sent to the MONO (C) bus Signal sent to the STEREO (L) bus Signal sent to the CLOSE button (or the × symbol... that is not currently shown in the popup window, use the [SEL] key to select that channel, and then make settings for it. In this case, the [PAN] encoder will operate as a conventional BALANCE knob, and no signal is sent to the STEREO (L/R) bus and MONO (C) bus as shown in the...
Owner's Manual
Page 63
...a specific key in the MIX/MATRIX SELECT section is blinking and the LEDs of the remaining keys are lit, the LS9 is in SENDS ON FADER mode (the mode in which of the two adjacent keys of the MIX/MATRIX SELECT section are...blue background. If you want to monitor the signal that is being sent from the pre-EQ or pre-fader position if this case, you selected a VARI type MIX bus in step 4, use the faders to control the send levels to a stereo MIX ... Use the [SELECTED SEND] encoder to adjust the 5 pan (or balance, for that MIX channel. Input channel operations LS9-16/32 Owner's Manual 63
...a specific key in the MIX/MATRIX SELECT section is blinking and the LEDs of the remaining keys are lit, the LS9 is in SENDS ON FADER mode (the mode in which of the two adjacent keys of the MIX/MATRIX SELECT section are...blue background. If you want to monitor the signal that is being sent from the pre-EQ or pre-fader position if this case, you selected a VARI type MIX bus in step 4, use the faders to control the send levels to a stereo MIX ... Use the [SELECTED SEND] encoder to adjust the 5 pan (or balance, for that MIX channel. Input channel operations LS9-16/32 Owner's Manual 63

Owner's Manual
Page 73
.... This operation will change the signal levels sent from the even-numbered MIX channel to the STEREO (R) bus L C R TO ST BALANCE knob LS9-16/32 Owner's Manual 73 In this case, the [PAN] encoder will differ depending on whether you want to use the MONO bus, make sure that is turned on /off... STEREO bus and MONO bus. In this case, the TO ST PAN knob will operate as shown in the following steps will operate as shown in the TO STEREO/MONO popup window to adjust the proportion between the LS9-16 and LS9-32. ● For the LS9-16 Assign the MONO channel to the custom...
.... This operation will change the signal levels sent from the even-numbered MIX channel to the STEREO (R) bus L C R TO ST BALANCE knob LS9-16/32 Owner's Manual 73 In this case, the [PAN] encoder will differ depending on whether you want to use the MONO bus, make sure that is turned on /off... STEREO bus and MONO bus. In this case, the TO ST PAN knob will operate as shown in the following steps will operate as shown in the TO STEREO/MONO popup window to adjust the proportion between the LS9-16 and LS9-32. ● For the LS9-16 Assign the MONO channel to the custom...

Owner's Manual
Page 83
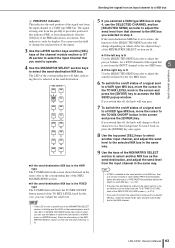
...always be able to view the settings in the screen while operating an encoder of the SELECTED CHANNEL section always affect the currently selected channel. LS9-16/32 Owner's Manual 83 HINT • You can also move the cursor to the selected channel in the upper left of the display. 7...VIEW screen to edit the parameters of the selected channel. 1 2 Operations in the SELECTED CHANNEL section 1 Channel number B Channel name HINT • In the case of ST IN channels or STEREO channels, you can switch between L and R by repeatedly pressing the same [SEL] key. • In order to select...
...always be able to view the settings in the screen while operating an encoder of the SELECTED CHANNEL section always affect the currently selected channel. LS9-16/32 Owner's Manual 83 HINT • You can also move the cursor to the selected channel in the upper left of the display. 7...VIEW screen to edit the parameters of the selected channel. 1 2 Operations in the SELECTED CHANNEL section 1 Channel number B Channel name HINT • In the case of ST IN channels or STEREO channels, you can switch between L and R by repeatedly pressing the same [SEL] key. • In order to select...

Owner's Manual
Page 93
In this case, the channel module will operate as follows. • The fader and [ON] key will... the dial or the [DEC]/[INC] keys, you can be selected in the channel module select field • INPUT channels 1-32 {1-64} • ST IN channels 1-4 • STEREO channel • MONO channels • MIX channels 1-16 • MATRIX...Custom fader layer settings are remembered for each user. 8 When a user logs-in the LAYER section. Custom fader layer LS9-16/32 Owner's Manual 93 Assigning channels to the custom fader layer 1 Channel module select field Select the channels that ...
In this case, the channel module will operate as follows. • The fader and [ON] key will... the dial or the [DEC]/[INC] keys, you can be selected in the channel module select field • INPUT channels 1-32 {1-64} • ST IN channels 1-4 • STEREO channel • MONO channels • MIX channels 1-16 • MATRIX...Custom fader layer settings are remembered for each user. 8 When a user logs-in the LAYER section. Custom fader layer LS9-16/32 Owner's Manual 93 Assigning channels to the custom fader layer 1 Channel module select field Select the channels that ...

Owner's Manual
Page 98
... in the CONFIRMATION field of the window. The OUTPUT CH SELECT popup window will be output directly from the corresponding output port. In this case, the channel select button in the OUTPUT PORT popup window will indicate "DIR CH xx" (xx = channel number). (For details on , a confi... the signal level of the channel assigned to the output port. 3 To assign a channel to an output port, move the cursor to the previous screen. LS9-32 1 Category tab This selects the type of channel that port, and press the [ENTER] key. Each tab corresponds to the following items. 1 2 4 Use ...
... in the CONFIRMATION field of the window. The OUTPUT CH SELECT popup window will be output directly from the corresponding output port. In this case, the channel select button in the OUTPUT PORT popup window will indicate "DIR CH xx" (xx = channel number). (For details on , a confi... the signal level of the channel assigned to the output port. 3 To assign a channel to an output port, move the cursor to the previous screen. LS9-32 1 Category tab This selects the type of channel that port, and press the [ENTER] key. Each tab corresponds to the following items. 1 2 4 Use ...

Owner's Manual
Page 109
...from the current location when you move the cursor to the beginning of the screen, and press the [ENTER] key. In either of the above cases, operating this button and press the [ENTER] key during recording Recording will be given a default title and file name. If you were ... from the current location when you move the cursor to the beginning of the screen to the STOP (■) button and press the [ENTER] key. LS9-16/32 Owner's Manual 109 Recording to USB memory 6 Move the cursor to the PLAY/PAUSE ( ) button and press the [ENTER] key. D FF ( ) button ●...
...from the current location when you move the cursor to the beginning of the screen, and press the [ENTER] key. In either of the above cases, operating this button and press the [ENTER] key during recording Recording will be given a default title and file name. If you were ... from the current location when you move the cursor to the beginning of the screen to the STOP (■) button and press the [ENTER] key. LS9-16/32 Owner's Manual 109 Recording to USB memory 6 Move the cursor to the PLAY/PAUSE ( ) button and press the [ENTER] key. D FF ( ) button ●...