
Owner's Manual
Page 3
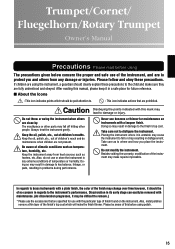
Trumpet/Cornet/ Fluegelhorn/Rotary Trumpet Owner's Manual Precautions Please read before using polish. 15 If children are using The precautions given below concern the proper and safe use of children's mouths. The mouthpiece or other people. Keep the oil, polish, etc., out of the instrument, and are not present. Keep the instrument away from any extreme conditions of the finish's top coat which should be paid attention to remove.) * Please use the accessories that are specified for use or store the instrument in a safe place for maintenance on the instrument. Doing...
Trumpet/Cornet/ Fluegelhorn/Rotary Trumpet Owner's Manual Precautions Please read before using polish. 15 If children are using The precautions given below concern the proper and safe use of children's mouths. The mouthpiece or other people. Keep the oil, polish, etc., out of the instrument, and are not present. Keep the instrument away from any extreme conditions of the finish's top coat which should be paid attention to remove.) * Please use the accessories that are specified for use or store the instrument in a safe place for maintenance on the instrument. Doing...
Owner's Manual
Page 4
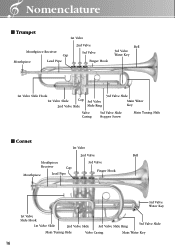
Nomenclature ■ Trumpet 1st Valve Mouthpiece Receiver Cap Mouthpiece Lead Pipe 2nd Valve 3rd Valve Finger Hook Bell 3rd Valve Water Key 1st Valve Slide Hook 1st Valve Slide Cap 2nd Valve Slide 3rd Valve Slide Ring 3rd Valve Slide Main Water Key Valve Casing 3rd Valve Slide Stopper Screw Main Tuning Slide ■ Cornet 1st Valve 2nd Valve Bell Mouthpiece Receiver Cap Mouthpiece Lead Pipe 3rd Valve Finger Hook 3rd Valve Water Key 1st Valve Slide Hook 1st Valve Slide 2nd Valve Slide 3rd Valve Slide Ring 3rd Valve Slide Main Tuning Slide Valve Casing Main ...
Nomenclature ■ Trumpet 1st Valve Mouthpiece Receiver Cap Mouthpiece Lead Pipe 2nd Valve 3rd Valve Finger Hook Bell 3rd Valve Water Key 1st Valve Slide Hook 1st Valve Slide Cap 2nd Valve Slide 3rd Valve Slide Ring 3rd Valve Slide Main Water Key Valve Casing 3rd Valve Slide Stopper Screw Main Tuning Slide ■ Cornet 1st Valve 2nd Valve Bell Mouthpiece Receiver Cap Mouthpiece Lead Pipe 3rd Valve Finger Hook 3rd Valve Water Key 1st Valve Slide Hook 1st Valve Slide 2nd Valve Slide 3rd Valve Slide Ring 3rd Valve Slide Main Tuning Slide Valve Casing Main ...
Owner's Manual
Page 5
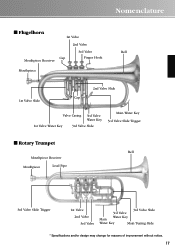
Nomenclature ■ Flugelhorn 1st Valve 2nd Valve 3rd Valve Bell Cap Mouthpiece Receiver Finger Hook Mouthpiece 1st Valve Slide 2nd Valve Slide Cap Valve Casing 3rd Valve Water Key 1st Valve Water Key 3rd Valve Slide Main Water Key 3rd Valve Slide Trigger ■ Rotary Trumpet Bell Mouthpiece Receiver Mouthpiece Lead Pipe 3rd Valve Slide Trigger 1st Valve 2nd Valve 3rd Valve 3rd Valve Slide 3rd Valve Water Key Main Water Key Main Tuning Slide * Specifications and/or design may change for reasons of improvement without notice. 17
Nomenclature ■ Flugelhorn 1st Valve 2nd Valve 3rd Valve Bell Cap Mouthpiece Receiver Finger Hook Mouthpiece 1st Valve Slide 2nd Valve Slide Cap Valve Casing 3rd Valve Water Key 1st Valve Water Key 3rd Valve Slide Main Water Key 3rd Valve Slide Trigger ■ Rotary Trumpet Bell Mouthpiece Receiver Mouthpiece Lead Pipe 3rd Valve Slide Trigger 1st Valve 2nd Valve 3rd Valve 3rd Valve Slide 3rd Valve Water Key Main Water Key Main Tuning Slide * Specifications and/or design may change for reasons of improvement without notice. 17
Owner's Manual
Page 6
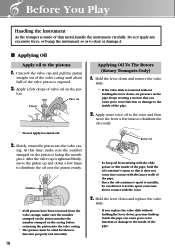
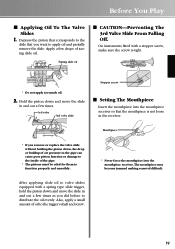
Slowly, return the piston into the valve casing. * The pistons must be careful not to let the spout come into direct contact with the inner walls of the pipe. * Since the oil container's spout is removed without holding the lever down, air pressure in the pipe drops creating a suction that is does not come into contact with the rotor. 3. After the valve cap is made of the pipe. Apply some rotor oil to the rotor and then move the piston up inside of the valve piston is facing the mouthpiece. Valve oil Piston * Do not apply too much oil. 3. Before You Play ...
Slowly, return the piston into the valve casing. * The pistons must be careful not to let the spout come into direct contact with the inner walls of the pipe. * Since the oil container's spout is removed without holding the lever down, air pressure in the pipe drops creating a suction that is does not come into contact with the rotor. 3. After the valve cap is made of the pipe. Apply some rotor oil to the rotor and then move the piston up inside of the valve piston is facing the mouthpiece. Valve oil Piston * Do not apply too much oil. 3. Before You Play ...
Owner's Manual
Page 7
Apply a few times as you did before to apply oil and partially remove the slide. Mouthpiece * If you want to distribute the oil evenly. Also, apply a small amount of the pipe. * The pistons must be oiled for them to the trigger's shaft and screw. * Never force the mouthpiece into the mouthpiece receiver so that the mouthpiece is tight. On instruments fitted with a spring type slide trigger, hold the piston down and move the slide in the pipe can cause poor piston function or damage to the inside of oil to function properly and smoothly. Depress the piston that you...
Apply a few times as you did before to apply oil and partially remove the slide. Mouthpiece * If you want to distribute the oil evenly. Also, apply a small amount of the pipe. * The pistons must be oiled for them to the trigger's shaft and screw. * Never force the mouthpiece into the mouthpiece receiver so that the mouthpiece is tight. On instruments fitted with a spring type slide trigger, hold the piston down and move the slide in the pipe can cause poor piston function or damage to the inside of oil to function properly and smoothly. Depress the piston that you...

Owner's Manual
Page 8
... out to tune the instrument. Before You Play ■ Tuning Slide the main tuning slide in or out to tune the instrument. Main tuning slide Flugelhorn/Piccolo Trumpet/ Eb Cornet Loosen the mouthpipe screw and slide the mouthpipe in temperature can have an effect on the pitch, blow some warm air...
... out to tune the instrument. Before You Play ■ Tuning Slide the main tuning slide in or out to tune the instrument. Main tuning slide Flugelhorn/Piccolo Trumpet/ Eb Cornet Loosen the mouthpipe screw and slide the mouthpipe in temperature can have an effect on the pitch, blow some warm air...
Owner's Manual
Page 9
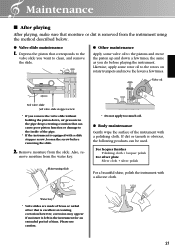
move the piston up and down , air pressure in the instrument for an extended period of time. For lacquer finishes Polishing cloth + lacquer polish For silver plate Silver cloth + silver polish For a beautiful shine, polish the instrument with a polishing cloth. Please use caution. 21 Main tuning slide * Do not apply too much oil. ● Body maintenance Gently wipe the surface of the instrument with a silicone cloth. Depress the piston that corresponds to the valve slide you want to clean, and remove the slide. ● Other maintenance Apply some rotor oil to the rotors ...
move the piston up and down , air pressure in the instrument for an extended period of time. For lacquer finishes Polishing cloth + lacquer polish For silver plate Silver cloth + silver polish For a beautiful shine, polish the instrument with a polishing cloth. Please use caution. 21 Main tuning slide * Do not apply too much oil. ● Body maintenance Gently wipe the surface of the instrument with a silicone cloth. Depress the piston that corresponds to the valve slide you want to clean, and remove the slide. ● Other maintenance Apply some rotor oil to the rotors ...
Owner's Manual
Page 10
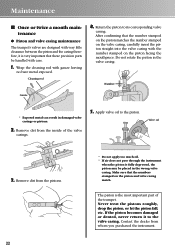
After confirming that the number stamped on the piston matches the number stamped on the valve casing, carefully insert the piston straight into the valve casing with the number stamped on the piston and valve casing match. If the piston becomes damaged or dented, never return it is very important that the numbers stamped on the piston facing the mouthpiece. Wrap the cleaning rod with care. 1. Never treat the pistons roughly, drop the piston, or let the piston fall, etc. Contact the dealer from the inside of the trumpet. Cleaning rod 4. Number Gauze * Exposed metal can ...
After confirming that the number stamped on the piston matches the number stamped on the valve casing, carefully insert the piston straight into the valve casing with the number stamped on the piston and valve casing match. If the piston becomes damaged or dented, never return it is very important that the numbers stamped on the piston facing the mouthpiece. Wrap the cleaning rod with care. 1. Never treat the pistons roughly, drop the piston, or let the piston fall, etc. Contact the dealer from the inside of the trumpet. Cleaning rod 4. Number Gauze * Exposed metal can ...
Owner's Manual
Page 11
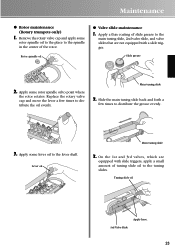
Replace the rotary valve cap and move the lever a few times to distribute the grease evenly. 3. On the 1st and 3rd valves, which are not equipped with slide triggers, apply a small amount of tuning slide oil to the main tuning slide, 2nd valve slide, and valve slides that are equipped with a slide trigger. Tuning slide oil Apply here. 3rd Valve Slide 23 Apply a thin coating of the rotor. Lever oil Main tuning slide 3. Rotor spindle oil ● Valve slide maintenance 1. Slide grease 2. Remove the rotary valve cap and apply some rotor spindle oil to the spindle in...
Replace the rotary valve cap and move the lever a few times to distribute the grease evenly. 3. On the 1st and 3rd valves, which are not equipped with slide triggers, apply a small amount of tuning slide oil to the main tuning slide, 2nd valve slide, and valve slides that are equipped with a slide trigger. Tuning slide oil Apply here. 3rd Valve Slide 23 Apply a thin coating of the rotor. Lever oil Main tuning slide 3. Rotor spindle oil ● Valve slide maintenance 1. Slide grease 2. Remove the rotary valve cap and apply some rotor spindle oil to the spindle in...
Owner's Manual
Page 12
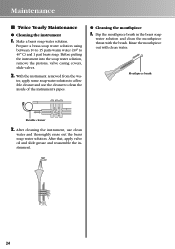
With the instrument removed from the wa- Make a brass soap water solution. Before putting the instrument into the soap water solution, remove the pistons, valve casing covers, slide valves. 2. ter, apply some soap water solution to a flexible cleaner and use clean water and thoroughly rinse out the brass soap water solution. After cleaning the instrument, use the cleaner to 40° C) and 1 part brass soap. After that, apply valve oil and slide grease and reassemble the instrument. 24 Prepare a brass soap water solution using between 10 to 15 parts warm water (30° to...
With the instrument removed from the wa- Make a brass soap water solution. Before putting the instrument into the soap water solution, remove the pistons, valve casing covers, slide valves. 2. ter, apply some soap water solution to a flexible cleaner and use clean water and thoroughly rinse out the brass soap water solution. After cleaning the instrument, use the cleaner to 40° C) and 1 part brass soap. After that, apply valve oil and slide grease and reassemble the instrument. 24 Prepare a brass soap water solution using between 10 to 15 parts warm water (30° to...
Owner's Manual
Page 13
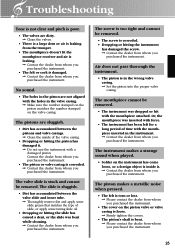
Contact the dealer from whom you purchased the instrument. • The piston or valve casing is bent. ➞ Please contact the dealer from whom you purchased the instrument. 25 The slide is stuck and cannot be removed. • The instrument was dropped or hit with the mouthpiece inserted in the valve casing. ➞ Make sure the number stamped on the piston matches the number stamped on the valve casing. Or, the mouthpiece was bent while cleaning. ➞ Contact the dealer from whom you purchased the instrument. The valve slide is sluggish. • Dirt has ...
Contact the dealer from whom you purchased the instrument. • The piston or valve casing is bent. ➞ Please contact the dealer from whom you purchased the instrument. 25 The slide is stuck and cannot be removed. • The instrument was dropped or hit with the mouthpiece inserted in the valve casing. ➞ Make sure the number stamped on the piston matches the number stamped on the valve casing. Or, the mouthpiece was bent while cleaning. ➞ Contact the dealer from whom you purchased the instrument. The valve slide is sluggish. • Dirt has ...

Owner's Manual
Page 16
Este documento se ha impreso en papel sin cloro alguno, con tinta de soja ECF ECF ECF YYYYYYY 2429030 0708PONK-A0 Printed in Japan This document is printed on chlorine free (ECF) paper with soy ink. Ce document a été imprimé sur du papier non blanchi au chlore avec de l'encre d'huile de soja. Auf Umweltpapier mit Sojatinte gedruckt.
Este documento se ha impreso en papel sin cloro alguno, con tinta de soja ECF ECF ECF YYYYYYY 2429030 0708PONK-A0 Printed in Japan This document is printed on chlorine free (ECF) paper with soy ink. Ce document a été imprimé sur du papier non blanchi au chlore avec de l'encre d'huile de soja. Auf Umweltpapier mit Sojatinte gedruckt.
