Owners Manual
Page 7
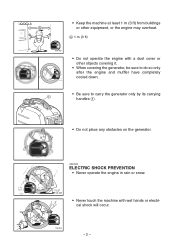
... engine with wet hands or electrical shock will occur. 7DK-010 -2- 9 Keep the machine at least 1 m (3 ft) from buildings a or other objects covering it. 9 When covering the generator, be sure to do so only after the engine and muffler have completely cooled down. 9 Be sure to carry the... generator only by its carrying 1 handles 1. 7DK-036 9 Do not place any obstacles on the generator. AE00083 ELECTRIC SHOCK PREVENTION 9 Never operate the engine in rain or snow. 7DK-009 9 Never touch the machine with a dust cover or other equipment, or the engine may ...
... engine with wet hands or electrical shock will occur. 7DK-010 -2- 9 Keep the machine at least 1 m (3 ft) from buildings a or other objects covering it. 9 When covering the generator, be sure to do so only after the engine and muffler have completely cooled down. 9 Be sure to carry the... generator only by its carrying 1 handles 1. 7DK-036 9 Do not place any obstacles on the generator. AE00083 ELECTRIC SHOCK PREVENTION 9 Never operate the engine in rain or snow. 7DK-009 9 Never touch the machine with a dust cover or other equipment, or the engine may ...
Owners Manual
Page 10
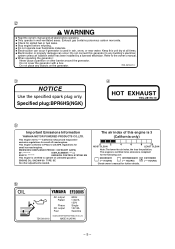
... times. 8 Electrocution or property damage can occur if generator is certified to Phase 2 U.S.EPA regulations for further details. 6 OIL EF2000IS AC output Rated Phase DC output Fuel 60Hz 1.6kVA 120V Single 12V 8A Gasoline YAMAHA MOTOR POWERED PRODUCTS CO.,LTD. 7DK-24164-10 MADE IN... connect this engine is certified to the owner's manual. 8 When operating the generator: Never place a partition or other adjustments needed. This engine is used in well-ventilated areas. Do not cover the generator with a box. ENGINE OIL: SAE10W-30 TYPE: SE No other barrier around...
... times. 8 Electrocution or property damage can occur if generator is certified to Phase 2 U.S.EPA regulations for further details. 6 OIL EF2000IS AC output Rated Phase DC output Fuel 60Hz 1.6kVA 120V Single 12V 8A Gasoline YAMAHA MOTOR POWERED PRODUCTS CO.,LTD. 7DK-24164-10 MADE IN... connect this engine is certified to the owner's manual. 8 When operating the generator: Never place a partition or other adjustments needed. This engine is used in well-ventilated areas. Do not cover the generator with a box. ENGINE OIL: SAE10W-30 TYPE: SE No other barrier around...

Owners Manual
Page 17
...-030 1 3. Remove the oil filler cap 1. 7DK-031 4. AE00222 Engine oil NOTICE The generator has been shipped without engine oil. Install the cover and tighten the screws. - 12 - Fill the specified amount of the recommended engine oil, and then install and tighten the oil filler cap. 7DK-033 1 ... or higher Engine oil quantity: 0.4 L (0.42 US qt, 0.35 lmp qt) 5. Do not start the engine till fill with the sufficient engine oil. 1. Place the generator on a level surface. 2.
...-030 1 3. Remove the oil filler cap 1. 7DK-031 4. AE00222 Engine oil NOTICE The generator has been shipped without engine oil. Install the cover and tighten the screws. - 12 - Fill the specified amount of the recommended engine oil, and then install and tighten the oil filler cap. 7DK-033 1 ... or higher Engine oil quantity: 0.4 L (0.42 US qt, 0.35 lmp qt) 5. Do not start the engine till fill with the sufficient engine oil. 1. Place the generator on a level surface. 2.
Owners Manual
Page 24
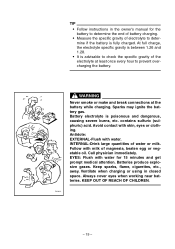
... every hour to determine if the battery is poisonous and dangerous, causing severe burns, etc. Follow with skin, eyes or clothing. Call physician immediately. Always cover eyes when working near batteries. Battery electrolyte is fully charged. Batteries produce explosive gases. At full charge, the electrolyte specific gravity is between 1.26 and...
... every hour to determine if the battery is poisonous and dangerous, causing severe burns, etc. Follow with skin, eyes or clothing. Call physician immediately. Always cover eyes when working near batteries. Battery electrolyte is fully charged. Batteries produce explosive gases. At full charge, the electrolyte specific gravity is between 1.26 and...

Owners Manual
Page 28
... the handlebar 6 into the tool 5 and turn it counterclockwise to remove the spark plug. 7DK-054 4. The porcelain insulator around the center electrode of the cover. 7DK-053 6 5 3. Check the spark plug type and gap a. Standard Spark Plug: BPR6HS (NGK) a Spark Plug Gap a: 0.6-0.7 mm (0.024-0.028...plug gap should be checked periodically. 1. Check for discoloration and remove the carbon. Remove the screws 1, and then remove the cover 2 2. 7DK-030 4 3 2. Spark plug inspection The spark plug is important engine components, which 1 should be a medium-to-light tan color. 5.
... the handlebar 6 into the tool 5 and turn it counterclockwise to remove the spark plug. 7DK-054 4. The porcelain insulator around the center electrode of the cover. 7DK-053 6 5 3. Check the spark plug type and gap a. Standard Spark Plug: BPR6HS (NGK) a Spark Plug Gap a: 0.6-0.7 mm (0.024-0.028...plug gap should be checked periodically. 1. Check for discoloration and remove the carbon. Remove the screws 1, and then remove the cover 2 2. 7DK-030 4 3 2. Spark plug inspection The spark plug is important engine components, which 1 should be a medium-to-light tan color. 5.
Owners Manual
Page 29
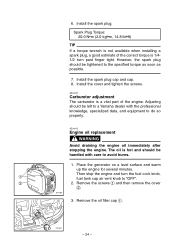
... is not available when installing a spark plug, a good estimate of the engine. Install the spark plug. Install the cover and tighten the screws. Adjusting should be left to a Yamaha dealer with care to "OFF". 2 2. AE00431 Carburetor adjustment The carburetor is hot and should be handled with the professional...41/2 turn the fuel cock knob, 1 fuel tank cap air vent knob to avoid burns. 1. Remove the screws 1 and then remove the cover 2. 7DK-030 3. Remove the oil filler cap 1. 1 7DK-031 - 24 - However, the spark plug should be tightened to do so properly. ...
... is not available when installing a spark plug, a good estimate of the engine. Install the spark plug. Install the cover and tighten the screws. Adjusting should be left to a Yamaha dealer with care to "OFF". 2 2. AE00431 Carburetor adjustment The carburetor is hot and should be handled with the professional...41/2 turn the fuel cock knob, 1 fuel tank cap air vent knob to avoid burns. 1. Remove the screws 1 and then remove the cover 2. 7DK-030 3. Remove the oil filler cap 1. 1 7DK-031 - 24 - However, the spark plug should be tightened to do so properly. ...

Owners Manual
Page 30
Install the oil filler cap. 9. NOTICE 7DK-055 Do not tilt the generator when adding engine oil. Install the cover 2 and tighten the screws 1. 1 2 7DK-030 - 25 - Recommended engine oil: åYAMALUBE 4 (10W-40), SAE 10W-30 or 10W-40 ∫SAE #30 çSAE #... to the engine. 7DK-033 q 700-006a 0°C 25°C å YAMALUBE 4 (10W-40) ∂ SAE 10W ç SAE #20 ∫ SAE #30 6. Wipe the cover clean, and wipe up any spilled oil. Replace the generator on a level surface. Tilt the generator to drain the oil completely. 5. 4.
Install the oil filler cap. 9. NOTICE 7DK-055 Do not tilt the generator when adding engine oil. Install the cover 2 and tighten the screws 1. 1 2 7DK-030 - 25 - Recommended engine oil: åYAMALUBE 4 (10W-40), SAE 10W-30 or 10W-40 ∫SAE #30 çSAE #... to the engine. 7DK-033 q 700-006a 0°C 25°C å YAMALUBE 4 (10W-40) ∂ SAE 10W ç SAE #20 ∫ SAE #30 6. Wipe the cover clean, and wipe up any spilled oil. Replace the generator on a level surface. Tilt the generator to drain the oil completely. 5. 4.

Owners Manual
Page 31
... tighten the screw. 8. This could cause it . 5. Insert the foam element into the air filter case. Install the cover and tighten the screws. - 26 - Remove the screw 1 and then remove the air filter case cover 2. 1 1 7DK-061 3. NOTICE 7DK-062 The engine should be wet but not dripping. excessive piston and cylinder.... TIP Be sure the foam element sealing surface matches the air filter so there is no air leak. Remove the screws 1, and then remove the cover 2. 7DK-030 2. Install the air filter case cover in solvent and dry it to tear. 6.
... tighten the screw. 8. This could cause it . 5. Insert the foam element into the air filter case. Install the cover and tighten the screws. - 26 - Remove the screw 1 and then remove the air filter case cover 2. 1 1 7DK-061 3. NOTICE 7DK-062 The engine should be wet but not dripping. excessive piston and cylinder.... TIP Be sure the foam element sealing surface matches the air filter so there is no air leak. Remove the screws 1, and then remove the cover 2. 7DK-030 2. Install the air filter case cover in solvent and dry it to tear. 6.

Owners Manual
Page 32
AE01075 Muffler screen and spark arrester WARNING The engine and muffler will be very hot after the engine has been run. 7DK-026 Avoid touching the engine and muffler while they are still hot with any part of the cover 2 shown. 1 1 7DK-066 2. Loosen the bolt 1 and then remove the muffler cap 2 3 2, the muffler screen 3 and spark arrester 4. 1 7DK-063 7DK-064 4 7DK-065 - 27 - Remove the screws 1, and then pull outward on the areas of your body or clothing during inspection or repair. 2 1.
AE01075 Muffler screen and spark arrester WARNING The engine and muffler will be very hot after the engine has been run. 7DK-026 Avoid touching the engine and muffler while they are still hot with any part of the cover 2 shown. 1 1 7DK-066 2. Loosen the bolt 1 and then remove the muffler cap 2 3 2, the muffler screen 3 and spark arrester 4. 1 7DK-063 7DK-064 4 7DK-065 - 27 - Remove the screws 1, and then pull outward on the areas of your body or clothing during inspection or repair. 2 1.

Owners Manual
Page 33
Remove the carbon deposits on the muffler screen and spark arrester using a wire brush. Replace them if damaged. 5. Install the cover and tighten the screws. 7DK-068 - 28 - Check the muffler screen and spark arrester. Install the spark arrester. TIP Align the spark arrester projection 1 with the hole 2 in the muffler pipe. 2 1 7DK-065a 6. NOTICE When cleaning, use the wire brush lightly to avoid 711-075 damaging or scratching of the muffler screen and spark arrester. 4. Install the muffler screen and the muffler cap. 7. 3.
Remove the carbon deposits on the muffler screen and spark arrester using a wire brush. Replace them if damaged. 5. Install the cover and tighten the screws. 7DK-068 - 28 - Check the muffler screen and spark arrester. Install the spark arrester. TIP Align the spark arrester projection 1 with the hole 2 in the muffler pipe. 2 1 7DK-065a 6. NOTICE When cleaning, use the wire brush lightly to avoid 711-075 damaging or scratching of the muffler screen and spark arrester. 4. Install the muffler screen and the muffler cap. 7. 3.

Owners Manual
Page 36
Turn the fuel cock knob to "OFF". 13. Tighten further if any screws, bolts and nuts are loose. 14. Store the generator in a dry, well-ventilated place, with the cover placed over it. - 31 - Drain the fuel from the carburetor by loosening the drain screw 3 on the carburetor float chamber. 8. 6. Install the cover and tighten the screws. 12. Turn the fuel tank cap air vent knob to "OFF". 10. Remove the screws 1, and then remove the cover 2. 1 2 7DK-030 3 7DK-071 7. Tighten the drain screw 3. 11. Turn the engine switch to "OFF". 9.
Turn the fuel cock knob to "OFF". 13. Tighten further if any screws, bolts and nuts are loose. 14. Store the generator in a dry, well-ventilated place, with the cover placed over it. - 31 - Drain the fuel from the carburetor by loosening the drain screw 3 on the carburetor float chamber. 8. 6. Install the cover and tighten the screws. 12. Turn the fuel tank cap air vent knob to "OFF". 10. Remove the screws 1, and then remove the cover 2. 1 2 7DK-030 3 7DK-071 7. Tighten the drain screw 3. 11. Turn the engine switch to "OFF". 9.
Owners Manual
Page 37
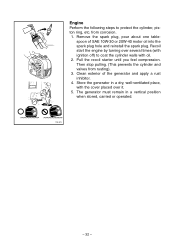
...feel compression. Recoil start the engine by turning over it. 5. Store the generator in a vertical position when stored, carried or operated. 7DK-072 - 32 - Engine Perform the following steps to coat the cylinder walls with the cover placed over several times (with ignition off) to protect the cylinder, piston ...ring, etc. Clean exterior of SAE 10W-30 or 20W-40 motor oil into the spark plug hole and reinstall the spark plug. The generator must remain in a dry, well...
...feel compression. Recoil start the engine by turning over it. 5. Store the generator in a vertical position when stored, carried or operated. 7DK-072 - 32 - Engine Perform the following steps to coat the cylinder walls with the cover placed over several times (with ignition off) to protect the cylinder, piston ...ring, etc. Clean exterior of SAE 10W-30 or 20W-40 motor oil into the spark plug hole and reinstall the spark plug. The generator must remain in a dry, well...

Owners Manual
Page 44
... may not be done by an authorized Yamaha generator dealer for advice. Mail to second owners? WARRANTY DEPARTMENT P.O. A. These terms are my responsibility during the warranty period? A. No. CUSTOMER RELATIONS DEPARTMENT P.O. Does the warranty cover incidental costs such as oil and spark ...identification, your name and new mailing address. A. A. Q. Will the warranty be void or cancelled if I perform any authorized Yamaha generator dealer within the continental United States. Since all costs of your dealer for the policy to be "voided" or "cancelled." If...
... may not be done by an authorized Yamaha generator dealer for advice. Mail to second owners? WARRANTY DEPARTMENT P.O. A. These terms are my responsibility during the warranty period? A. No. CUSTOMER RELATIONS DEPARTMENT P.O. Does the warranty cover incidental costs such as oil and spark ...identification, your name and new mailing address. A. A. Q. Will the warranty be void or cancelled if I perform any authorized Yamaha generator dealer within the continental United States. Since all costs of your dealer for the policy to be "voided" or "cancelled." If...