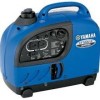
Owners Manual
Page 5
...the engine 16 Connection 17 Battery charging 18 Application range 20 PERIODIC MAINTENANCE 21 Maintenance chart 21 Spark plug inspection 23 Carburetor adjustment 24 Engine oil replacement 24 Air filter 26 Muffler screen and spark arrester ......27 Fuel tank filter 29 STORAGE ...30 Drain the fuel 30 Engine 32 TROUBLESHOOTING 33 Engine won't start 33 Generator won't produce power .........34 SPECIFICATIONS 36 Dimensions 36 Engine 36 Generator 36 CONSUMER INFORMATION 37 Identification number records 37 Machine identification 37 LIMITED WARRANTY (EF- AND ...
...the engine 16 Connection 17 Battery charging 18 Application range 20 PERIODIC MAINTENANCE 21 Maintenance chart 21 Spark plug inspection 23 Carburetor adjustment 24 Engine oil replacement 24 Air filter 26 Muffler screen and spark arrester ......27 Fuel tank filter 29 STORAGE ...30 Drain the fuel 30 Engine 32 TROUBLESHOOTING 33 Engine won't start 33 Generator won't produce power .........34 SPECIFICATIONS 36 Dimensions 36 Engine 36 Generator 36 CONSUMER INFORMATION 37 Identification number records 37 Machine identification 37 LIMITED WARRANTY (EF- AND ...

Owners Manual
Page 6
... flame. 9 Take care not to get in your eye(s), see your clothes. 9 When operating or transporting the machine, be sure it may leak from the carburetor or fuel tank. 7DK-004 AE00843 ENGINE AND MUFFLER MAY BE HOT 9 Place the machine in a place where pedestrians or children are not likely to...
... flame. 9 Take care not to get in your eye(s), see your clothes. 9 When operating or transporting the machine, be sure it may leak from the carburetor or fuel tank. 7DK-004 AE00843 ENGINE AND MUFFLER MAY BE HOT 9 Place the machine in a place where pedestrians or children are not likely to...
Owners Manual
Page 15
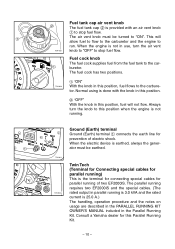
... the generator must be earthed. 7DK-011 7DK-042a Twin Tech (Terminal for Connecting special cables for parallel running . The air vent knob must be turned to the carburetor. Always turn the air vent knob to "OFF" to the carburetor. This will not flow. Consult a Yamaha dealer for... an air vent knob 1 to run. Ground (Earth) terminal Ground (Earth) terminal 1 connects the earth line for prevention of two EF2000iS. The parallel running requires two EF2000iS and the special cables. (The rated output in parallel running of electric shock. 1 2 1 2 7DK-023 1 7DK-024 Fuel ...
... the generator must be earthed. 7DK-011 7DK-042a Twin Tech (Terminal for Connecting special cables for parallel running . The air vent knob must be turned to the carburetor. Always turn the air vent knob to "OFF" to the carburetor. This will not flow. Consult a Yamaha dealer for... an air vent knob 1 to run. Ground (Earth) terminal Ground (Earth) terminal 1 connects the earth line for prevention of two EF2000iS. The parallel running requires two EF2000iS and the special cables. (The rated output in parallel running of electric shock. 1 2 1 2 7DK-023 1 7DK-024 Fuel ...
Owners Manual
Page 29
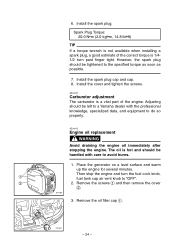
... wrench is not available when installing a spark plug, a good estimate of the correct torque is a vital part of the engine. AE00431 Carburetor adjustment The carburetor is 1/41/2 turn the fuel cock knob, 1 fuel tank cap air vent knob to avoid burns. 1. Then stop the engine and turn...Avoid draining the engine oil immediately after stopping the engine. Adjusting should be left to a Yamaha dealer with care to "OFF". 2 2. Remove the oil filler cap 1. 1 7DK-031 - 24 - Place the generator on a level surface and warm up the engine for several minutes. Install the spark plug...
... wrench is not available when installing a spark plug, a good estimate of the correct torque is a vital part of the engine. AE00431 Carburetor adjustment The carburetor is 1/41/2 turn the fuel cock knob, 1 fuel tank cap air vent knob to avoid burns. 1. Then stop the engine and turn...Avoid draining the engine oil immediately after stopping the engine. Adjusting should be left to a Yamaha dealer with care to "OFF". 2 2. Remove the oil filler cap 1. 1 7DK-031 - 24 - Place the generator on a level surface and warm up the engine for several minutes. Install the spark plug...

Owners Manual
Page 36
Turn the fuel tank cap air vent knob to "OFF". 9. Tighten further if any screws, bolts and nuts are loose. 14. 6. Store the generator in a dry, well-ventilated place, with the cover placed over it. - 31 - Turn the engine switch to "OFF". 13. Turn the fuel cock knob to "OFF". 10. Drain the fuel from the carburetor by loosening the drain screw 3 on the carburetor float chamber. 8. Remove the screws 1, and then remove the cover 2. 1 2 7DK-030 3 7DK-071 7. Install the cover and tighten the screws. 12. Tighten the drain screw 3. 11.
Turn the fuel tank cap air vent knob to "OFF". 9. Tighten further if any screws, bolts and nuts are loose. 14. 6. Store the generator in a dry, well-ventilated place, with the cover placed over it. - 31 - Turn the engine switch to "OFF". 13. Turn the fuel cock knob to "OFF". 10. Drain the fuel from the carburetor by loosening the drain screw 3 on the carburetor float chamber. 8. Remove the screws 1, and then remove the cover 2. 1 2 7DK-030 3 7DK-071 7. Install the cover and tighten the screws. 12. Tighten the drain screw 3. 11.

Owners Manual
Page 38
AE00512 TROUBLESHOOTING Engine won't start 1. Fuel tank cap air vent knob and fuel cock knob to combustion chamber. 7DK-091 2 No fuel in tank .... Engine oil system Insufficient 2 Oil level is low .... Clean carburetor. 1 7DK-035 1 7DK-038 2. Fuel systems No fuel supplied to "ON" 1. 2 Clogged fuel line .... Supply fuel. 2 Fuel in tank .... Clean fuel line. 2 Clogged carburetor .... Add engine oil. 700-006 - 33 -
AE00512 TROUBLESHOOTING Engine won't start 1. Fuel tank cap air vent knob and fuel cock knob to combustion chamber. 7DK-091 2 No fuel in tank .... Engine oil system Insufficient 2 Oil level is low .... Clean carburetor. 1 7DK-035 1 7DK-038 2. Fuel systems No fuel supplied to "ON" 1. 2 Clogged fuel line .... Supply fuel. 2 Fuel in tank .... Clean fuel line. 2 Clogged carburetor .... Add engine oil. 700-006 - 33 -

Owners Manual
Page 40
...element clogging. M OK Clean the spark plug. R Consult a Yamaha dealer. - 35 - F OK Consult a Yamaha dealer. w 9 To prevent FIRE HAZARDS be sure to "ON", then pull the recoil starter and check if the oil warining light flickers. Consult a Yamaha dealer. AE00515 A ENGINE DOES NOT START B Turn the engine ...switch to place the spark plug as far way as possible from the spark plug hole and carburetor area. 9 To prevent ELECTRIC SHOCK do not hold...
...element clogging. M OK Clean the spark plug. R Consult a Yamaha dealer. - 35 - F OK Consult a Yamaha dealer. w 9 To prevent FIRE HAZARDS be sure to "ON", then pull the recoil starter and check if the oil warining light flickers. Consult a Yamaha dealer. AE00515 A ENGINE DOES NOT START B Turn the engine ...switch to place the spark plug as far way as possible from the spark plug hole and carburetor area. 9 To prevent ELECTRIC SHOCK do not hold...

Owners Manual
Page 45
ASSY., LH. & JT CARB (Carburetor) CARBURETOR2 9 T.C.I. EPA REGULATIONS FOR NEW NONROAD SPARK-IGNITION NONHANDHELD ENGINES and the CALIFORNIA REGULATIONS FOR 1995 AND LATER SMALL OFFROAD ENGINES. The acronyms ... of the SAE's recommended practice document J1930, "Diagnostic Acronyms, Terms, and Definitions For Electrical/Electronic System". It is recommended that these items be serviced by a Yamaha dealer. - 40 - MAGNETO ASSY EI (Electronic Ignition) PLUG, SPARK 9 CRANKCASE1 & HEAD PCV (Positive Crankcase CYLINDER1 Ventilation) 9 AIR FILTER ASSY ACL (Air Cleaner) 9 MUFF., 2, CAP...
ASSY., LH. & JT CARB (Carburetor) CARBURETOR2 9 T.C.I. EPA REGULATIONS FOR NEW NONROAD SPARK-IGNITION NONHANDHELD ENGINES and the CALIFORNIA REGULATIONS FOR 1995 AND LATER SMALL OFFROAD ENGINES. The acronyms ... of the SAE's recommended practice document J1930, "Diagnostic Acronyms, Terms, and Definitions For Electrical/Electronic System". It is recommended that these items be serviced by a Yamaha dealer. - 40 - MAGNETO ASSY EI (Electronic Ignition) PLUG, SPARK 9 CRANKCASE1 & HEAD PCV (Positive Crankcase CYLINDER1 Ventilation) 9 AIR FILTER ASSY ACL (Air Cleaner) 9 MUFF., 2, CAP...
