
EAD10 Owners Manual
Page 10
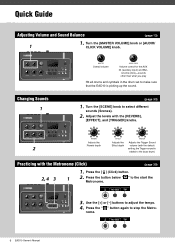
...than what you play Hit all drums and cymbals in the drum set to make sure that the EAD10 is added to the bass drum) Practicing with the [REVERB], [EFFECT], and [TRIGGER] knobs. nome. 6 EAD10 Owner's Manual Turn the [SCENE] knob to stop the Metro- Press the " " button ... AUX IN (auxiliary input) and Met- Press the [ ] (Click) button. 1 2. Adjusts the Adjusts the Adjusts the Trigger Sound Reverb depth Effect depth volume (with the default 2 setting, the Trigger sound is picking up the sound. (page 33) 1. Use the [+] or [-] buttons to the start the Metronome. 3. ...
...than what you play Hit all drums and cymbals in the drum set to make sure that the EAD10 is added to the bass drum) Practicing with the [REVERB], [EFFECT], and [TRIGGER] knobs. nome. 6 EAD10 Owner's Manual Turn the [SCENE] knob to stop the Metro- Press the " " button ... AUX IN (auxiliary input) and Met- Press the [ ] (Click) button. 1 2. Adjusts the Adjusts the Adjusts the Trigger Sound Reverb depth Effect depth volume (with the default 2 setting, the Trigger sound is picking up the sound. (page 33) 1. Use the [+] or [-] buttons to the start the Metronome. 3. ...
EAD10 Owners Manual
Page 12
...'s Manual PRECAUTIONS 2 Quick Guide 6 Included Accessories 9 Features of the EAD10 10 How the EAD10 makes sound 11 About the Manuals 12 Printed Manual 12 Digital Manual (PDF 12 Panel Controls and Functions 13 Main Unit 13 Sensor Unit 15 About the Trigger Input Jacks 16 Setup Guide 17 Setting Up 17 Connect with...
...'s Manual PRECAUTIONS 2 Quick Guide 6 Included Accessories 9 Features of the EAD10 10 How the EAD10 makes sound 11 About the Manuals 12 Printed Manual 12 Digital Manual (PDF 12 Panel Controls and Functions 13 Main Unit 13 Sensor Unit 15 About the Trigger Input Jacks 16 Setup Guide 17 Setting Up 17 Connect with...
EAD10 Owners Manual
Page 14
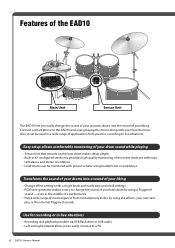
... possible via USB flash drive or USB audio • Left and right outputs allow you to easily connect to a PA 10 EAD10 Owner's Manual ples or the internal Triggered sounds Use for recording or in XY configured stereo mic provides high quality monitoring of the entire drum set with your favorite...while playing • Sensor Unit that mounts on the bass drum makes setup simple • Built-in -live situations. Features of the EAD10 Main Unit Sensor Unit The EAD10 lets you easily change the sound of your bass drum by using the effects, your liking. even in a wide range of your ...
... possible via USB flash drive or USB audio • Left and right outputs allow you to easily connect to a PA 10 EAD10 Owner's Manual ples or the internal Triggered sounds Use for recording or in XY configured stereo mic provides high quality monitoring of the entire drum set with your favorite...while playing • Sensor Unit that mounts on the bass drum makes setup simple • Built-in -live situations. Features of the EAD10 Main Unit Sensor Unit The EAD10 lets you easily change the sound of your bass drum by using the effects, your liking. even in a wide range of your ...
EAD10 Owners Manual
Page 15
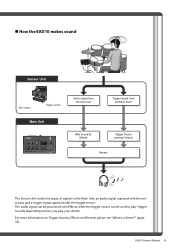
... 11 The audio signal can be processed with the trigger sensor. an audio signal captured with the mic sensor, and a trigger signal captured with Effects, while the trigger sensor can be used to the Main Unit; How the EAD10 makes sound Sensor Unit Mic sensor Trigger sensor Main Unit Audio signal from the drum...
... 11 The audio signal can be processed with the trigger sensor. an audio signal captured with the mic sensor, and a trigger signal captured with Effects, while the trigger sensor can be used to the Main Unit; How the EAD10 makes sound Sensor Unit Mic sensor Trigger sensor Main Unit Audio signal from the drum...
EAD10 Owners Manual
Page 17
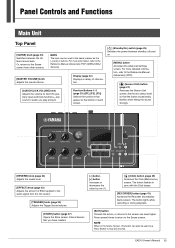
... AUX IN (auxiliary input) and Click functions-any sounds. Or, returns to the Scene screen. EAD10 Owner's Manual 13 Press several times to return to the Scene screen from the mic sensor. [TRIGGER] knob (page 33) Adjusts the Trigger Sound volume. [STORE] button (page 37) Opens the Store screen. Panel Controls and Functions...
... AUX IN (auxiliary input) and Click functions-any sounds. Or, returns to the Scene screen. EAD10 Owner's Manual 13 Press several times to return to the Scene screen from the mic sensor. [TRIGGER] knob (page 33) Adjusts the Trigger Sound volume. [STORE] button (page 37) Opens the Store screen. Panel Controls and Functions...
EAD10 Owners Manual
Page 18
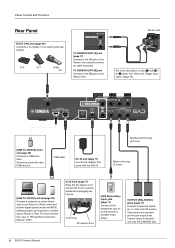
TO SENSOR UNIT [A] jack (page 17) Connect to the [A] jack on the Sensor Unit. Cannot be used with the EAD10. Additional parts are standard phone type output jacks. Standard phone plug (6.3 mm) Stereo mini plug (3.5 mm) [USB TO HOST] terminal (page 25)...connector cable (included). TO SENSOR UNIT [B] jack Connect to prevent accidental unplugging during use only the [L/MONO] jack. 14 EAD10 Owner's Manual For more information, refer to [y] jacks, see "About the Trigger Input Jacks" (page 16). [USB TO DEVICE] terminal (page 30) Connects a USB flash drive. For more information ...
TO SENSOR UNIT [A] jack (page 17) Connect to the [A] jack on the Sensor Unit. Cannot be used with the EAD10. Additional parts are standard phone type output jacks. Standard phone plug (6.3 mm) Stereo mini plug (3.5 mm) [USB TO HOST] terminal (page 25)...connector cable (included). TO SENSOR UNIT [B] jack Connect to prevent accidental unplugging during use only the [L/MONO] jack. 14 EAD10 Owner's Manual For more information, refer to [y] jacks, see "About the Trigger Input Jacks" (page 16). [USB TO DEVICE] terminal (page 30) Connects a USB flash drive. For more information ...

EAD10 Owners Manual
Page 19
...screw (page 17) Secures the Sensor Unit to the bass drum hoop. [A] jack Connect to connect headphones or earphones with the drumsticks. EAD10 Owner's Manual 15 Front Panel Panel Controls and Functions Standard stereo phone plug (6.3 mm) [PHONES] jack Connects headphones. CAUTION Do not ...so can damage the mic sensor resulting in inferior performance. Mic Sensor Captures the whole drum set's acoustic sound converting it into a trigger signal. Trigger sensor Converts vibrations produced when the bass drum is a standard stereo phone plug (6.3 mm). Sensor Unit NOTICE Do not hit the...
...screw (page 17) Secures the Sensor Unit to the bass drum hoop. [A] jack Connect to connect headphones or earphones with the drumsticks. EAD10 Owner's Manual 15 Front Panel Panel Controls and Functions Standard stereo phone plug (6.3 mm) [PHONES] jack Connects headphones. CAUTION Do not ...so can damage the mic sensor resulting in inferior performance. Mic Sensor Captures the whole drum set's acoustic sound converting it into a trigger signal. Trigger sensor Converts vibrations produced when the bass drum is a standard stereo phone plug (6.3 mm). Sensor Unit NOTICE Do not hit the...
EAD10 Owners Manual
Page 20
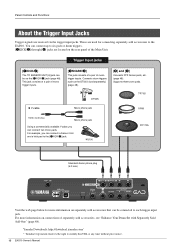
... to the EAD10. For example, you can connect up to the [qKICK/w] jack. Panel Controls and Functions About the Trigger Input Jacks Trigger signals are located on the rear panel of mono trigger inputs. This jack consists of a pair of mono trigger inputs. ...[eSNARE/r] This jack consists of a pair of the Main Unit. You can connect two mono pads. Supports three-zone pads. Yamaha Downloads: http://download.yamaha.com/ * Yamaha Corporation reserves the right to modify this URL at any time without prior notice. 16 EAD10...
... to the EAD10. For example, you can connect up to the [qKICK/w] jack. Panel Controls and Functions About the Trigger Input Jacks Trigger signals are located on the rear panel of mono trigger inputs. This jack consists of a pair of mono trigger inputs. ...[eSNARE/r] This jack consists of a pair of the Main Unit. You can connect two mono pads. Supports three-zone pads. Yamaha Downloads: http://download.yamaha.com/ * Yamaha Corporation reserves the right to modify this URL at any time without prior notice. 16 EAD10...
EAD10 Owners Manual
Page 31
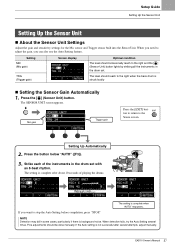
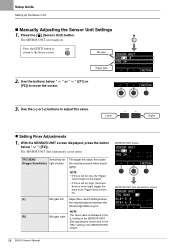
...when "AUTO" reappears. If the Auto setting is not successful after about 10 seconds of the instruments in the drum set . EAD10 Owner's Manual 27 TRG (Trigger gain) The level should reach to stop the Auto Setting before completion, press "STOP." Fine adjustments should occasionally reach to the ...lights by striking all the instruments in some cases, particularly if there is complete after several times. The SENSOR UNIT screen appears. Mic gain Trigger gain Press the [EXIT] button to return to adjust the gain, you need to the Scene screen. Setup Guide Setting Up the Sensor...
...when "AUTO" reappears. If the Auto setting is not successful after about 10 seconds of the instruments in the drum set . EAD10 Owner's Manual 27 TRG (Trigger gain) The level should reach to stop the Auto Setting before completion, press "STOP." Fine adjustments should occasionally reach to the ...lights by striking all the instruments in some cases, particularly if there is complete after several times. The SENSOR UNIT screen appears. Mic gain Trigger gain Press the [EXIT] button to return to adjust the gain, you need to the Scene screen. Setup Guide Setting Up the Sensor...
EAD10 Owners Manual
Page 32
... 2. SENSOR UNIT screen TRG SENS Sensitivity for (Trigger Sensitivity) light strokes The larger the value, the louder the sound produced when struck ...not be played. • If this is set too high, the snare drum or toms might trigger the bass drum Trigger Sound when hit. [L] Mic gain left Adjust the L and R settings when the volume balance... screen. Press the [EXIT] button to return to the Scene screen. SENSOR UNIT (fine adjustment) screen 28 EAD10 Owner's Manual The SENSOR UNIT (fine adjustment) screen opens. Setup Guide Setting Up the Sensor Unit Manually Adjusting ...
... 2. SENSOR UNIT screen TRG SENS Sensitivity for (Trigger Sensitivity) light strokes The larger the value, the louder the sound produced when struck ...not be played. • If this is set too high, the snare drum or toms might trigger the bass drum Trigger Sound when hit. [L] Mic gain left Adjust the L and R settings when the volume balance... screen. Press the [EXIT] button to return to the Scene screen. SENSOR UNIT (fine adjustment) screen 28 EAD10 Owner's Manual The SENSOR UNIT (fine adjustment) screen opens. Setup Guide Setting Up the Sensor Unit Manually Adjusting ...
EAD10 Owners Manual
Page 36
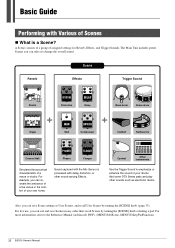
...live use, you can select to change the overall sound. Cymbal Other instruments Use the Trigger Sound to the Reference Manual (Advanced) (PDF). (MENU/Job/Scene, MENU/Utility/PadFunction) 32 EAD10 Owner's Manual The Main Unit includes preset Scenes you can sort and save Scene settings as... by turning the [SCENE] knob. (page 35) For live venue in the comfort of your own home. Scene Reverb Effects Trigger Sound Studio DISTORTION Distortion DELAY Delay Bass drum Snare drum Stage WAH Wah COMPRESSOR Compressor Cowbell Tambourine Concert Hall PHASER Phaser FLANGER Flanger...
...live use, you can select to change the overall sound. Cymbal Other instruments Use the Trigger Sound to the Reference Manual (Advanced) (PDF). (MENU/Job/Scene, MENU/Utility/PadFunction) 32 EAD10 Owner's Manual The Main Unit includes preset Scenes you can sort and save Scene settings as... by turning the [SCENE] knob. (page 35) For live venue in the comfort of your own home. Scene Reverb Effects Trigger Sound Studio DISTORTION Distortion DELAY Delay Bass drum Snare drum Stage WAH Wah COMPRESSOR Compressor Cowbell Tambourine Concert Hall PHASER Phaser FLANGER Flanger...
EAD10 Owners Manual
Page 37
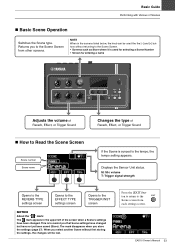
...; Screens such as Store where it is used for selecting a Scene Number • Screen for entering a name Adjusts the volume of Reverb, Effect, or Trigger Sound Changes the type of Reverb, Effect, or Trigger Sound How to Read the Scene Screen Scene number Scene name If the Scene is to the... Scene type. Press the [EXIT] button to return to the tempo, the tempo setting appears. This is synced to the Scene screen from other screens. EAD10 Owner's Manual 33 Basic Guide Performing with Various of the screen when a Scene's settings have been changed but have changed .
...; Screens such as Store where it is used for selecting a Scene Number • Screen for entering a name Adjusts the volume of Reverb, Effect, or Trigger Sound Changes the type of Reverb, Effect, or Trigger Sound How to Read the Scene Screen Scene number Scene name If the Scene is to the... Scene type. Press the [EXIT] button to return to the tempo, the tempo setting appears. This is synced to the Scene screen from other screens. EAD10 Owner's Manual 33 Basic Guide Performing with Various of the screen when a Scene's settings have been changed but have changed .
EAD10 Owners Manual
Page 38
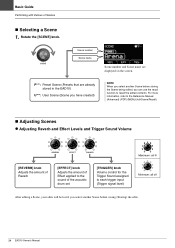
...to the Reference Manual (Advanced) (PDF) (MENU/Job/Scene/Recall). Adjusting Scenes Adjusting Reverb and Effect Levels and Trigger Sound Volume Maximum: all lit [REVERB] knob Adjusts the amount of Reverb [EFFECT] knob Adjusts the amount of Effect applied to recall the... you select another Scene before saving (Storing) the edits. 34 EAD10 Owner's Manual Basic Guide Performing with Various of the acoustic drum set [TRIGGER] knob Volume control for the Trigger Sound assigned to each trigger input (Trigger signal level) Minimum: all off After editing a Scene, your edits...
...to the Reference Manual (Advanced) (PDF) (MENU/Job/Scene/Recall). Adjusting Scenes Adjusting Reverb and Effect Levels and Trigger Sound Volume Maximum: all lit [REVERB] knob Adjusts the amount of Reverb [EFFECT] knob Adjusts the amount of Effect applied to recall the... you select another Scene before saving (Storing) the edits. 34 EAD10 Owner's Manual Basic Guide Performing with Various of the acoustic drum set [TRIGGER] knob Volume control for the Trigger Sound assigned to each trigger input (Trigger signal level) Minimum: all off After editing a Scene, your edits...
EAD10 Owners Manual
Page 39
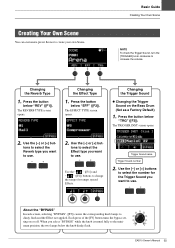
... a Factory Default) 1. Press the button below "TRG" ([F3]). Press the button below "REV" ([F1]). EAD10 Owner's Manual 35 tons to select the Reverb type you select "BYPASS" while the knob is turned fully to use. 2. Trigger Sound name Trigger Sound number 2. When you want to the minimum position, the two lamps below "EFF... the number for tempo synced Effects. Press the button below the knob dimly flash. tons to select the Effect type you want to use . The TRIGGER INST screen opens. 2. Basic Guide Creating Your Own Scene NOTE To check the...
... a Factory Default) 1. Press the button below "TRG" ([F3]). Press the button below "REV" ([F1]). EAD10 Owner's Manual 35 tons to select the Reverb type you select "BYPASS" while the knob is turned fully to use. 2. Trigger Sound name Trigger Sound number 2. When you want to the minimum position, the two lamps below "EFF... the number for tempo synced Effects. Press the button below the knob dimly flash. tons to select the Effect type you want to use . The TRIGGER INST screen opens. 2. Basic Guide Creating Your Own Scene NOTE To check the...
EAD10 Owners Manual
Page 40
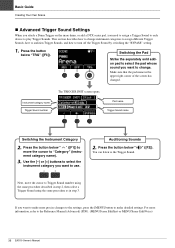
...want to make more information, refer to the Reference Manual (Advanced) (PDF). (MENU/Scene Edit/Inst or MENU/Scene Edit/Voice) 36 EAD10 Owner's Manual Pad name Trigger Sound name Switching the Instrument Category 2. " ([F2]). Press the button below "TRG" ([F3]). Press the button below " " ([F1])... to the settings, press the [MENU] button to make detailed settings. Basic Guide Creating Your Own Scene Advanced Trigger Sound Settings When you attach a Drum Trigger on the snare drum, or add a DTX series pad, you want to use. This section describes how to "Category"...
...want to make more information, refer to the Reference Manual (Advanced) (PDF). (MENU/Scene Edit/Inst or MENU/Scene Edit/Voice) 36 EAD10 Owner's Manual Pad name Trigger Sound name Switching the Instrument Category 2. " ([F2]). Press the button below "TRG" ([F3]). Press the button below " " ([F1])... to the settings, press the [MENU] button to make detailed settings. Basic Guide Creating Your Own Scene Advanced Trigger Sound Settings When you attach a Drum Trigger on the snare drum, or add a DTX series pad, you want to use. This section describes how to "Category"...
EAD10 Owners Manual
Page 41
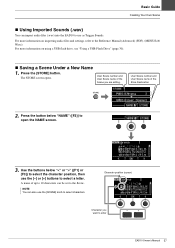
Character position (cursor) Character you are editing. The STORE screen opens. User Scene number and User Scene name of the Scene you want to enter EAD10 Owner's Manual 37 Use the buttons below "NAME" ([F2)] to the Reference Manual (Advanced) (PDF). (MENU/Job/ Wave) For more information on importing ... to open the NAME screen. 3. Press the [STORE] button. Press the button below "" ([F1] or [F3]) to select the character position, then use as Trigger Sounds. NOTE You can be set to the Scene. User Scene number and User Scene name of up to 10 characters can also use the...
Character position (cursor) Character you are editing. The STORE screen opens. User Scene number and User Scene name of the Scene you want to enter EAD10 Owner's Manual 37 Use the buttons below "NAME" ([F2)] to the Reference Manual (Advanced) (PDF). (MENU/Job/ Wave) For more information on importing ... to open the NAME screen. 3. Press the [STORE] button. Press the button below "" ([F1] or [F3]) to select the character position, then use as Trigger Sounds. NOTE You can be set to the Scene. User Scene number and User Scene name of up to 10 characters can also use the...

EAD10 Owners Manual
Page 43
...The VOLUME/BEAT screen opens. Press the button below " " ([F1]) to stop the Click. Slower Faster Press the [EXIT] button to return to the Trigger Input jacks. Press the button below "TAP" ([F3]). Setting Click Beat Volumes and Types of sound, etc. 1. The TAP screen opens. 3. Tap the...at the desired tempo to set the tempo by Tapping the Button (Tap Tempo) Tap the button at least 3 times. (continued to stop the Click. EAD10 Owner's Manual 39 Press the [ ] (Click) button. Press the button below "VOL/BEAT" ([F2]). Basic Guide Using the Click (Metronome) Using ...
...The VOLUME/BEAT screen opens. Press the button below " " ([F1]) to stop the Click. Slower Faster Press the [EXIT] button to return to the Trigger Input jacks. Press the button below "TAP" ([F3]). Setting Click Beat Volumes and Types of sound, etc. 1. The TAP screen opens. 3. Tap the...at the desired tempo to set the tempo by Tapping the Button (Tap Tempo) Tap the button at least 3 times. (continued to stop the Click. EAD10 Owner's Manual 39 Press the [ ] (Click) button. Press the button below "VOL/BEAT" ([F2]). Basic Guide Using the Click (Metronome) Using ...
EAD10 Owners Manual
Page 52
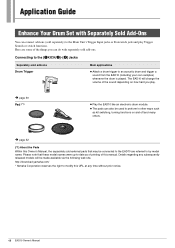
... following web site. Please note that these model names were up-to an acoustic drum and trigger a sound from the EAD10 (including your own samples) whenever the drum is played. The EAD10 will be connected to modify this manual. Application Guide Enhance Your Drum Set with separately sold ...add-ons. http://download.yamaha.com/ * Yamaha Corporation reserves the right to the EAD10 are some of the sound depending on how hard you can do with Separately Sold Add-Ons You can also...
... following web site. Please note that these model names were up-to an acoustic drum and trigger a sound from the EAD10 (including your own samples) whenever the drum is played. The EAD10 will be connected to modify this manual. Application Guide Enhance Your Drum Set with separately sold ...add-ons. http://download.yamaha.com/ * Yamaha Corporation reserves the right to the EAD10 are some of the sound depending on how hard you can do with Separately Sold Add-Ons You can also...
EAD10 Owners Manual
Page 53
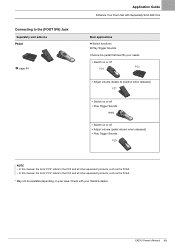
... and all other equivalent products, such as the FC4A. * May not be available depending on your Yamaha dealer. EAD10 Owner's Manual 49 Check with Separately Sold Add-Ons Main applications Switch functions Play Trigger Sounds Choose the pedal that best fits your needs. • Switch on or off FC5 FC4 •...
... and all other equivalent products, such as the FC4A. * May not be available depending on your Yamaha dealer. EAD10 Owner's Manual 49 Check with Separately Sold Add-Ons Main applications Switch functions Play Trigger Sounds Choose the pedal that best fits your needs. • Switch on or off FC5 FC4 •...
EAD10 Owners Manual
Page 54
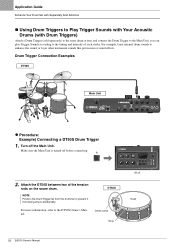
... sure the Main Unit is turned off the Main Unit. Drum Trigger Connection Examples DT50S Main Unit Procedure: Example) Connecting a DT50S Drum Trigger 1. For more information, refer to the DT50S Owner's Manual. DT50S Clamp screw Hoop All off Head 50 EAD10 Owner's Manual Attach the DT50S between two of each stroke. Application...
... sure the Main Unit is turned off the Main Unit. Drum Trigger Connection Examples DT50S Main Unit Procedure: Example) Connecting a DT50S Drum Trigger 1. For more information, refer to the DT50S Owner's Manual. DT50S Clamp screw Hoop All off Head 50 EAD10 Owner's Manual Attach the DT50S between two of each stroke. Application...


