

Owner's Manual
Page 2
... the point where they exit from being walked on or pinched particularly at least 10 cm above, behind and on both sides of the DVR-S150. 16 Do not place the following objects on the rear or the bottom of electric shock to the unit, and/or you to the presence...
... the point where they exit from being walked on or pinched particularly at least 10 cm above, behind and on both sides of the DVR-S150. 16 Do not place the following objects on the rear or the bottom of electric shock to the unit, and/or you to the presence...
Owner's Manual
Page 3
... its subsidiaries. Since hearing damage from excessive volume levels. Follow all installations. We Want You Listening For A Lifetime YAMAHA and the Electronic Industries Association's Consumer Electronics Group want you can be used according to the instructions found in FCC Regulations... In the case of the following measures: Relocate either this manual, meets FCC requirements. Modifications not expressly approved by Yamaha may cause interference harmful to get the most importantly, without annoying blaring or distortion - Compliance with the requirements listed ...
... its subsidiaries. Since hearing damage from excessive volume levels. Follow all installations. We Want You Listening For A Lifetime YAMAHA and the Electronic Industries Association's Consumer Electronics Group want you can be used according to the instructions found in FCC Regulations... In the case of the following measures: Relocate either this manual, meets FCC requirements. Modifications not expressly approved by Yamaha may cause interference harmful to get the most importantly, without annoying blaring or distortion - Compliance with the requirements listed ...
Owner's Manual
Page 4
...- Using this unit to sudden temperature changes from the AC power source as long as a plug with the letter N or coloured BLACK. YAMAHA will form when the surrounding temperature changes suddenly. FOR CANADIAN CUSTOMERS To prevent electric shock, match wide blade of the disc tray and other ...the coloured markings identifying the terminals in a safe place for any reasons. 15 When not planning to consume a very small quantity of DVR-S150 - in an environment with this appliance, it is connected to the wall outlet, even if this unit itself is plugged to hot, and...
...- Using this unit to sudden temperature changes from the AC power source as long as a plug with the letter N or coloured BLACK. YAMAHA will form when the surrounding temperature changes suddenly. FOR CANADIAN CUSTOMERS To prevent electric shock, match wide blade of the disc tray and other ...the coloured markings identifying the terminals in a safe place for any reasons. 15 When not planning to consume a very small quantity of DVR-S150 - in an environment with this appliance, it is connected to the wall outlet, even if this unit itself is plugged to hot, and...
Owner's Manual
Page 5
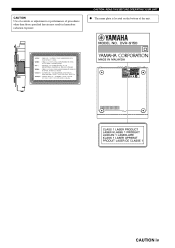
CAUTION: READ THIS BEFORE OPERATING YOUR UNIT. ¶ The name plate is located on the bottom of procedures other than those specified herein may result in hazardous radiation exposure. CAUTION iv CAUTION Use of controls or adjustments or performance of the unit.
CAUTION: READ THIS BEFORE OPERATING YOUR UNIT. ¶ The name plate is located on the bottom of procedures other than those specified herein may result in hazardous radiation exposure. CAUTION iv CAUTION Use of controls or adjustments or performance of the unit.
Owner's Manual
Page 6
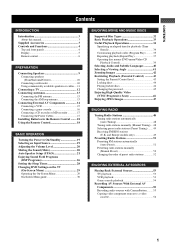
CONTENTS Contents INTRODUCTION Introduction 3 About this manual 3 Supplied Accessories 3 Controls and Functions 4 Top and front panels 4 Display 5 Remote control 6 PREPARATION Connecting Speakers 9 Connecting speakers (Front/Surround/Center 10 Connecting a subwoofer 10 Using commercially available speakers or cables ... 11 Connecting a TV 12 Connecting Antennas 13 Connecting the FM antenna 13 Connecting the AM loop antenna 13 Connecting External AV Components 14 Connecting a VCR 15 Connecting a game console 16 Connecting a CD recorder or MD recorder 17 Connecting the ...
CONTENTS Contents INTRODUCTION Introduction 3 About this manual 3 Supplied Accessories 3 Controls and Functions 4 Top and front panels 4 Display 5 Remote control 6 PREPARATION Connecting Speakers 9 Connecting speakers (Front/Surround/Center 10 Connecting a subwoofer 10 Using commercially available speakers or cables ... 11 Connecting a TV 12 Connecting Antennas 13 Connecting the FM antenna 13 Connecting the AM loop antenna 13 Connecting External AV Components 14 Connecting a VCR 15 Connecting a game console 16 Connecting a CD recorder or MD recorder 17 Connecting the ...
Owner's Manual
Page 7
Contents SOUND OPTIONS Enjoying Sound with Specific Speakers 57 Enjoying 6.1/5.1ch sources with all speakers including a virtual speaker (Matrix 6.1 57 Enjoying 2ch sources with all speakers (Dolby Pro Logic II 58 Enjoying DSP programs with the front speakers only (Virtual CINEMA DSP 59 Enjoying DSP Programs in a Variety of Ways 60 Listening with headphones ("SILENT CINEMA 60 Listening at low volume (Night Listening 61 Enjoying High-Quality Sound 62 Enjoying original Dolby and DTS sounds 62 Enjoying original 2ch sound (Stereo 63 ADVANCED CONFIGURATION Adjusting the Speaker Balance ...
Contents SOUND OPTIONS Enjoying Sound with Specific Speakers 57 Enjoying 6.1/5.1ch sources with all speakers including a virtual speaker (Matrix 6.1 57 Enjoying 2ch sources with all speakers (Dolby Pro Logic II 58 Enjoying DSP programs with the front speakers only (Virtual CINEMA DSP 59 Enjoying DSP Programs in a Variety of Ways 60 Listening with headphones ("SILENT CINEMA 60 Listening at low volume (Night Listening 61 Enjoying High-Quality Sound 62 Enjoying original Dolby and DTS sounds 62 Enjoying original 2ch sound (Stereo 63 ADVANCED CONFIGURATION Adjusting the Speaker Balance ...
Owner's Manual
Page 8
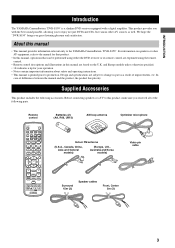
...control are subject to change in this product, make sure you great listening pleasure and satisfaction. We hope the "DVR-S150" brings you received all of differences between the manual and the product, the product has priority. In case of the... this manual • This manual provides information relevant only to the YAMAHA CinemaStation "DVR-S150". Supplied Accessories This product includes the following parts. For information on the U.K. INTRODUCTION Introduction The YAMAHA CinemaStation "DVR-S150" is a slimline DVD receiver equipped with the best sound possible, ...
...control are subject to change in this product, make sure you great listening pleasure and satisfaction. We hope the "DVR-S150" brings you received all of differences between the manual and the product, the product has priority. In case of the... this manual • This manual provides information relevant only to the YAMAHA CinemaStation "DVR-S150". Supplied Accessories This product includes the following parts. For information on the U.K. INTRODUCTION Introduction The YAMAHA CinemaStation "DVR-S150" is a slimline DVD receiver equipped with the best sound possible, ...

Owner's Manual
Page 9
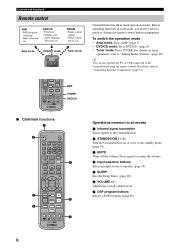
CONTROLS AND FUNCTIONS Controls and Functions Top and front panels Buttons indicated with an asterisk (*) perform different functions depending on the selected mode of operation. 1 2 3 4 56 7 8 9 0 A BC D E 1 STANDBY/ON Turn this unit on. Press to set the unit in the selected DSP program group. Press and hold to fast forward or fast reverse. (Tuner mode) Selects a preset number or adjusts the frequency. (page 51) 5 (A/B/C/D/E) (DVD/CD mode) Stops disc playback. (Tuner mode) Selects a preset group. (page 52) 6 (PRESET/BAND) (DVD/CD mode) Pauses disc playback. (Tuner mode) Switches between...
CONTROLS AND FUNCTIONS Controls and Functions Top and front panels Buttons indicated with an asterisk (*) perform different functions depending on the selected mode of operation. 1 2 3 4 56 7 8 9 0 A BC D E 1 STANDBY/ON Turn this unit on. Press to set the unit in the selected DSP program group. Press and hold to fast forward or fast reverse. (Tuner mode) Selects a preset number or adjusts the frequency. (page 51) 5 (A/B/C/D/E) (DVD/CD mode) Stops disc playback. (Tuner mode) Selects a preset group. (page 52) 6 (PRESET/BAND) (DVD/CD mode) Pauses disc playback. (Tuner mode) Switches between...

Owner's Manual
Page 10
H MEMORY Blinks when presetting an FM/AM radio station. ■ U.K. E Display mode indicator Displays the indicator for the disc. C Pause icon Lights up when disc playback is activated. (page 50) 5 F GH I RDS indicators Light up when receiving an RDS signal. D PCM Lights up when receiving an FM/AM broadcast. G TUNED Lights up when playing PCM signals such as a title, chapter or track number, or elapsed playing time. F Display Displays various information such as CDs. and Europe models only) B Playback icon Lights up during disc playback. "PTY HOLD" ...
H MEMORY Blinks when presetting an FM/AM radio station. ■ U.K. E Display mode indicator Displays the indicator for the disc. C Pause icon Lights up when disc playback is activated. (page 50) 5 F GH I RDS indicators Light up when receiving an RDS signal. D PCM Lights up when receiving an FM/AM broadcast. G TUNED Lights up when playing PCM signals such as a title, chapter or track number, or elapsed playing time. F Display Displays various information such as CDs. and Europe models only) B Playback icon Lights up during disc playback. "PTY HOLD" ...
Owner's Manual
Page 11
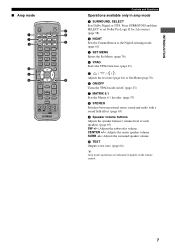
To switch the operation mode • Amp mode: Press AMP. (page 7) • DVD/CD mode: Press DVD/CD. (page 8) • Tuner mode: Press TUNER. DVD/CD AMP VCR VIDEO TUNER MOVIE MUSIC SPORTS GAME CINEMA AMP TUNER DVD/CD ■ Common functions 1 2 3 4 STANDBY/ON POWER TV AUDIO ANGLE SUBTITLE SURROUND SELECT MATRIX 6.1 STEREO REPEAT A-B NIGHT SW CENTER SURR SET MENU TV CH PRESET TV INPUT SHIFT A B C D E SLEEP PRESET FREQ/RDS MODE PTY SEEK START ON SCREEN START MENU YPAO CH ENTER CH STATUS RETURN ON/OFF TV VOL MUTE TEST VOLUME AMP DVD/CD VCR VIDEO ...
To switch the operation mode • Amp mode: Press AMP. (page 7) • DVD/CD mode: Press DVD/CD. (page 8) • Tuner mode: Press TUNER. DVD/CD AMP VCR VIDEO TUNER MOVIE MUSIC SPORTS GAME CINEMA AMP TUNER DVD/CD ■ Common functions 1 2 3 4 STANDBY/ON POWER TV AUDIO ANGLE SUBTITLE SURROUND SELECT MATRIX 6.1 STEREO REPEAT A-B NIGHT SW CENTER SURR SET MENU TV CH PRESET TV INPUT SHIFT A B C D E SLEEP PRESET FREQ/RDS MODE PTY SEEK START ON SCREEN START MENU YPAO CH ENTER CH STATUS RETURN ON/OFF TV VOL MUTE TEST VOLUME AMP DVD/CD VCR VIDEO ...
Owner's Manual
Page 12
CENTER +/-: Adjusts the center speaker volume. Press SURROUND and then SELECT to set Dolby Pro Logic II for 2ch sources. (page 58) 2 NIGHT Sets the CinemaStation to the Night Listening mode. (page 61) 3 SET MENU Enters the Set Menu. (page 76) 4 YPAO Starts the YPAO function. (page 21) 5 / // Adjusts the test tone (page 64) or Set Menu (page 76). 6 ON/OFF Turns the YPAO mode on the remote control. 7 INTRODUCTION ■ Amp mode 1 2 3 4 5 6 STANDBY/ON POWER TV AUDIO ANGLE SUBTITLE SURROUND SELECT MATRIX 6.1 STEREO REPEAT A-B NIGHT SW CENTER SURR SET MENU TV CH PRESET TV INPUT ...
CENTER +/-: Adjusts the center speaker volume. Press SURROUND and then SELECT to set Dolby Pro Logic II for 2ch sources. (page 58) 2 NIGHT Sets the CinemaStation to the Night Listening mode. (page 61) 3 SET MENU Enters the Set Menu. (page 76) 4 YPAO Starts the YPAO function. (page 21) 5 / // Adjusts the test tone (page 64) or Set Menu (page 76). 6 ON/OFF Turns the YPAO mode on the remote control. 7 INTRODUCTION ■ Amp mode 1 2 3 4 5 6 STANDBY/ON POWER TV AUDIO ANGLE SUBTITLE SURROUND SELECT MATRIX 6.1 STEREO REPEAT A-B NIGHT SW CENTER SURR SET MENU TV CH PRESET TV INPUT ...
Owner's Manual
Page 13
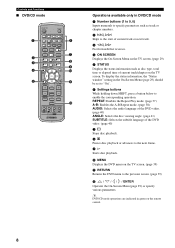
REPEAT: Enables the Repeat Play mode. (page 37) A-B: Enables the A-B Repeat mode. (page 38) AUDIO: Selects the audio language of the DVD video. (page 40) ANGLE: Selects the disc viewing angle. (page 41) SUBTITLE: Selects the subtitle language of current track/chapter on the TV screen. (page 39) A RETURN Returns the DVD menu to the previous screen. (page 39) B / / / / ENTER Operates the On-Screen Menu (page 29) or specify various parameters. Controls and Functions ■ DVD/CD mode 1 2 3 4 5 STANDBY/ON POWER TV AUDIO ANGLE SUBTITLE SURROUND SELECT MATRIX 6.1 STEREO REPEAT A-B NIGHT...
REPEAT: Enables the Repeat Play mode. (page 37) A-B: Enables the A-B Repeat mode. (page 38) AUDIO: Selects the audio language of the DVD video. (page 40) ANGLE: Selects the disc viewing angle. (page 41) SUBTITLE: Selects the subtitle language of current track/chapter on the TV screen. (page 39) A RETURN Returns the DVD menu to the previous screen. (page 39) B / / / / ENTER Operates the On-Screen Menu (page 29) or specify various parameters. Controls and Functions ■ DVD/CD mode 1 2 3 4 5 STANDBY/ON POWER TV AUDIO ANGLE SUBTITLE SURROUND SELECT MATRIX 6.1 STEREO REPEAT A-B NIGHT...
Owner's Manual
Page 14
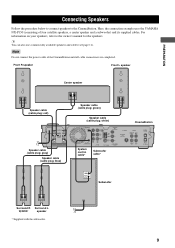
.... 9 Note Do not connect the power cable of four satellite speakers, a center speaker and a subwoofer) and its supplied cables. Here, the connection example uses the YAMAHA NX-P150 (consisting of the CinemaStation until all cable connections are completed. y You can also use commercially available speakers and cables (see page 11). PREPARATION...
.... 9 Note Do not connect the power cable of four satellite speakers, a center speaker and a subwoofer) and its supplied cables. Here, the connection example uses the YAMAHA NX-P150 (consisting of the CinemaStation until all cable connections are completed. y You can also use commercially available speakers and cables (see page 11). PREPARATION...
Owner's Manual
Page 15
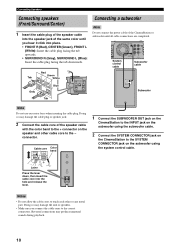
Connecting Speakers Connecting speakers (Front/Surround/Center) 1 Insert the cable plug of the speaker cable into the speaker jack of the CinemaStation or subwoofer until you connect the cable cores to the correct connectors. Red Green Tab White Gray Blue SPEAKERS R L FRONT CENTER FRONT SURROUND SURROUND SPEAKER IMPEDANCE: 6 MIN. Connecting a subwoofer Note Do not connect the power cable of the same color until all cable connections are completed. Doing so may damage the cable plug or speaker jack. 2 Connect the cable core of the speaker cable with the color band to the + ...
Connecting Speakers Connecting speakers (Front/Surround/Center) 1 Insert the cable plug of the speaker cable into the speaker jack of the CinemaStation or subwoofer until you connect the cable cores to the correct connectors. Red Green Tab White Gray Blue SPEAKERS R L FRONT CENTER FRONT SURROUND SURROUND SPEAKER IMPEDANCE: 6 MIN. Connecting a subwoofer Note Do not connect the power cable of the same color until all cable connections are completed. Doing so may damage the cable plug or speaker jack. 2 Connect the cable core of the speaker cable with the color band to the + ...

Owner's Manual
Page 16
... release button, insert the cable core into the cable plug, then release the button. Release button 11 If a speaker with less than those of the YAMAHA NX-P150 (consisting of four satellite speakers, a center speaker and a subwoofer) and its supplied cables, be heard unnaturally. • Use speaker cables that are the...
... release button, insert the cable core into the cable plug, then release the button. Release button 11 If a speaker with less than those of the YAMAHA NX-P150 (consisting of four satellite speakers, a center speaker and a subwoofer) and its supplied cables, be heard unnaturally. • Use speaker cables that are the...
Owner's Manual
Page 17
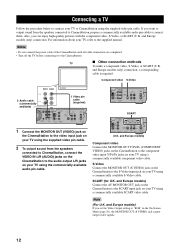
If you set the Video Output setting to "RGB" in the On-Screen Menu (page 29), the MONITOR OUT (S VIDEO) jack cannot output video signals. 12 and Europe models only) connection. AM ANT GND MONITOR OUT (DVD ONLY) Y PB S VIDEO MONITOR OUT (DVD ONLY) FM ANT PR 75 UNBAL COMPONENT VIDEO VIDEO MONITOR VCR OUT OUT VIDEO VCR IN IN DIGITAL AUDIO IN OUT OPTICAL SCART MONITOR OUT (DVD ONLY) AV MONITOR OUT (DVD ONLY) Y AM ANT GND PB MONITOR OUT VCR OUT FM ANT MONITOR PR OUT (DVD ONLY) 75 UNBAL COMPONENT VIDEO S VIDEO VIDEO IN VCR IN VIDEO IN OUT OPTICAL DIGITAL AUDIO ...
If you set the Video Output setting to "RGB" in the On-Screen Menu (page 29), the MONITOR OUT (S VIDEO) jack cannot output video signals. 12 and Europe models only) connection. AM ANT GND MONITOR OUT (DVD ONLY) Y PB S VIDEO MONITOR OUT (DVD ONLY) FM ANT PR 75 UNBAL COMPONENT VIDEO VIDEO MONITOR VCR OUT OUT VIDEO VCR IN IN DIGITAL AUDIO IN OUT OPTICAL SCART MONITOR OUT (DVD ONLY) AV MONITOR OUT (DVD ONLY) Y AM ANT GND PB MONITOR OUT VCR OUT FM ANT MONITOR PR OUT (DVD ONLY) 75 UNBAL COMPONENT VIDEO S VIDEO VIDEO IN VCR IN VIDEO IN OUT OPTICAL DIGITAL AUDIO ...
Owner's Manual
Page 18
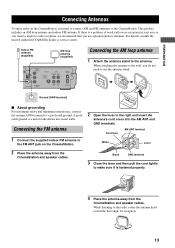
... GND terminal 3 Close the lever and then pull the cord lightly to find the best angle for reception. 13 For details, consult the nearest authorized YAMAHA dealer or service center. Connecting the FM antenna 1 Connect the supplied indoor FM antenna to the FM ANT jack on the CinemaStation, you need to...
... GND terminal 3 Close the lever and then pull the cord lightly to find the best angle for reception. 13 For details, consult the nearest authorized YAMAHA dealer or service center. Connecting the FM antenna 1 Connect the supplied indoor FM antenna to the FM ANT jack on the CinemaStation, you need to...
Owner's Manual
Page 19
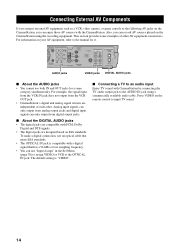
For information on your AV equipment, refer to input TV sound. 14 For example, the signal input from the VCR IN jack does not output from digital output jacks. ■ About the DIGITAL AUDIO jacks • The digital jacks are compatible with CinemaStation by connecting the TV audio output jack to the AUDIO IN jack using the recording equipment. Press VIDEO on the remote control to the manual for a same category simultaneously. Analog input signals can only output from analog output jacks and digital input signals can only output from the VCR OUT jack. • CinemaStation's...
For information on your AV equipment, refer to input TV sound. 14 For example, the signal input from the VCR IN jack does not output from digital output jacks. ■ About the DIGITAL AUDIO jacks • The digital jacks are compatible with CinemaStation by connecting the TV audio output jack to the AUDIO IN jack using the recording equipment. Press VIDEO on the remote control to the manual for a same category simultaneously. Analog input signals can only output from analog output jacks and digital input signals can only output from the VCR OUT jack. • CinemaStation's...

Owner's Manual
Page 20
Notes • Do not connect the power cable of the CinemaStation until all connections, three audio/video cables are completed. • Turn off , connect the audio and video output jacks on your VCR, refer to the owner's manual for the VCR. PREPARATION Connecting External AV Components Connecting a VCR If you connect a VCR to the CinemaStation using commercially available audio/video cables, you can enjoy videos with the CinemaStation and record AV sources played on the CinemaStation on your TV using another audio/video cable. 4 Connect the VIDEO IN (VIDEO) jack on the ...
Notes • Do not connect the power cable of the CinemaStation until all connections, three audio/video cables are completed. • Turn off , connect the audio and video output jacks on your VCR, refer to the owner's manual for the VCR. PREPARATION Connecting External AV Components Connecting a VCR If you connect a VCR to the CinemaStation using commercially available audio/video cables, you can enjoy videos with the CinemaStation and record AV sources played on the CinemaStation on your TV using another audio/video cable. 4 Connect the VIDEO IN (VIDEO) jack on the ...
Owner's Manual
Page 21
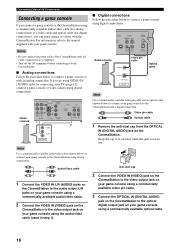
Anti-dust cap 2 Connect the VIDEO IN (VIDEO) jack on the CinemaStation to the video output jack on your game console using a commercially available video pin cable. 3 Connect the OPTICAL IN (DIGITAL AUDIO) jack on the CinemaStation to the optical digital output jack on your game console. If you are completed. • Turn off the AV equipment before connecting it when the jack is not in step 1). ■ Digital connections Follow the procedure below ) to connect your game console to the manual supplied with your game console using digital connections. S VIDEO ITOR UT ONLY) VIDEO ...
Anti-dust cap 2 Connect the VIDEO IN (VIDEO) jack on the CinemaStation to the video output jack on your game console using a commercially available video pin cable. 3 Connect the OPTICAL IN (DIGITAL AUDIO) jack on the CinemaStation to the optical digital output jack on your game console. If you are completed. • Turn off the AV equipment before connecting it when the jack is not in step 1). ■ Digital connections Follow the procedure below ) to connect your game console to the manual supplied with your game console using digital connections. S VIDEO ITOR UT ONLY) VIDEO ...