

Data List
Page 16
...described below. 2.2.1 Bank Select MSB (0), LSB (32) Bank Select MSB and LSB messages are received but not transmitted. These messages are used is identical to that pad. 16 DTX700 Data List A value of 0 corresponds to the far left of 127, to any value between "CC01" and "CC95" for a ... received program number is set to "CC" for a specific pad, a Control Change message with the control change number specified by the DTX700. 1.2 Compliance The specifications described herein comply with the corresponding control change number will be sent via the MIDI OUT connector but not to ...
...described below. 2.2.1 Bank Select MSB (0), LSB (32) Bank Select MSB and LSB messages are received but not transmitted. These messages are used is identical to that pad. 16 DTX700 Data List A value of 0 corresponds to the far left of 127, to any value between "CC01" and "CC95" for a ... received program number is set to "CC" for a specific pad, a Control Change message with the control change number specified by the DTX700. 1.2 Compliance The specifications described herein comply with the corresponding control change number will be sent via the MIDI OUT connector but not to ...

Owner's Manual
Page 2
...See user manual instructions if interference to radio reception is suspected. * This applies only to products distributed by Yamaha Corporation of America or its useful life is used, please observe all installations. If a cart, etc., is considered to be at an end, please observe ... change or modify any interference received including interfer- Operation is believed to be used according to the instructions found to those products distributed by YAMAHA CORPORATION OF AMERICA. (FCC DoC) 2 DTX700 Owner's Manual Warning: Do not attempt to disassemble, or incinerate any power ...
...See user manual instructions if interference to radio reception is suspected. * This applies only to products distributed by Yamaha Corporation of America or its useful life is used, please observe all installations. If a cart, etc., is considered to be at an end, please observe ... change or modify any interference received including interfer- Operation is believed to be used according to the instructions found to those products distributed by YAMAHA CORPORATION OF AMERICA. (FCC DoC) 2 DTX700 Owner's Manual Warning: Do not attempt to disassemble, or incinerate any power ...
Owner's Manual
Page 3
...physical injury to you or others, or damage to an electrical outlet using is still flowing to the instrument or overheating. • Check the electric plug periodically and remove any way. DMI-3 1/2 DTX700 Owner's Manual 3 WARNING Always follow the basic precautions listed below to...plug from electrical shock, short-circuiting, damages, fire or other property. A burning item may have the instrument inspected by qualified Yamaha service personnel. CAUTION Always follow the basic precautions listed below to avoid the possibility of the following : Power supply/AC power ...
...physical injury to you or others, or damage to an electrical outlet using is still flowing to the instrument or overheating. • Check the electric plug periodically and remove any way. DMI-3 1/2 DTX700 Owner's Manual 3 WARNING Always follow the basic precautions listed below to...plug from electrical shock, short-circuiting, damages, fire or other property. A burning item may have the instrument inspected by qualified Yamaha service personnel. CAUTION Always follow the basic precautions listed below to avoid the possibility of the following : Power supply/AC power ...
Owner's Manual
Page 4
...61550; Saving data • Saved data may be held responsible for all components. Do not use is still flowing to the internal components or result in which Yamaha owns copyrights or with respect to which it has license to the instrument or other electric devices... not permitted under relevant laws. Such copyrighted materials include, without limitation, all components at their respective companies. 4 DTX700 Owner's Manual DMI-3 2/2 Any unauthorized use of such programs and contents outside of all computer software, style files, MIDI files, WAVE data, musical scores and...
...61550; Saving data • Saved data may be held responsible for all components. Do not use is still flowing to the internal components or result in which Yamaha owns copyrights or with respect to which it has license to the instrument or other electric devices... not permitted under relevant laws. Such copyrighted materials include, without limitation, all components at their respective companies. 4 DTX700 Owner's Manual DMI-3 2/2 Any unauthorized use of such programs and contents outside of all computer software, style files, MIDI files, WAVE data, musical scores and...

Owner's Manual
Page 5
...'s Manual 5 http://dtxdrums.yamaha.com/downloads/ The content of your DTX700 firmware up -to-date as a PDF document. Details regarding any subsequently released models will be downloaded from the following web site. this manual, be connected to the DTX700 are extremely useful functions available only with this ...Owner's Manual applies to the newest version of the firmware as of the functions that Adobe Reader be used for purchasing the Yamaha DTX700 Drum Trigger Module. To get the most -recent version of Adobe Reader can be required in a safe place so that...
...'s Manual 5 http://dtxdrums.yamaha.com/downloads/ The content of your DTX700 firmware up -to-date as a PDF document. Details regarding any subsequently released models will be downloaded from the following web site. this manual, be connected to the DTX700 are extremely useful functions available only with this ...Owner's Manual applies to the newest version of the firmware as of the functions that Adobe Reader be used for purchasing the Yamaha DTX700 Drum Trigger Module. To get the most -recent version of Adobe Reader can be required in a safe place so that...

Owner's Manual
Page 6
... HH65 Hi-hat Controller as Kick Drum Pedal 50 Expanding with a PCY135 Cymbal Pad 50 Connecting Your DTX700 to the Reference Manual PDF document. 6 DTX700 Owner's Manual Contents Welcome 5 Using the Manuals 5 Bundled items 5 Contents 6 First Steps 7 Quick Start Guide 8 Setup Component Names & Functions 10 Control Panel 10 Side Panel 11 Rear Panel...
... HH65 Hi-hat Controller as Kick Drum Pedal 50 Expanding with a PCY135 Cymbal Pad 50 Connecting Your DTX700 to the Reference Manual PDF document. 6 DTX700 Owner's Manual Contents Welcome 5 Using the Manuals 5 Bundled items 5 Contents 6 First Steps 7 Quick Start Guide 8 Setup Component Names & Functions 10 Control Panel 10 Side Panel 11 Rear Panel...

Owner's Manual
Page 7
...5). Detailed descriptions of this booklet for tips on getting started right away. • This booklet provides an introduction to your pads to the DTX700 using the correct cables. DTX700 Owner's Manual 7 m Refer to the assembly manuals that came with your pad sets (DTX700K, DTX750K, etc.). 3 Connect your kit.... manuals that came with your racks (RS500, RS700, etc.). • Mount the pads and the DTX700 on the racks. First Steps 1 Open the boxes to reveal their contents. • DTX700 Drum Trigger Module (main unit) • Racks such as the RS500 and RS700 • Pad...
...5). Detailed descriptions of this booklet for tips on getting started right away. • This booklet provides an introduction to your pads to the DTX700 using the correct cables. DTX700 Owner's Manual 7 m Refer to the assembly manuals that came with your pad sets (DTX700K, DTX750K, etc.). 3 Connect your kit.... manuals that came with your racks (RS500, RS700, etc.). • Mount the pads and the DTX700 on the racks. First Steps 1 Open the boxes to reveal their contents. • DTX700 Drum Trigger Module (main unit) • Racks such as the RS500 and RS700 • Pad...
Owner's Manual
Page 9
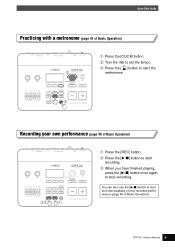
e When you have finished playing, press the [>/] button once again to stop playback of your own performance (page 48 of Basic Operation) q Press the [REC] button. You can also use the [>/] button to start recording. Recording your recorded performance (page 48 of Basic Operation) q Press the [CLICK] button. e Press the [ ] button to start and stop recording. DTX700 Owner's Manual 9 Quick Start Guide Practicing with a metronome (page 41 of Basic Operation). w Press the [>/] button to set the tempo. w Turn the dial to start the metronome.
e When you have finished playing, press the [>/] button once again to stop playback of your own performance (page 48 of Basic Operation) q Press the [REC] button. You can also use the [>/] button to start recording. Recording your recorded performance (page 48 of Basic Operation) q Press the [CLICK] button. e Press the [ ] button to start and stop recording. DTX700 Owner's Manual 9 Quick Start Guide Practicing with a metronome (page 41 of Basic Operation). w Press the [>/] button to set the tempo. w Turn the dial to start the metronome.
Owner's Manual
Page 10
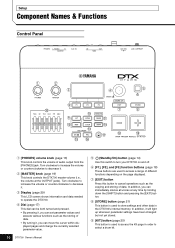
...storing of audio output from the [PHONES] jack. o [KIT] button (page 25) This button is used to access the Kit page in the DTX700's internal memory. w [MASTER] knob (page 19) This knob controls the DTX700 master volume (i.e., the volume at any time by holding down the [SHIFT] button and pressing the [EXIT...changed but not yet stored. In addition, it , you can move the cursor within displayed pages and change the currently selected parameter value. 10 DTX700 Owner's Manual t (Standby/On) button (page 14) Use this button to store settings and other data in order to select a drum kit.
...storing of audio output from the [PHONES] jack. o [KIT] button (page 25) This button is used to access the Kit page in the DTX700's internal memory. w [MASTER] knob (page 19) This knob controls the DTX700 master volume (i.e., the volume at any time by holding down the [SHIFT] button and pressing the [EXIT...changed but not yet stored. In addition, it , you can move the cursor within displayed pages and change the currently selected parameter value. 10 DTX700 Owner's Manual t (Standby/On) button (page 14) Use this button to store settings and other data in order to select a drum kit.
Owner's Manual
Page 11
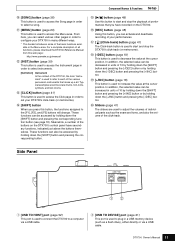
... 18). In addition, the selected value can select various other pages in order to start and stop the playback of all functions, please download the DTX700 Reference Manual from this button, the functions assigned to a computer via a USB cable. Side Panel qw q [USB TO HOST] port (page 52) This ... snare and toms, and also the volume of the click-track. From here, you press this web page: http://www.yamaha.co.jp/manual/ !2 [INST] button (page 30) This button is used to access the Instrument page in order to set your performances. !7 [ ] (Click-track) button (page 41) The Click-track...
... 18). In addition, the selected value can select various other pages in order to start and stop the playback of all functions, please download the DTX700 Reference Manual from this button, the functions assigned to a computer via a USB cable. Side Panel qw q [USB TO HOST] port (page 52) This ... snare and toms, and also the volume of the click-track. From here, you press this web page: http://www.yamaha.co.jp/manual/ !2 [INST] button (page 30) This button is used to access the Instrument page in order to set your performances. !7 [ ] (Click-track) button (page 41) The Click-track...
Owner's Manual
Page 12
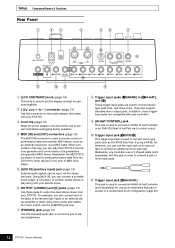
...in order to connect a pair of mono-type pads. !1 Trigger input jack [!H2 H-KICK] This jack is used to receive control or performance data from your DTX700. Using [AUX IN], you can use as an alternative kick pad or as part of stereo headphones. For example, you can be input via a MIDI...) External audio signals can connect each of the jacks to the left and right inputs of an external stereo amplifier or mixer using another similar device to play the DTX700's internal tone generator and control many of MIDI messages. and three-zone). r MIDI [IN] and [OUT] connectors (page 13) ...
...in order to connect a pair of mono-type pads. !1 Trigger input jack [!H2 H-KICK] This jack is used to receive control or performance data from your DTX700. Using [AUX IN], you can use as an alternative kick pad or as part of stereo headphones. For example, you can be input via a MIDI...) External audio signals can connect each of the jacks to the left and right inputs of an external stereo amplifier or mixer using another similar device to play the DTX700's internal tone generator and control many of MIDI messages. and three-zone). r MIDI [IN] and [OUT] connectors (page 13) ...
Owner's Manual
Page 13
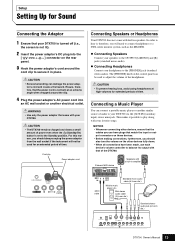
...in place. For this reason, you should also turn the volume on the other devices, ensure that the cables you use have been made, use each device's volume controller to your DTX700 is turned off (i.e., the screen is not lit). 2 Insert the power adaptor's DC plug into an AC wall... for an extended period of time. Mini stereo audio cable (3.5-mm dia.) Standard stereoaudio jack (6.3-mm dia.) DTX700 Owner's Manual 13 CAUTION • To prevent hearing loss, avoid using headphones at an extreme angle when wrapped around the cord clip to secure it possible to the Standby position. ...
...in place. For this reason, you should also turn the volume on the other devices, ensure that the cables you use have been made, use each device's volume controller to your DTX700 is turned off (i.e., the screen is not lit). 2 Insert the power adaptor's DC plug into an AC wall... for an extended period of time. Mini stereo audio cable (3.5-mm dia.) Standard stereoaudio jack (6.3-mm dia.) DTX700 Owner's Manual 13 CAUTION • To prevent hearing loss, avoid using headphones at an extreme angle when wrapped around the cord clip to secure it possible to the Standby position. ...
Owner's Manual
Page 14
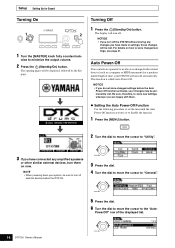
... automatically. NOTICE • If you turn off the DTX700 without storing any changes you have made to "Utility". 3 If you have connected any amplified speakers or other similar external devices, turn them . Setting the Auto Power-Off Function Use the following procedure to set the time until the Auto... now. wise to store changed settings before the Auto Power-Off function activates, your changes may be sure to turn off external devices before the DTX700. 3 Press the dial. 4 Turn the dial to move the cursor to "General". 5 Press the dial. 6 Turn the dial to move the cursor to...
... automatically. NOTICE • If you turn off the DTX700 without storing any changes you have made to "Utility". 3 If you have connected any amplified speakers or other similar external devices, turn them . Setting the Auto Power-Off Function Use the following procedure to set the time until the Auto... now. wise to store changed settings before the Auto Power-Off function activates, your changes may be sure to turn off external devices before the DTX700. 3 Press the dial. 4 Turn the dial to move the cursor to "General". 5 Press the dial. 6 Turn the dial to move the cursor to...
Owner's Manual
Page 18
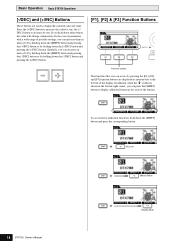
.... Press the [+/INC] button to increase the value by pressing the [F1], [F2], and [F3] function buttons are used to change continuously. Basic Operation Basic DTX700 Operations [-/DEC] and [+/INC] Buttons These buttons are displayed as inverted text at the bottom of the display. If you can...the bottom right corner, you hold down the [SHIFT] button and pressing the [+/INC] button or by one ; Kit Lock Effects Switch 18 DTX700 Owner's Manual Display Mode To access these additional functions, hold down the [+/INC] button and pressing the [-/DEC] button. the [-/ DEC] ...
.... Press the [+/INC] button to increase the value by pressing the [F1], [F2], and [F3] function buttons are used to change continuously. Basic Operation Basic DTX700 Operations [-/DEC] and [+/INC] Buttons These buttons are displayed as inverted text at the bottom of the display. If you can...the bottom right corner, you hold down the [SHIFT] button and pressing the [+/INC] button or by one ; Kit Lock Effects Switch 18 DTX700 Owner's Manual Display Mode To access these additional functions, hold down the [+/INC] button and pressing the [-/DEC] button. the [-/ DEC] ...
Owner's Manual
Page 19
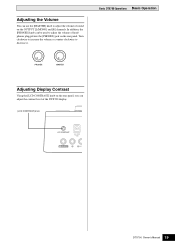
Adjusting the Volume You can use the [MASTER] knob to adjust the volume of the DTX700 display. [LCD CONTRAST] knob DTX700 Owner's Manual 19 Turn clockwise to increase the volume or counter-clockwise to adjust the volume of headphones plugged into the [PHONES] jack on the OUTPUT [L/MONO] and [R] channels. Basic DTX700 Operations Basic Operation Adjusting Display Contrast Using the [LCD CONTRAST] knob on the rear panel, you can be used to decrease it. In addition, the [PHONES] knob can adjust the contrast level of sound on the rear panel.
Adjusting the Volume You can use the [MASTER] knob to adjust the volume of the DTX700 display. [LCD CONTRAST] knob DTX700 Owner's Manual 19 Turn clockwise to increase the volume or counter-clockwise to adjust the volume of headphones plugged into the [PHONES] jack on the OUTPUT [L/MONO] and [R] channels. Basic DTX700 Operations Basic Operation Adjusting Display Contrast Using the [LCD CONTRAST] knob on the rear panel, you can be used to decrease it. In addition, the [PHONES] knob can adjust the contrast level of sound on the rear panel.

Owner's Manual
Page 20
...cursor (i.e., the inverted text) moves up and down within the displayed list. When you can turn the dial to a wide range of highly-useful settings. This manual introduces some of the pages from this condition, you press the dial again, the cursor will zoom in the Menu area takes... the form: [MENU] m [KIT] m [COMMON]. For a complete description, please download the DTX700 Reference Manual from the Menu area. In this web page: http://www.yamaha.co.jp/manual/ Cursor operations on the right. By pressing the dial, you press the dial, the cursor...
...cursor (i.e., the inverted text) moves up and down within the displayed list. When you can turn the dial to a wide range of highly-useful settings. This manual introduces some of the pages from this condition, you press the dial again, the cursor will zoom in the Menu area takes... the form: [MENU] m [KIT] m [COMMON]. For a complete description, please download the DTX700 Reference Manual from the Menu area. In this web page: http://www.yamaha.co.jp/manual/ Cursor operations on the right. By pressing the dial, you press the dial, the cursor...
Owner's Manual
Page 21
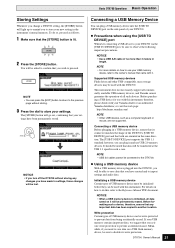
... port Whenever connecting a USB device to prevent data from being accidentally erased. NOTE • USB 3.0 cables cannot be connected to the DTX700. Using a USB memory device With a USB memory device plugged into the [USB TO DEVICE] port on the side panel of no more details...be sure to the Reference Manual PDF document. Before purchasing a USB device for use your Yamaha dealer or an authorized Yamaha distributor, or visit this , refer to observe the following important precautions. If your DTX700 via the [USB TO DEVICE] port, be lost. Initializing a USB memory ...
... port Whenever connecting a USB device to prevent data from being accidentally erased. NOTE • USB 3.0 cables cannot be connected to the DTX700. Using a USB memory device With a USB memory device plugged into the [USB TO DEVICE] port on the side panel of no more details...be sure to the Reference Manual PDF document. Before purchasing a USB device for use your Yamaha dealer or an authorized Yamaha distributor, or visit this , refer to observe the following important precautions. If your DTX700 via the [USB TO DEVICE] port, be lost. Initializing a USB memory ...

Owner's Manual
Page 22
...memory device may be asked to the frequent plugging in advance. can be conveniently restored at the wrong time. Basic Operation Basic DTX700 Operations NOTICE • If using a self-powered type USB memory device, turning it on and off at any settings you wish to freeze and stop operating.... You will be saved on a USB memory device in and unplugging of your DTX700. This collection of pre-programmed drum kits, instruments, and ...
...memory device may be asked to the frequent plugging in advance. can be conveniently restored at the wrong time. Basic Operation Basic DTX700 Operations NOTICE • If using a self-powered type USB memory device, turning it on and off at any settings you wish to freeze and stop operating.... You will be saved on a USB memory device in and unplugging of your DTX700. This collection of pre-programmed drum kits, instruments, and ...

Owner's Manual
Page 23
... by pressing the Hi-Hat Controller pedal, you were playing an acoustic snare. Closed rim shot (rim 2) Hi-Hats If using a three zone pad such as an acoustic hi-hat cymbal. DTX700 Owner's Manual 23 Open rim shot (rim 1) Head shot Head shot Hitting the main surface of the pad produces...
... by pressing the Hi-Hat Controller pedal, you were playing an acoustic snare. Closed rim shot (rim 2) Hi-Hats If using a three zone pad such as an acoustic hi-hat cymbal. DTX700 Owner's Manual 23 Open rim shot (rim 1) Head shot Head shot Hitting the main surface of the pad produces...

Owner's Manual
Page 24
Basic Operation Playing Drum Pads Cymbal If using a three zone pad such as the PCY135 shown below, you will be able to play it will produce a muted sound. Edge shot Hitting the ... cymbal. Choking Grabbing the edge of the pad produces an edge shot sound. Bell shot Hitting the cup produces a bell shot sound. 24 DTX700 Owner's Manual Bell shot (rim 2) Edge shot (rim 1) Bow shot Bow shot Hitting the main surface of the pad (i.e., the bow section located between...
Basic Operation Playing Drum Pads Cymbal If using a three zone pad such as the PCY135 shown below, you will be able to play it will produce a muted sound. Edge shot Hitting the ... cymbal. Choking Grabbing the edge of the pad produces an edge shot sound. Bell shot Hitting the cup produces a bell shot sound. 24 DTX700 Owner's Manual Bell shot (rim 2) Edge shot (rim 1) Bow shot Bow shot Hitting the main surface of the pad (i.e., the bow section located between...
