

Midi Reference
Page 1
...in the toolbar to Use This Manual This MIDI Reference will prove useful when transferring MIDI data between the drum module that came with your DTX400K, DTX430K, or DTX450K electronic drum set and a computer after they have been connected with a USB cable can download the latest version of...shown in this manual are the trademarks or registered trademarks of Adobe® Reader® from the following web page. ELECTRONIC DRUM KIT DTX400K DTX430K DTX450K MIDI Reference How to quickly and conveniently search for your particular instrument or computer. • The company names and ...
...in the toolbar to Use This Manual This MIDI Reference will prove useful when transferring MIDI data between the drum module that came with your DTX400K, DTX430K, or DTX450K electronic drum set and a computer after they have been connected with a USB cable can download the latest version of...shown in this manual are the trademarks or registered trademarks of Adobe® Reader® from the following web page. ELECTRONIC DRUM KIT DTX400K DTX430K DTX450K MIDI Reference How to quickly and conveniently search for your particular instrument or computer. • The company names and ...

Midi Reference
Page 2
...Files Using the free Yamaha application Musicsoft Downloader, you can also be found in SMF format) between 01 and 10) representing the target song number on the module must be added at the same time, be transferred to song No. 10 on your electronic drum kit's model name and...can be transferred to the application will be added to your Programs menu and a shortcut to your drum module. 2 DTX400K/DTX430K/DTX450K MIDI Reference Numbering files to be displayed on your drum module and computer as described below. Installing Musicsoft Downloader 1. Make sure your computer is connected to ...
...Files Using the free Yamaha application Musicsoft Downloader, you can also be found in SMF format) between 01 and 10) representing the target song number on the module must be added at the same time, be transferred to song No. 10 on your electronic drum kit's model name and...can be transferred to the application will be added to your Programs menu and a shortcut to your drum module. 2 DTX400K/DTX430K/DTX450K MIDI Reference Numbering files to be displayed on your drum module and computer as described below. Installing Musicsoft Downloader 1. Make sure your computer is connected to ...
Midi Reference
Page 4
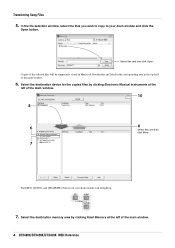
...all light up. 7. Select the destination memory area by clicking Electronic Musical Instruments at the left of the main window. 10 8 6 8 Select files and then click Move. 7 The [KIT], [SONG], and [TRAINING] buttons on your drum module and click the Open button. Select files and then click ... window, select the files you wish to copy to your drum module will be temporarily stored in Musicsoft Downloader and listed in the corresponding area in the top half of the main window. 4 DTX400K/DTX430K/DTX450K MIDI Reference Transferring Song Files 5. Select the destination device for...
...all light up. 7. Select the destination memory area by clicking Electronic Musical Instruments at the left of the main window. 10 8 6 8 Select files and then click Move. 7 The [KIT], [SONG], and [TRAINING] buttons on your drum module and click the Open button. Select files and then click ... window, select the files you wish to copy to your drum module will be temporarily stored in Musicsoft Downloader and listed in the corresponding area in the top half of the main window. 4 DTX400K/DTX430K/DTX450K MIDI Reference Transferring Song Files 5. Select the destination device for...
Midi Reference
Page 6
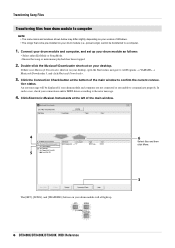
...connec- Click Electronic Musical Instruments at the bottom of the main window to a computer. 1. Connect your drum module and computer, and set up . 6 Select files and then click Move. 3 6 DTX400K/DTX430K/DTX450K MIDI Reference tion status. In such a case, check your drum module as follows...-installed on your desktop, open the Start menu, navigate to All Programs YAMAHA Musicsoft Downloader 5, and click Musicsoft Downloader. 3. Transferring Song Files Transferring files from drum module to computer NOTE • The menu items and windows shown below may differ ...
...connec- Click Electronic Musical Instruments at the bottom of the main window to a computer. 1. Connect your drum module and computer, and set up . 6 Select files and then click Move. 3 6 DTX400K/DTX430K/DTX450K MIDI Reference tion status. In such a case, check your drum module as follows...-installed on your desktop, open the Start menu, navigate to All Programs YAMAHA Musicsoft Downloader 5, and click Musicsoft Downloader. 3. Transferring Song Files Transferring files from drum module to computer NOTE • The menu items and windows shown below may differ ...

Midi Reference
Page 11
MIDI Implemantation Chart YAMAHA [ Electronic Drum Kit ] Date :11-Apr-2012 Model DTX400K/430K/450K MIDI Implementation Chart Version : 1.0 Function... Mode 1 : OMNI ON , POLY Mode 3 : OMNI OFF, POLY Mode 2 : OMNI ON ,...
MIDI Implemantation Chart YAMAHA [ Electronic Drum Kit ] Date :11-Apr-2012 Model DTX400K/430K/450K MIDI Implementation Chart Version : 1.0 Function... Mode 1 : OMNI ON , POLY Mode 3 : OMNI OFF, POLY Mode 2 : OMNI ON ,...
Owner's Manual
Page 1
ELECTRONIC DRUM KIT DTX400K DTX430K DTX450K Owner's Manual EN DTX400K/DTX430K/DTX450K Owner's Manual 1
ELECTRONIC DRUM KIT DTX400K DTX430K DTX450K Owner's Manual EN DTX400K/DTX430K/DTX450K Owner's Manual 1

Owner's Manual
Page 3
... batteries. Operation is being charged. ENVIRONMENTAL ISSUES: Yamaha strives to the disposal of products that could void your authority, granted by the FCC, to use of Equipment : ELECTRONIC DRUM KIT Model Name : DTX400K/DTX430K/DTX450K This device complies with the components supplied or; ... to be correct at a level that is uncomfortable. a cart, rack, or stand that is recommended by YAMAHA CORPORATION OF AMERICA. (FCC DoC) DTX400K/DTX430K/DTX450K Owner's Manual 3 When installing batteries, never mix old batteries with FCC regulations does not guar- This product,...
... batteries. Operation is being charged. ENVIRONMENTAL ISSUES: Yamaha strives to the disposal of products that could void your authority, granted by the FCC, to use of Equipment : ELECTRONIC DRUM KIT Model Name : DTX400K/DTX430K/DTX450K This device complies with the components supplied or; ... to be correct at a level that is uncomfortable. a cart, rack, or stand that is recommended by YAMAHA CORPORATION OF AMERICA. (FCC DoC) DTX400K/DTX430K/DTX450K Owner's Manual 3 When installing batteries, never mix old batteries with FCC regulations does not guar- This product,...
Owner's Manual
Page 4
... and other fasteners. Water warning • Do not expose the instrument to rain, use the electronic drum kit's rack to hold the plug itself and not the cord. A burning item may collapse ...anyone were to fall over them. 4 DTX400K/DTX430K/DTX450K Owner's Manual DMI-5 1/2 Doing so could cause clamps to break and the drums to trip on kick pads and foot pedals as they...follow the basic precautions listed below to avoid the possibility of this product be injured by qualified Yamaha service personnel. • Never insert or remove an electric plug with the anti-slip stoppers ...
... and other fasteners. Water warning • Do not expose the instrument to rain, use the electronic drum kit's rack to hold the plug itself and not the cord. A burning item may collapse ...anyone were to fall over them. 4 DTX400K/DTX430K/DTX450K Owner's Manual DMI-5 1/2 Doing so could cause clamps to break and the drums to trip on kick pads and foot pedals as they...follow the basic precautions listed below to avoid the possibility of this product be injured by qualified Yamaha service personnel. • Never insert or remove an electric plug with the anti-slip stoppers ...
Owner's Manual
Page 5
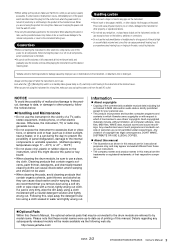
... include, without limitation, all components. Details regarding any subsequently released models will be connected to the drum module are referred to by improper use . • This product incorporates and bundles computer programs and...instrument to other electronic components, turn off ), electricity is in this might discolor the panel or keyboard. • When cleaning the drum module, be held responsible for a long time, make sure to which Yamaha owns copyrights or ... different from the wall AC outlet. http://www.yamaha.com/ DMI-5 2/2 DTX400K/DTX430K/DTX450K Owner's Manual 5
... include, without limitation, all components. Details regarding any subsequently released models will be connected to the drum module are referred to by improper use . • This product incorporates and bundles computer programs and...instrument to other electronic components, turn off ), electricity is in this might discolor the panel or keyboard. • When cleaning the drum module, be held responsible for a long time, make sure to which Yamaha owns copyrights or ... different from the wall AC outlet. http://www.yamaha.com/ DMI-5 2/2 DTX400K/DTX430K/DTX450K Owner's Manual 5

Owner's Manual
Page 6
... will be sure to store it . Product Manuals The DTX400K, DTX430K, and DTX450K are extremely useful functions available only with this owner's manual carefully. We recommend that you can be used when operating and playing the electronic drum kit. As such, a computer and suitable software will prove useful when making... documents. Keyword searching and link-based navigation in particular are described in order to it again as it set up for purchasing a Yamaha DTX400K, DTX430K, or DTX450K Electronic Drum Kit. http://www.adobe.com/products/reader/ 6 DTX400K/DTX430K...
... will be sure to store it . Product Manuals The DTX400K, DTX430K, and DTX450K are extremely useful functions available only with this owner's manual carefully. We recommend that you can be used when operating and playing the electronic drum kit. As such, a computer and suitable software will prove useful when making... documents. Keyword searching and link-based navigation in particular are described in order to it again as it set up for purchasing a Yamaha DTX400K, DTX430K, or DTX450K Electronic Drum Kit. http://www.adobe.com/products/reader/ 6 DTX400K/DTX430K...

Owner's Manual
Page 7
... See page 18. • Connect the power adaptor to the drum module and turn on the module. See page 19. 4 Play your electronic drum kit. • Basic techniques used when operating and playing the electronic drum kit are described in the Basic Techniques section (pages 23 to... 39). • More complex methods are described in the Advanced Techniques section (pages 40 to 55). DTX400K/DTX430K/DTX450K Owner's Manual 7...
... See page 18. • Connect the power adaptor to the drum module and turn on the module. See page 19. 4 Play your electronic drum kit. • Basic techniques used when operating and playing the electronic drum kit are described in the Basic Techniques section (pages 23 to... 39). • More complex methods are described in the Advanced Techniques section (pages 40 to 55). DTX400K/DTX430K/DTX450K Owner's Manual 7...

Owner's Manual
Page 8
.... • Parts e and i are actually different. Part i has a wing bolt, but are almost identical in appearance but are present. Please check with your electronic drum kit, please verify that all of the following parts are actually different. tion, the polystyrene foam packaging used for part i is marked "T" (tom); while the ... !9 Power adaptor (x1) * May not be told apart by the sticker on your particular area. Setup Package Contents After opening up the package containing your Yamaha dealer. @0 Owner's Manual (this booklet) 8 DTX400K/DTX430K/DTX450K Owner's Manual
.... • Parts e and i are actually different. Part i has a wing bolt, but are almost identical in appearance but are present. Please check with your electronic drum kit, please verify that all of the following parts are actually different. tion, the polystyrene foam packaging used for part i is marked "T" (tom); while the ... !9 Power adaptor (x1) * May not be told apart by the sticker on your particular area. Setup Package Contents After opening up the package containing your Yamaha dealer. @0 Owner's Manual (this booklet) 8 DTX400K/DTX430K/DTX450K Owner's Manual

Owner's Manual
Page 11
...of at least one other person will be required when assembling the electronic drum kit. • Once a piece has been assembled, be sure to tighten the corresponding nuts or bolts. • To disassemble your electronic drum kit. • Take care to avoid mixing up parts or ...supports w Joint Left Right 1. Setup Assembly Guide Fully assembled drum kit (DTX450K shown) Step 5 Step 10 Step 6 Step 8 Step 4 Step 7 Step 11 Step 9 Step 3 Step 2 CAUTION • Choose a flat, hard surface on which to assemble your electronic drum kit, carry out the assembly sequence in the figure, place...
...of at least one other person will be required when assembling the electronic drum kit. • Once a piece has been assembled, be sure to tighten the corresponding nuts or bolts. • To disassemble your electronic drum kit. • Take care to avoid mixing up parts or ...supports w Joint Left Right 1. Setup Assembly Guide Fully assembled drum kit (DTX450K shown) Step 5 Step 10 Step 6 Step 8 Step 4 Step 7 Step 11 Step 9 Step 3 Step 2 CAUTION • Choose a flat, hard surface on which to assemble your electronic drum kit, carry out the assembly sequence in the figure, place...
Owner's Manual
Page 18
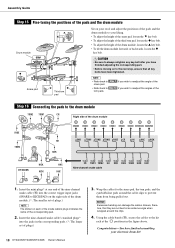
Assembly Guide Step 15 Fine-tuning the positions of the pads and the drum module Drum module Sit on your stool and adjust the positions of the pads and the drum module to your electronic drum kit! Insert the mini plugs* at one end of the nine-channel snake cable (!6) into the jacks in... the figure above. Step 16 Connecting the pads to the drum module TOM2 TOM1 CR Right side of plugs.) 18 DTX400K/DTX430K/DTX450K Owner's Manual 3. ...
Assembly Guide Step 15 Fine-tuning the positions of the pads and the drum module Drum module Sit on your stool and adjust the positions of the pads and the drum module to your electronic drum kit! Insert the mini plugs* at one end of the nine-channel snake cable (!6) into the jacks in... the figure above. Step 16 Connecting the pads to the drum module TOM2 TOM1 CR Right side of plugs.) 18 DTX400K/DTX430K/DTX450K Owner's Manual 3. ...
Owner's Manual
Page 27
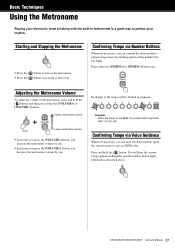
Basic Techniques Using the Metronome Playing your electronic drum kit along with the built-in metronome is 108 BPM, the number button lights will flash as a BPM value. Confirming Tempo via Voice Guidance Whenever necessary, you can confirm the drum module's current tempo from the flashing pattern of the... the metronome volume by one. Press and hold the [ ] button, and then press either the [TEMPO+] or [TEMPO-] button once. DTX400K/DTX430K/DTX450K Owner's Manual 27 Starting and Stopping the Metronome • Press the [ ] button to turn it off. Example: When the tempo is a great ...
Basic Techniques Using the Metronome Playing your electronic drum kit along with the built-in metronome is 108 BPM, the number button lights will flash as a BPM value. Confirming Tempo via Voice Guidance Whenever necessary, you can confirm the drum module's current tempo from the flashing pattern of the... the metronome volume by one. Press and hold the [ ] button, and then press either the [TEMPO+] or [TEMPO-] button once. DTX400K/DTX430K/DTX450K Owner's Manual 27 Starting and Stopping the Metronome • Press the [ ] button to turn it off. Example: When the tempo is a great ...

Owner's Manual
Page 48
...you change the type of snare pad connected to [5]). 48 DTX400K/DTX430K/DTX450K Owner's Manual This makes it is turned on . Use the following procedure, you change the type of pedal that comes with your drum module. 1. Press number button [5] to select the Snare Pad Type ... [3] to indicate the result of automatic identification. • Whenever you can use setting [5] or [6] to switch (or reverse) the drum sounds assigned to your electronic drum kit when it is turned on . ton to [5]). Select a new snare pad type using the corresponding number button ([2] to [6]). •...
...you change the type of snare pad connected to [5]). 48 DTX400K/DTX430K/DTX450K Owner's Manual This makes it is turned on . Use the following procedure, you change the type of pedal that comes with your drum module. 1. Press number button [5] to select the Snare Pad Type ... [3] to indicate the result of automatic identification. • Whenever you can use setting [5] or [6] to switch (or reverse) the drum sounds assigned to your electronic drum kit when it is turned on . ton to [5]). Select a new snare pad type using the corresponding number button ([2] to [6]). •...

Owner's Manual
Page 56
Turn off the drum module. For DTX430K & DTX450K Owners Adding a PCY90AT Cymbal Pad 1. Turn on the drum module. 4. Advanced Techniques Integrating Separately Sold Accessories As described below, you can add various accessories* to your electronic drum kit for an even more enjoyable drumming experience. (*: Sold separately) For ...and/or the hi-hat controller included as part of the DTX400K, you can make your KU100 to a KP65, you upgrade your electronic drum kit feel much closer to the real thing. Replacing the KU100 Kick Unit with the cymbal pad, connect it to ...
Turn off the drum module. For DTX430K & DTX450K Owners Adding a PCY90AT Cymbal Pad 1. Turn on the drum module. 4. Advanced Techniques Integrating Separately Sold Accessories As described below, you can add various accessories* to your electronic drum kit for an even more enjoyable drumming experience. (*: Sold separately) For ...and/or the hi-hat controller included as part of the DTX400K, you can make your KU100 to a KP65, you upgrade your electronic drum kit feel much closer to the real thing. Replacing the KU100 Kick Unit with the cymbal pad, connect it to ...

Owner's Manual
Page 60
Oak Custom Kit with a four-beat rhythm. 60 DTX400K/DTX430K/DTX450K Owner's Manual Name 27 Vintage 60 Vintage H 61 Vintage M 62 Vintage L 86 Vintage Rd 22 97 VintageCr 16 118 Vintage 14 6 Vintage 24 98 VintageCr ... PAD No. Funk tune based on every beat. Hard Rock Rock kit with a Maple Custom Absolute sound. Vintage A seventies sounding kit. R&B Electronic sounding kit. Maple Custom Kit with a double bass drum. Jazz Ideal kit for practicing standard eight-beat songs. PAD SNARE TOM1 TOM2 TOM3 RIDE CRASH HI-HAT KICK PAD No.
Oak Custom Kit with a four-beat rhythm. 60 DTX400K/DTX430K/DTX450K Owner's Manual Name 27 Vintage 60 Vintage H 61 Vintage M 62 Vintage L 86 Vintage Rd 22 97 VintageCr 16 118 Vintage 14 6 Vintage 24 98 VintageCr ... PAD No. Funk tune based on every beat. Hard Rock Rock kit with a Maple Custom Absolute sound. Vintage A seventies sounding kit. R&B Electronic sounding kit. Maple Custom Kit with a double bass drum. Jazz Ideal kit for practicing standard eight-beat songs. PAD SNARE TOM1 TOM2 TOM3 RIDE CRASH HI-HAT KICK PAD No.


