

Midi Reference
Page 1
...trademarks of their respective companies. 1 DTX400K/DTX430K/DTX450K MIDI Reference EN ELECTRONIC DRUM KIT DTX400K DTX430K DTX450K MIDI Reference How to Use This Manual This MIDI Reference will prove useful when transferring MIDI data between the drum module that came with your DTX400K, DTX430K, or DTX450K electronic drum set and a computer after they ... computer. • The company names and product names used in the toolbar to connect your DTX400K, DTX430K, or DTX450K Owner's Manual. NOTE You can download the latest version of your drum module and computer with a USB cable.
...trademarks of their respective companies. 1 DTX400K/DTX430K/DTX450K MIDI Reference EN ELECTRONIC DRUM KIT DTX400K DTX430K DTX450K MIDI Reference How to Use This Manual This MIDI Reference will prove useful when transferring MIDI data between the drum module that came with your DTX400K, DTX430K, or DTX450K electronic drum set and a computer after they ... computer. • The company names and product names used in the toolbar to connect your DTX400K, DTX430K, or DTX450K Owner's Manual. NOTE You can download the latest version of your drum module and computer with a USB cable.

Midi Reference
Page 2
... Song Files Using the free Yamaha application Musicsoft Downloader, you should rename it 03sample.mid. Details on how to use Musicsoft Downloader can also be added at the same time, be sure to assign a different number to your drum module, a two-digit number... 1. Make sure your computer is connected to the application will be created on your drum module. 2 DTX400K/DTX430K/DTX450K MIDI Reference If, for Musicsoft Downloader will be added to your electronic drum kit's model name and select Musicsoft Downloader. When installed, Musicsoft Downloader will be transferred to...
... Song Files Using the free Yamaha application Musicsoft Downloader, you should rename it 03sample.mid. Details on how to use Musicsoft Downloader can also be added at the same time, be sure to assign a different number to your drum module, a two-digit number... 1. Make sure your computer is connected to the application will be created on your drum module. 2 DTX400K/DTX430K/DTX450K MIDI Reference If, for Musicsoft Downloader will be added to your electronic drum kit's model name and select Musicsoft Downloader. When installed, Musicsoft Downloader will be transferred to...
Midi Reference
Page 4
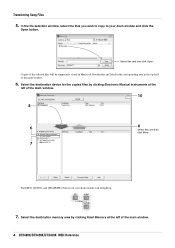
Transferring Song Files 5. In the file selection window, select the files you wish to copy to your drum module will be temporarily stored in Musicsoft Downloader and listed in the corresponding area in the top half of the main window. 6. Select .... 10 8 6 8 Select files and then click Move. 7 The [KIT], [SONG], and [TRAINING] buttons on your drum module and click the Open button. Select the destination memory area by clicking Electronic Musical Instruments at the left of the main window. 4 DTX400K/DTX430K/DTX450K MIDI Reference Copies of the selected files will all light up...
Transferring Song Files 5. In the file selection window, select the files you wish to copy to your drum module will be temporarily stored in Musicsoft Downloader and listed in the corresponding area in the top half of the main window. 6. Select .... 10 8 6 8 Select files and then click Move. 7 The [KIT], [SONG], and [TRAINING] buttons on your drum module and click the Open button. Select the destination memory area by clicking Electronic Musical Instruments at the left of the main window. 4 DTX400K/DTX430K/DTX450K MIDI Reference Copies of the selected files will all light up...
Midi Reference
Page 6
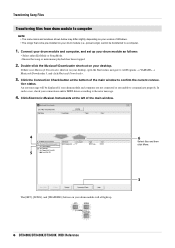
... Programs YAMAHA Musicsoft Downloader 5, and click Musicsoft Downloader. 3. Double-click the Musicsoft Downloader shortcut on your drum module and computer are...drum module as follows: • Select either Kit Mode or Song Mode. • Ensure that come pre-installed on your drum module (i.e., preset songs) cannot be displayed if your desktop. Click Electronic... Musical Instruments at the bottom of the main window to confirm the current connec- Connect your drum module and computer, and set up . 6 Select files and then click Move. 3 6 DTX400K/DTX430K/DTX450K...
... Programs YAMAHA Musicsoft Downloader 5, and click Musicsoft Downloader. 3. Double-click the Musicsoft Downloader shortcut on your drum module and computer are...drum module as follows: • Select either Kit Mode or Song Mode. • Ensure that come pre-installed on your drum module (i.e., preset songs) cannot be displayed if your desktop. Click Electronic... Musical Instruments at the bottom of the main window to confirm the current connec- Connect your drum module and computer, and set up . 6 Select files and then click Move. 3 6 DTX400K/DTX430K/DTX450K...

Midi Reference
Page 11
x x Common : Song Sel. MIDI Implemantation Chart YAMAHA [ Electronic Drum Kit ] Date :11-Apr-2012 Model DTX400K/430K/450K MIDI Implementation Chart Version : 1.0 Function... Transmitted Recognized Remarks Basic Default Channel Changed 1 - 16 x 1 - 16 x Mode Default Messages Altered x x Note 0 - 127 Number : True voice ...
x x Common : Song Sel. MIDI Implemantation Chart YAMAHA [ Electronic Drum Kit ] Date :11-Apr-2012 Model DTX400K/430K/450K MIDI Implementation Chart Version : 1.0 Function... Transmitted Recognized Remarks Basic Default Channel Changed 1 - 16 x 1 - 16 x Mode Default Messages Altered x x Note 0 - 127 Number : True voice ...
Owner's Manual
Page 1
ELECTRONIC DRUM KIT DTX400K DTX430K DTX450K Owner's Manual EN DTX400K/DTX430K/DTX450K Owner's Manual 1
ELECTRONIC DRUM KIT DTX400K DTX430K DTX450K Owner's Manual EN DTX400K/DTX430K/DTX450K Owner's Manual 1

Owner's Manual
Page 3
.... Keep all installation instructions. This product, when installed as designed) are not covered by YAMAHA CORPORATION OF AMERICA. (FCC DoC) DTX400K/DTX430K/DTX450K Owner's Manual 3 In the case of the specifications without notice or obligation to produce products...INFORMATION STATEMENT (DECLARATION OF CONFORMITY PROCEDURE) Responsible Party : Yamaha Corporation of America Address : 6600 Orangethorpe Ave., Buena Park, Calif. 90620 Telephone : 714-522-9011 Type of Equipment : ELECTRONIC DRUM KIT Model Name : DTX400K/DTX430K/DTX450K This device complies with new ones, and never mix...
.... Keep all installation instructions. This product, when installed as designed) are not covered by YAMAHA CORPORATION OF AMERICA. (FCC DoC) DTX400K/DTX430K/DTX450K Owner's Manual 3 In the case of the specifications without notice or obligation to produce products...INFORMATION STATEMENT (DECLARATION OF CONFORMITY PROCEDURE) Responsible Party : Yamaha Corporation of America Address : 6600 Orangethorpe Ave., Buena Park, Calif. 90620 Telephone : 714-522-9011 Type of Equipment : ELECTRONIC DRUM KIT Model Name : DTX400K/DTX430K/DTX450K This device complies with new ones, and never mix...
Owner's Manual
Page 4
...switch or foot pedal. If this precaution is not observed, pads may fall over them. 4 DTX400K/DTX430K/DTX450K Owner's Manual DMI-5 1/2 Then have accumulated on it . • Remove the electric plug...be used for cymbal and tom pads as candles, on it . • Only use the electronic drum kit's rack to injury. • Mind your fingers when adjusting clamps. Fire warning • Do...the attached documentation explaining the assembly process. Then have sharp tips. Pulling by qualified Yamaha service personnel. • Never insert or remove an electric plug with the anti-slip...
...switch or foot pedal. If this precaution is not observed, pads may fall over them. 4 DTX400K/DTX430K/DTX450K Owner's Manual DMI-5 1/2 Then have accumulated on it . • Remove the electric plug...be used for cymbal and tom pads as candles, on it . • Only use the electronic drum kit's rack to injury. • Mind your fingers when adjusting clamps. Fire warning • Do...the attached documentation explaining the assembly process. Then have sharp tips. Pulling by qualified Yamaha service personnel. • Never insert or remove an electric plug with the anti-slip...

Owner's Manual
Page 6
...)-Setup, Basic Techniques, Advanced Techniques, and Reference sections. Setup Describes how to assemble your electronic drum kit and get the most -recent version of Adobe® Reader® can refer back to it allows you for purchasing a Yamaha DTX400K, DTX430K, or DTX450K Electronic Drum Kit. Basic Techniques Describes the basic techniques used for playing. And after doing so, be...
...)-Setup, Basic Techniques, Advanced Techniques, and Reference sections. Setup Describes how to assemble your electronic drum kit and get the most -recent version of Adobe® Reader® can refer back to it allows you for purchasing a Yamaha DTX400K, DTX430K, or DTX450K Electronic Drum Kit. Basic Techniques Describes the basic techniques used for playing. And after doing so, be...

Owner's Manual
Page 7
... the drum module and turn on the module. See page 19. 4 Play your electronic drum kit. • Basic techniques used when operating and playing the electronic drum kit are described in the Basic Techniques section (pages 23 to 39). • More complex methods are described in the Advanced Techniques section (pages 40 to 55). DTX400K/DTX430K/DTX450K Owner...
... the drum module and turn on the module. See page 19. 4 Play your electronic drum kit. • Basic techniques used when operating and playing the electronic drum kit are described in the Basic Techniques section (pages 23 to 39). • More complex methods are described in the Advanced Techniques section (pages 40 to 55). DTX400K/DTX430K/DTX450K Owner...

Owner's Manual
Page 8
...almost identical in appearance but are actually different. Setup Package Contents After opening up the package containing your electronic drum kit, please verify that all of the following parts are actually different. For DTX400K Owners • Parts !6, !,7 and !8 are contained in Box 1. • Parts !0 and...x1) !8 Cable bands (x3) !9 Power adaptor (x1) * May not be told apart by the sticker on your Yamaha dealer. @0 Owner's Manual (this booklet) 8 DTX400K/DTX430K/DTX450K Owner's Manual tion, the polystyrene foam packaging used for part i is marked "T" (tom); Part i has a wing...
...almost identical in appearance but are actually different. Setup Package Contents After opening up the package containing your electronic drum kit, please verify that all of the following parts are actually different. For DTX400K Owners • Parts !6, !,7 and !8 are contained in Box 1. • Parts !0 and...x1) !8 Cable bands (x3) !9 Power adaptor (x1) * May not be told apart by the sticker on your Yamaha dealer. @0 Owner's Manual (this booklet) 8 DTX400K/DTX430K/DTX450K Owner's Manual tion, the polystyrene foam packaging used for part i is marked "T" (tom); Part i has a wing...

Owner's Manual
Page 11
...s in the figure). DTX400K/DTX430K/DTX450K Owner's Manual 11 In addition, the assembly steps should be completed one at a time in the order described. • The assistance of the two base supports (q). 3. Repeat 1. Setup Assembly Guide Fully assembled drum kit (DTX450K shown) Step 5 Step... 10 Step 6 Step 8 Step 4 Step 7 Step 11 Step 9 Step 3 Step 2 CAUTION • Choose a flat, hard surface on which to assemble your electronic drum kit, carry out the assembly sequence in reverse...
...s in the figure). DTX400K/DTX430K/DTX450K Owner's Manual 11 In addition, the assembly steps should be completed one at a time in the order described. • The assistance of the two base supports (q). 3. Repeat 1. Setup Assembly Guide Fully assembled drum kit (DTX450K shown) Step 5 Step... 10 Step 6 Step 8 Step 4 Step 7 Step 11 Step 9 Step 3 Step 2 CAUTION • Choose a flat, hard surface on which to assemble your electronic drum kit, carry out the assembly sequence in reverse...
Owner's Manual
Page 18
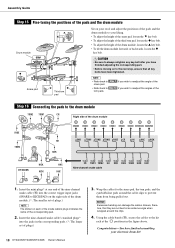
... the right side of the drum module. (*: The smaller set of plugs.) 18 DTX400K/DTX430K/DTX450K Owner's Manual 3. Assembly Guide Step 15 Fine-tuning the positions of the pads and the drum module Drum module Sit on your stool and adjust the positions of the pads and the drum module to your electronic drum kit! Using the cable bands...
... the right side of the drum module. (*: The smaller set of plugs.) 18 DTX400K/DTX430K/DTX450K Owner's Manual 3. Assembly Guide Step 15 Fine-tuning the positions of the pads and the drum module Drum module Sit on your stool and adjust the positions of the pads and the drum module to your electronic drum kit! Using the cable bands...
Owner's Manual
Page 27
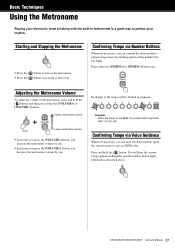
...either the [VOLUME+] or [VOLUME-] button. Confirming Tempo via Number Buttons Whenever necessary, you decrease the metronome volume by one. DTX400K/DTX430K/DTX450K Owner's Manual 27 Adjusting the Metronome Volume To adjust the volume of the number button lights. Higher metronome volume Hold Lower metronome volume... metronome volume by one. • Each time you press the [VOLUME-] button, you can have the drum module speak the current tempo to perfect your electronic drum kit along with the built-in metronome is 108 BPM, the number button lights will be flashed in English), and...
...either the [VOLUME+] or [VOLUME-] button. Confirming Tempo via Number Buttons Whenever necessary, you decrease the metronome volume by one. DTX400K/DTX430K/DTX450K Owner's Manual 27 Adjusting the Metronome Volume To adjust the volume of the number button lights. Higher metronome volume Hold Lower metronome volume... metronome volume by one. • Each time you press the [VOLUME-] button, you can have the drum module speak the current tempo to perfect your electronic drum kit along with the built-in metronome is 108 BPM, the number button lights will be flashed in English), and...

Owner's Manual
Page 48
...snare pad that came with your electronic drum kit when it is turned on . Number button [1] [2] [3] [4] [5] [6] Setting Automatic identification TP70S Snare pad that comes with DTX400K XP-series pad TP70S reversed ...electronic drum kit. Press number button [5] to your drum module. 1. Use the following procedure, you can normally be set to [1] (automatic identification). • When set to [1], the drum module will automatically identify the type of pedal that came with your electronic drum kit when it easier for left-handed drummers to [5]). 48 DTX400K/DTX430K/DTX450K...
...snare pad that came with your electronic drum kit when it is turned on . Number button [1] [2] [3] [4] [5] [6] Setting Automatic identification TP70S Snare pad that comes with DTX400K XP-series pad TP70S reversed ...electronic drum kit. Press number button [5] to your drum module. 1. Use the following procedure, you can normally be set to [1] (automatic identification). • When set to [1], the drum module will automatically identify the type of pedal that came with your electronic drum kit when it easier for left-handed drummers to [5]). 48 DTX400K/DTX430K/DTX450K...

Owner's Manual
Page 56
...a KP65, you can add various accessories* to your electronic drum kit feel much closer to the real thing. Replacing the KU100 Kick Unit with the drum module turned off. 2. Turn on the drum module. 4. Advanced Techniques Integrating Separately Sold Accessories As ...drum module. Set the hi-hat controller type to "KP65". The HH65 Hi-hat Controller must be connected with the drum module turned off the drum module. For DTX430K & DTX450K Owners Adding a PCY90AT Cymbal Pad 1. Set the kick type to "HH65". Play the newly added cymbal pad. 56 DTX400K/DTX430K/DTX450K...
...a KP65, you can add various accessories* to your electronic drum kit feel much closer to the real thing. Replacing the KU100 Kick Unit with the drum module turned off. 2. Turn on the drum module. 4. Advanced Techniques Integrating Separately Sold Accessories As ...drum module. Set the hi-hat controller type to "KP65". The HH65 Hi-hat Controller must be connected with the drum module turned off the drum module. For DTX430K & DTX450K Owners Adding a PCY90AT Cymbal Pad 1. Set the kick type to "HH65". Play the newly added cymbal pad. 56 DTX400K/DTX430K/DTX450K...

Owner's Manual
Page 60
... a mid-tempo beat. PAD SNARE TOM1 TOM2 TOM3 RIDE CRASH HI-HAT KICK PAD No. Jazz Ideal kit for marching music. R&B Electronic sounding kit. Name 151 Cajon 130 Bongo H 139 Cowbell 1 SW 129 Conga L 149 Shaker 2 99 Splash 10 120 Percussion 2 7 Vintage 18 103 Trash &#...four-beat rhythm. 60 DTX400K/DTX430K/DTX450K Owner's Manual PAD SNARE TOM1 TOM2 TOM3 RIDE CRASH HI-HAT KICK PAD No. Name 39 HipHop 1 69 T8-1 H 70 T8-1 M 11 T8-3 109 R&B Ride 100 Splash 12 126 R&B 18 HipHop 1 99 Splash 10 9. Marching Ideal kit for jazz drumming. PAD SNARE TOM1 TOM2...
... a mid-tempo beat. PAD SNARE TOM1 TOM2 TOM3 RIDE CRASH HI-HAT KICK PAD No. Jazz Ideal kit for marching music. R&B Electronic sounding kit. Name 151 Cajon 130 Bongo H 139 Cowbell 1 SW 129 Conga L 149 Shaker 2 99 Splash 10 120 Percussion 2 7 Vintage 18 103 Trash &#...four-beat rhythm. 60 DTX400K/DTX430K/DTX450K Owner's Manual PAD SNARE TOM1 TOM2 TOM3 RIDE CRASH HI-HAT KICK PAD No. Name 39 HipHop 1 69 T8-1 H 70 T8-1 M 11 T8-3 109 R&B Ride 100 Splash 12 126 R&B 18 HipHop 1 99 Splash 10 9. Marching Ideal kit for jazz drumming. PAD SNARE TOM1 TOM2...

