
DTX402K/DTX432K/DTX452K Owners Manual
Page 1
ELECTRONIC DRUM KIT DTX402K DTX432K DTX452K Owner's Manual EN
ELECTRONIC DRUM KIT DTX402K DTX432K DTX452K Owner's Manual EN
DTX402K/DTX432K/DTX452K Owners Manual
Page 2
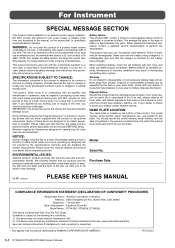
... (bottom) PLEASE KEEP THIS MANUAL COMPLIANCE INFORMATION STATEMENT (DECLARATION OF CONFORMITY PROCEDURE) Responsible Party : Yamaha Corporation of America Address : 6600 Orangethorpe Ave., Buena Park, Calif. 90620 Telephone : 714-522-9011 Type of Equipment : Electronic Drum Kit Model Name : DTX402K, DTX432K, DTX452K This device complies with an amplifier and headphones or speaker/s, may not cause harmful...
... (bottom) PLEASE KEEP THIS MANUAL COMPLIANCE INFORMATION STATEMENT (DECLARATION OF CONFORMITY PROCEDURE) Responsible Party : Yamaha Corporation of America Address : 6600 Orangethorpe Ave., Buena Park, Calif. 90620 Telephone : 714-522-9011 Type of Equipment : Electronic Drum Kit Model Name : DTX402K, DTX432K, DTX452K This device complies with an amplifier and headphones or speaker/s, may not cause harmful...

DTX402K/DTX432K/DTX452K Owners Manual
Page 7
... the instrument to other property. Even when the [ ] (Standby/On) switch is in use the electronic drum kit's rack to hold the plug itself and not the cord. Failure to assemble the instrument in the proper... to set the desired listening level. DMI-5 2/2 DTX402K DTX432K DTX452K Owner's Manual 5 Doing so could cause clamps to break and the drums to fall off or the rack may attach to your clothes...or headphones for a long time, make sure you unplug the power cord from the outlet. Yamaha cannot be injured by improper use the provided screws only. Doing so can easily be held...
... the instrument to other property. Even when the [ ] (Standby/On) switch is in use the electronic drum kit's rack to hold the plug itself and not the cord. Failure to assemble the instrument in the proper... to set the desired listening level. DMI-5 2/2 DTX402K DTX432K DTX452K Owner's Manual 5 Doing so could cause clamps to break and the drums to fall off or the rack may attach to your clothes...or headphones for a long time, make sure you unplug the power cord from the outlet. Yamaha cannot be injured by improper use the provided screws only. Doing so can easily be held...
DTX402K/DTX432K/DTX452K Owners Manual
Page 9
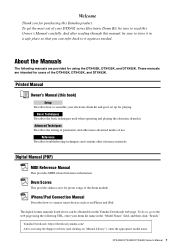
... your DTX402 series Electronic Drum Kit, be sure to the web page using the DTX402K, DTX432K, and DTX452K. Basic Techniques Describes the basic techniques used when operating and playing the electronic drum kit. To do so, go to read this manual, be obtained from the Yamaha Downloads web page... (PDF) MIDI Reference Manual This provides MIDI-related reference information. Drum Scores This provides drum scores for users of the DTX402K, DTX432K, and DTX452K. iPhone/iPad Connection Manual Describes how to assemble your electronic drum kit and get the most out of use. To get it in ...
... your DTX402 series Electronic Drum Kit, be sure to the web page using the DTX402K, DTX432K, and DTX452K. Basic Techniques Describes the basic techniques used when operating and playing the electronic drum kit. To do so, go to read this manual, be obtained from the Yamaha Downloads web page... (PDF) MIDI Reference Manual This provides MIDI-related reference information. Drum Scores This provides drum scores for users of the DTX402K, DTX432K, and DTX452K. iPhone/iPad Connection Manual Describes how to assemble your electronic drum kit and get the most out of use. To get it in ...
DTX402K/DTX432K/DTX452K Owners Manual
Page 10
... the drum module and turn on the module. See page 21. 4 Play your electronic drum kit. • Basic techniques used when operating and playing the electronic drum kit are described in the Basic Techniques section (pages 25 to 40). • More complex methods are described in the Advanced Techniques section (pages 41 to 56). 8 DTX402K DTX432K DTX452K...
... the drum module and turn on the module. See page 21. 4 Play your electronic drum kit. • Basic techniques used when operating and playing the electronic drum kit are described in the Basic Techniques section (pages 25 to 40). • More complex methods are described in the Advanced Techniques section (pages 41 to 56). 8 DTX402K DTX432K DTX452K...
DTX402K/DTX432K/DTX452K Owners Manual
Page 11
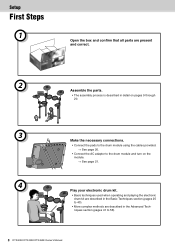
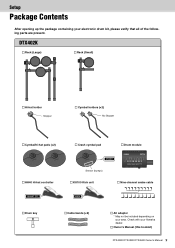
Owner's Manual (this booklet) DTX402K DTX432K DTX452K Owner's Manual 9 Check with your area. DTX402K Rack (Large) Rack (Small) Hi-hat holder Stopper Cymbal holders (×2) No Stopper Cymbal/hi-hat pads (×2) Crash cymbal pad Drum module HH40 Hi-hat controller Sensor (bumps) KU100 Kick unit Nine-channel snake cable Drum key Cable bands (×2) AC adaptor * May not be included depending on your Yamaha dealer. Setup Package Contents After opening up the package containing your electronic drum kit, please verify that all of the following parts are present.
Owner's Manual (this booklet) DTX402K DTX432K DTX452K Owner's Manual 9 Check with your area. DTX402K Rack (Large) Rack (Small) Hi-hat holder Stopper Cymbal holders (×2) No Stopper Cymbal/hi-hat pads (×2) Crash cymbal pad Drum module HH40 Hi-hat controller Sensor (bumps) KU100 Kick unit Nine-channel snake cable Drum key Cable bands (×2) AC adaptor * May not be included depending on your Yamaha dealer. Setup Package Contents After opening up the package containing your electronic drum kit, please verify that all of the following parts are present.
DTX402K/DTX432K/DTX452K Owners Manual
Page 14
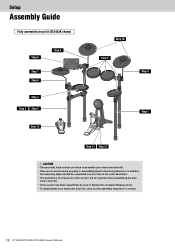
..., the assembly steps should be completed one at least one other person will be required when assembling the elec- Setup Assembly Guide Fully assembled drum kit (DTX452K shown) Step 8 Step 7 Step 6 Step 4 Step 2 Step 3 Step 9 Step 12 Step 10 Step 5 Step 9 Step...the wrong direction. tronic drum kit. • Once a piece has been assembled, be sure to tighten the corresponding key bolts. • To disassemble your electronic drum kit. • Take care to assemble your electronic drum kit, carry out the assembly sequence in reverse. 12 DTX402K DTX432K DTX452K Owner's Manual
..., the assembly steps should be completed one at least one other person will be required when assembling the elec- Setup Assembly Guide Fully assembled drum kit (DTX452K shown) Step 8 Step 7 Step 6 Step 4 Step 2 Step 3 Step 9 Step 12 Step 10 Step 5 Step 9 Step...the wrong direction. tronic drum kit. • Once a piece has been assembled, be sure to tighten the corresponding key bolts. • To disassemble your electronic drum kit. • Take care to assemble your electronic drum kit, carry out the assembly sequence in reverse. 12 DTX402K DTX432K DTX452K Owner's Manual

DTX402K/DTX432K/DTX452K Owners Manual
Page 22
... of the joints should be played when the PAD>IN jack is used. 3. Right-handed Left-handed 20 DTX402K DTX432K DTX452K Owner's Manual Setup for righthanded drummers. Congratulations-You have finished assembling your electronic drum kit! NOTICE Excessive bending can damage the cables. Insert the mini plugs* at one end of the corresponding pad...
... of the joints should be played when the PAD>IN jack is used. 3. Right-handed Left-handed 20 DTX402K DTX432K DTX452K Owner's Manual Setup for righthanded drummers. Congratulations-You have finished assembling your electronic drum kit! NOTICE Excessive bending can damage the cables. Insert the mini plugs* at one end of the corresponding pad...
DTX402K/DTX432K/DTX452K Owners Manual
Page 31
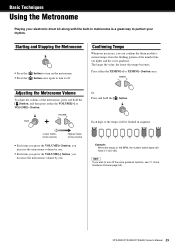
...is a great way to perfect your electronic drum kit along with the built-in metronome is 108 BPM, the number button lights will be flashed in sequence. NOTE If you decrease the metronome volume by one . Voice Guidance Volume (page 53). DTX402K DTX432K DTX452K Owner's Manual 29 Hold Each... digit of the metronome, press and hold the [ ] button. Confirming Tempo Whenever necessary, you can confirm the drum module's current tempo from the flashing pattern of the number button ...
...is a great way to perfect your electronic drum kit along with the built-in metronome is 108 BPM, the number button lights will be flashed in sequence. NOTE If you decrease the metronome volume by one . Voice Guidance Volume (page 53). DTX402K DTX432K DTX452K Owner's Manual 29 Hold Each... digit of the metronome, press and hold the [ ] button. Confirming Tempo Whenever necessary, you can confirm the drum module's current tempo from the flashing pattern of the number button ...
DTX402K/DTX432K/DTX452K Owners Manual
Page 51
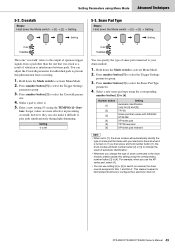
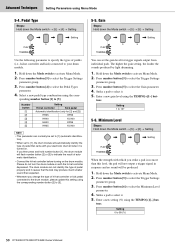
... 1 and Rim 2. Press number button [5] to [1], the drum module will flash number button [2] or [3] to indicate the result of snare pad connected to your electronic drum kit when it difficult to play pads simultaneously during light drumming. Number button [1] [2] [3] [4] [5] [6] Setting Automatic identification... change the type of vibration or interference between pads. DTX402K DTX432K DTX452K Owner's Manual 49 Select a new snare pad type using the TEMPO[+]/[-] but- Press number button [5] to configure their electronic drum kit. Setting 0 to 99 You can also make it is turned...
... 1 and Rim 2. Press number button [5] to [1], the drum module will flash number button [2] or [3] to indicate the result of snare pad connected to your electronic drum kit when it difficult to play pads simultaneously during light drumming. Number button [1] [2] [3] [4] [5] [6] Setting Automatic identification... change the type of vibration or interference between pads. DTX402K DTX432K DTX452K Owner's Manual 49 Select a new snare pad type using the TEMPO[+]/[-] but- Press number button [5] to configure their electronic drum kit. Setting 0 to 99 You can also make it is turned...
DTX402K/DTX432K/DTX452K Owners Manual
Page 52
...Hold down the Mode switch to [5]. Hold down the Mode switch to your electronic drum kit when it . 5. Select a new pedal type combination using Menu Mode 5-4. Please do not turn the drum module on with your drum module. 1. Strike a pad to 127 5-6. Pedal Type Steps: Hold ...the Mode switch to select the Minimum Level parameter. 4. sponding number button [1] to 99 (%) 50 DTX402K DTX432K DTX452K Owner's Manual If you strike a pad is turned on the drum module. Enter a new setting (%) using the corresponding number button [2] to activate Menu Mode. 2. Setting...
...Hold down the Mode switch to [5]. Hold down the Mode switch to your electronic drum kit when it . 5. Select a new pedal type combination using Menu Mode 5-4. Please do not turn the drum module on with your drum module. 1. Strike a pad to 127 5-6. Pedal Type Steps: Hold ...the Mode switch to select the Minimum Level parameter. 4. sponding number button [1] to 99 (%) 50 DTX402K DTX432K DTX452K Owner's Manual If you strike a pad is turned on the drum module. Enter a new setting (%) using the corresponding number button [2] to activate Menu Mode. 2. Setting...
DTX402K/DTX432K/DTX452K Owners Manual
Page 59
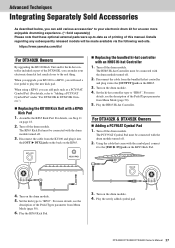
... Menu Mode (page 50). 5. Play the KP65 Kick Pad. 3. For DTX432K & DTX452K Owners Adding a PCY95AT Cymbal Pad 1. The PCY95AT Cymbal Pad must be connected with a KP65 Kick Pad 1. https://www.yamaha.com/dtx/ For DTX402K Owners By upgrading the KU100 Kick Unit and/or...Menu Mode (page 50). 6. Set the kick type to "HH65". Turn off the drum module. Turn off . 2. Advanced Techniques Integrating Separately Sold Accessories As described below, you can make your electronic drum kit feel much closer to the real thing. Details regarding any subsequently released models will need ...
... Menu Mode (page 50). 5. Play the KP65 Kick Pad. 3. For DTX432K & DTX452K Owners Adding a PCY95AT Cymbal Pad 1. The PCY95AT Cymbal Pad must be connected with a KP65 Kick Pad 1. https://www.yamaha.com/dtx/ For DTX402K Owners By upgrading the KU100 Kick Unit and/or...Menu Mode (page 50). 6. Set the kick type to "HH65". Turn off the drum module. Turn off . 2. Advanced Techniques Integrating Separately Sold Accessories As described below, you can make your electronic drum kit feel much closer to the real thing. Details regarding any subsequently released models will need ...
DTX402K/DTX432K/DTX452K Owners Manual
Page 64
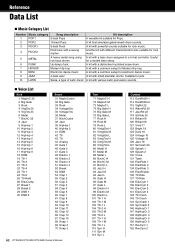
...two bass drums Up-tempo funk Modern Hip hop Electronic dance music 4-beat Jazz Salsa, a type of Latin music Kit description A versatile kit suitable for Pops. A kit with small diameter drums. Suitable for electronic dance music. A kit with a distinctive hi-pitched snare drum. A kit with a common setup for jazz. Useful for rock music. A kit with ...62 Clap 9 63 Clap 10 64 Clap 11 65 Clap 12 66 Clap 13 67 Clap 14 68 Snap 1 69 Snap 2 70 Snap 3 62 DTX402K DTX432K DTX452K Owner's Manual Tom 71 MapleC H 72 MapleC M 73 MapleC L 74 Big Gate H 75 Big Gate M 76 Big Gate L 77 Rock H ...
...two bass drums Up-tempo funk Modern Hip hop Electronic dance music 4-beat Jazz Salsa, a type of Latin music Kit description A versatile kit suitable for Pops. A kit with small diameter drums. Suitable for electronic dance music. A kit with a distinctive hi-pitched snare drum. A kit with a common setup for jazz. Useful for rock music. A kit with ...62 Clap 9 63 Clap 10 64 Clap 11 65 Clap 12 66 Clap 13 67 Clap 14 68 Snap 1 69 Snap 2 70 Snap 3 62 DTX402K DTX432K DTX452K Owner's Manual Tom 71 MapleC H 72 MapleC M 73 MapleC L 74 Big Gate H 75 Big Gate M 76 Big Gate L 77 Rock H ...


