
DTX402K/DTX432K/DTX452K Owners Manual
Page 2
... this manual as regulated by YAMAHA CORPORATION OF AMERICA. (FCC DoC) S-1 DTX402K DTX432K DTX452K Owner's Manual Some Yamaha products may be installed correctly. ENVIRONMENTAL ISSUES: Yamaha strives to the following : Battery Notice: This product MAY contain a small non-rechargeable battery which (if applicable) is operating as optional accessories. Some of used , please observe all batteries...
... this manual as regulated by YAMAHA CORPORATION OF AMERICA. (FCC DoC) S-1 DTX402K DTX432K DTX452K Owner's Manual Some Yamaha products may be installed correctly. ENVIRONMENTAL ISSUES: Yamaha strives to the following : Battery Notice: This product MAY contain a small non-rechargeable battery which (if applicable) is operating as optional accessories. Some of used , please observe all batteries...
DTX402K/DTX432K/DTX452K Owners Manual
Page 3
... in the users manual, may void your authority, granted by YAMAHA CORPORATION OF AMERICA. (class B) DTX402K DTX432K DTX452K Owner's Manual S-2 Modifications not expressly approved by Yamaha may cause interference harmful to use the product. 2. Compliance with these corrective measures do not produce... comply with this manual, meets FCC requirements. Failure to use this product in this product MUST be the source of interference, which can not locate the appropriate retailer, please contact Yamaha Corporation of America, Electronic Service Division, 6600 Orangethorpe Ave,...
... in the users manual, may void your authority, granted by YAMAHA CORPORATION OF AMERICA. (class B) DTX402K DTX432K DTX452K Owner's Manual S-2 Modifications not expressly approved by Yamaha may cause interference harmful to use the product. 2. Compliance with these corrective measures do not produce... comply with this manual, meets FCC requirements. Failure to use this product in this product MUST be the source of interference, which can not locate the appropriate retailer, please contact Yamaha Corporation of America, Electronic Service Division, 6600 Orangethorpe Ave,...
DTX402K/DTX432K/DTX452K Owners Manual
Page 4
... manufacturer. 12 Use only with the cart, stand, tripod, bracket, or table specified by the manufacturer, or sold with one wider than the other apparatus (including amplifiers) that may cause undesired operation. REFER SERVICING TO QUALIFIED SERVICE PERSONNEL. S-3 DTX402K DTX432K DTX452K Owner...Laitteen toisiopiiriin kytketty käyttökytkin ei irroita koko laitetta verkosta. The exclamation point within an equilateral triangle is used, use caution when moving the cart/apparatus combination to avoid injury from tip-over. 13 Unplug this apparatus during lightning storms ...
... manufacturer. 12 Use only with the cart, stand, tripod, bracket, or table specified by the manufacturer, or sold with one wider than the other apparatus (including amplifiers) that may cause undesired operation. REFER SERVICING TO QUALIFIED SERVICE PERSONNEL. S-3 DTX402K DTX432K DTX452K Owner...Laitteen toisiopiiriin kytketty käyttökytkin ei irroita koko laitetta verkosta. The exclamation point within an equilateral triangle is used, use caution when moving the cart/apparatus combination to avoid injury from tip-over. 13 Unplug this apparatus during lightning storms ...
DTX402K/DTX432K/DTX452K Owners Manual
Page 5
... a Song 27 Adjusting the Song Volume 27 Adjusting the Volume of Muted Drum Parts .... 28 Importing a MIDI song 28 Using the Metronome 29 Starting and Stopping the Metronome 29 Adjusting the Metronome Volume 29 Confirming Tempo 29 Adjusting the Tempo 30 Other ...31 Detailed Training settings 31 After Training 31 Switching to a Computer 58 Installing the Yamaha Steinberg USB Driver ... 58 MIDI-related Reference 58 Reference Troubleshooting 59 Data List 62 Specifications 64 Index 65 DTX402K DTX432K DTX452K Owner's Manual 3 DYNAMIC GATE 33 4. RHYTHM GATE 32 2. CHANGE UP...
... a Song 27 Adjusting the Song Volume 27 Adjusting the Volume of Muted Drum Parts .... 28 Importing a MIDI song 28 Using the Metronome 29 Starting and Stopping the Metronome 29 Adjusting the Metronome Volume 29 Confirming Tempo 29 Adjusting the Tempo 30 Other ...31 Detailed Training settings 31 After Training 31 Switching to a Computer 58 Installing the Yamaha Steinberg USB Driver ... 58 MIDI-related Reference 58 Reference Troubleshooting 59 Data List 62 Specifications 64 Index 65 DTX402K DTX432K DTX452K Owner's Manual 3 DYNAMIC GATE 33 4. RHYTHM GATE 32 2. CHANGE UP...
DTX402K/DTX432K/DTX452K Owners Manual
Page 6
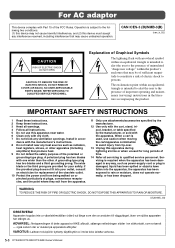
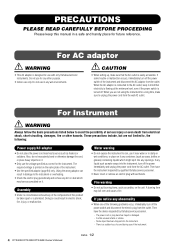
...so could result in damp or wet conditions, or place on it . Then have the instrument inspected by Yamaha service personnel. - These precautions include, but are not using the instrument for future reference. The required voltage is designed for the instrument. Water warning • Do not... off the power switch and disconnect the electric plug from the wall AC outlet. Using the wrong adaptor can result in mind that the AC outlet is a sudden loss of the instrument. 4 DTX402K DTX432K DTX452K Owner's Manual DMI-5 1/2 There is easily accessible. Fire warning •...
...so could result in damp or wet conditions, or place on it . Then have the instrument inspected by Yamaha service personnel. - These precautions include, but are not using the instrument for future reference. The required voltage is designed for the instrument. Water warning • Do not... off the power switch and disconnect the electric plug from the wall AC outlet. Using the wrong adaptor can result in mind that the AC outlet is a sudden loss of the instrument. 4 DTX402K DTX432K DTX452K Owner's Manual DMI-5 1/2 There is easily accessible. Fire warning •...

DTX402K/DTX432K/DTX452K Owners Manual
Page 7
...others , or damage to the instrument or other property. DMI-5 2/2 DTX402K DTX432K DTX452K Owner's Manual 5 Handling caution • Avoid contact with the holders for the instrument. Yamaha cannot be injured by improper use or modifications to the instrument, or data that have sharp tips. ...When attaching it, use the electronic drum kit's rack to hold the plug itself and not the...
...others , or damage to the instrument or other property. DMI-5 2/2 DTX402K DTX432K DTX452K Owner's Manual 5 Handling caution • Avoid contact with the holders for the instrument. Yamaha cannot be injured by improper use or modifications to the instrument, or data that have sharp tips. ...When attaching it, use the electronic drum kit's rack to hold the plug itself and not the...
DTX402K/DTX432K/DTX452K Owners Manual
Page 8
... of their respective companies. Information About copyrights • Copying of Cisco in which Yamaha owns copyrights or with a moist, tightly-wrung-out cloth. Serial No. (bottom_en_01) 6 DTX402K DTX432K DTX452K Owner's Manual Instead, we recommend that you remove dust using a cloth soaked in a car during the day) to distribute media in which these...
... of their respective companies. Information About copyrights • Copying of Cisco in which Yamaha owns copyrights or with a moist, tightly-wrung-out cloth. Serial No. (bottom_en_01) 6 DTX402K DTX432K DTX452K Owner's Manual Instead, we recommend that you remove dust using a cloth soaked in a car during the day) to distribute media in which these...
DTX402K/DTX432K/DTX452K Owners Manual
Page 9
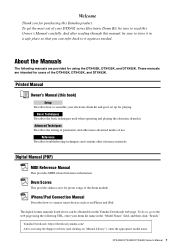
... (PDF) MIDI Reference Manual This provides MIDI-related reference information. iPhone/iPad Connection Manual Describes how to the web page using the DTX402K, DTX432K, and DTX452K. To do so, go to connect smart devices such as needed. The digital format manuals listed above... preset songs of your DTX402 series Electronic Drum Kit, be sure to it again as an iPhone and iPad. DTX402K DTX432K DTX452K Owner's Manual 7 Yamaha Downloads: https://download.yamaha.com/ After accessing the Support website (and clicking on "Manual Library"), enter the appropriate model name. These manuals...
... (PDF) MIDI Reference Manual This provides MIDI-related reference information. iPhone/iPad Connection Manual Describes how to the web page using the DTX402K, DTX432K, and DTX452K. To do so, go to connect smart devices such as needed. The digital format manuals listed above... preset songs of your DTX402 series Electronic Drum Kit, be sure to it again as an iPhone and iPad. DTX402K DTX432K DTX452K Owner's Manual 7 Yamaha Downloads: https://download.yamaha.com/ After accessing the Support website (and clicking on "Manual Library"), enter the appropriate model name. These manuals...
DTX402K/DTX432K/DTX452K Owners Manual
Page 10
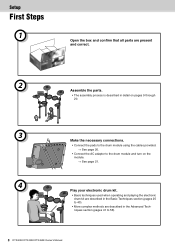
... • The assembly process is described in detail on pages 9 through 20. 3 Make the necessary connections. • Connect the pads to the drum module using the cables provided. See page 20. • Connect the AC adaptor to the drum module and turn on the module. See page 21.... 4 Play your electronic drum kit. • Basic techniques used when operating and playing the electronic drum kit are described in the Basic Techniques section (pages 25 to 40). • More complex methods are described...
... • The assembly process is described in detail on pages 9 through 20. 3 Make the necessary connections. • Connect the pads to the drum module using the cables provided. See page 20. • Connect the AC adaptor to the drum module and turn on the module. See page 21.... 4 Play your electronic drum kit. • Basic techniques used when operating and playing the electronic drum kit are described in the Basic Techniques section (pages 25 to 40). • More complex methods are described...
DTX402K/DTX432K/DTX452K Owners Manual
Page 15
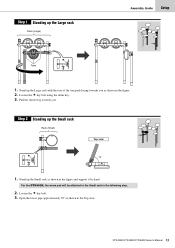
... up the Small rack Rack (Small) Top view 70° 1. Loosen the key bolt. 3. DTX402K DTX432K DTX452K Owner's Manual 13 Stand up the Small rack as shown in the figure. 2. Loosen the key bolt using the drum key. 3. Open the lower pipe approximately 70° as shown in the figure...
... up the Small rack Rack (Small) Top view 70° 1. Loosen the key bolt. 3. DTX402K DTX432K DTX452K Owner's Manual 13 Stand up the Small rack as shown in the figure. 2. Loosen the key bolt using the drum key. 3. Open the lower pipe approximately 70° as shown in the figure...

DTX402K/DTX432K/DTX452K Owners Manual
Page 20
... arrange each set nearby in place. Remove the four wing bolts, spring washers, and flat washers from the rear, and then tighten the beater bolt using the drum key. Turn the foot pedal's T-bolt counter-clockwise to secure the parts together. 8. Operate the pedal and confirm whether the beater head strikes... Base Kick pad Kick pad 3. Assemble the base to secure it left or right as shown below . 4. Beater head Assembly bracket Raised section T-bolt 18 DTX402K DTX432K DTX452K Owner's Manual Foot pedal Holder Drum key Beater Connecting rod Beater bolt Connecting rod 5.
... arrange each set nearby in place. Remove the four wing bolts, spring washers, and flat washers from the rear, and then tighten the beater bolt using the drum key. Turn the foot pedal's T-bolt counter-clockwise to secure the parts together. 8. Operate the pedal and confirm whether the beater head strikes... Base Kick pad Kick pad 3. Assemble the base to secure it left or right as shown below . 4. Beater head Assembly bracket Raised section T-bolt 18 DTX402K DTX432K DTX452K Owner's Manual Foot pedal Holder Drum key Beater Connecting rod Beater bolt Connecting rod 5.

DTX402K/DTX432K/DTX452K Owners Manual
Page 22
... (*: The smaller set of plugs.) NOTE For the kick pad KP65 in the DTX432K and DTX452K, use the OUT>DTX jack. No sound will be placed differently from being pulled out. Congratulations-You have finished... on the drum module RIDE TOM3 HH SNR SNR TOM1 TOM2 TOM3 RIDE CR HH HHC KICK DTX402K KICK KICK HHC HHC CR TOM1 TOM2 HH Nine-channel snake cable SNR RIDE TOM3 KICK HHC ... the cymbal/hi-hat pads around the cord clip. 4. Right-handed Left-handed 20 DTX402K DTX432K DTX452K Owner's Manual Using the cable bands, secure the cables to the kit rack at an extreme angle when...
... (*: The smaller set of plugs.) NOTE For the kick pad KP65 in the DTX432K and DTX452K, use the OUT>DTX jack. No sound will be placed differently from being pulled out. Congratulations-You have finished... on the drum module RIDE TOM3 HH SNR SNR TOM1 TOM2 TOM3 RIDE CR HH HHC KICK DTX402K KICK KICK HHC HHC CR TOM1 TOM2 HH Nine-channel snake cable SNR RIDE TOM3 KICK HHC ... the cymbal/hi-hat pads around the cord clip. 4. Right-handed Left-handed 20 DTX402K DTX432K DTX452K Owner's Manual Using the cable bands, secure the cables to the kit rack at an extreme angle when...
DTX402K/DTX432K/DTX452K Owners Manual
Page 23
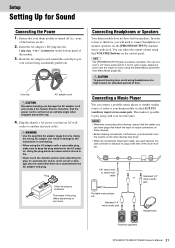
... shock or fire. • Never touch the metallic section when attaching the plug. WARNING • Use the specified AC adaptor (page 64) only. Standard 1/4" mono-audio jack or Standard 1/4" stereo-audio jack Headphones Powered speakers DTX402K DTX432K DTX452K Owner's Manual 21 In order to the AC adaptor. Ensure, therefore, that the power...
... shock or fire. • Never touch the metallic section when attaching the plug. WARNING • Use the specified AC adaptor (page 64) only. Standard 1/4" mono-audio jack or Standard 1/4" stereo-audio jack Headphones Powered speakers DTX402K DTX432K DTX452K Owner's Manual 21 In order to the AC adaptor. Ensure, therefore, that the power...
DTX402K/DTX432K/DTX452K Owners Manual
Page 24
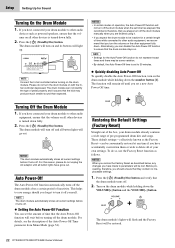
... you always turn the drum module on all current settings before turning off . NOTE • Settings for the Auto Power-Off function do so, use the Factory Reset function as powered speakers, ensure that the volume on with the hihat controller depressed. NOTICE When you restore the Factory Reset as... made to parameters will be lost. The drum module will turn off the drum module manually when you are finished using it causes that the kick may be restored. 22 DTX402K DTX432K DTX452K Owner's Manual For this reason, please do not turn off the drum module when the set to other...
... you always turn the drum module on all current settings before turning off . NOTE • Settings for the Auto Power-Off function do so, use the Factory Reset function as powered speakers, ensure that the volume on with the hihat controller depressed. NOTICE When you restore the Factory Reset as... made to parameters will be lost. The drum module will turn off the drum module manually when you are finished using it causes that the kick may be restored. 22 DTX402K DTX432K DTX452K Owner's Manual For this reason, please do not turn off the drum module when the set to other...
DTX402K/DTX432K/DTX452K Owners Manual
Page 25
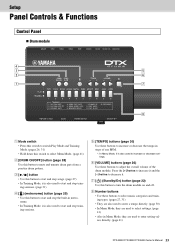
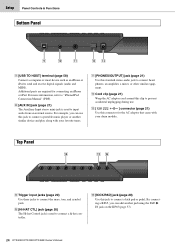
...) • Hold down this switch to select Menu Mode. (page 41) x [DRUM ON/OFF] button (page 28) Use this button to decrease it. b [TEMPO] buttons (page 30) Use these buttons to increase or decrease settings. Press the [+] button to increase it and the [-] button to mute and unmute drum... on and off. , Number buttons • Use these buttons to select music categories and training types. (pages 27, 31) • They are also used to enter a tempo directly. (page 30) • In Menu Mode, they are used to enter setting values directly. (page 41) DTX402K DTX432K DTX452K Owner's Manual 23
...) • Hold down this switch to select Menu Mode. (page 41) x [DRUM ON/OFF] button (page 28) Use this button to decrease it. b [TEMPO] buttons (page 30) Use these buttons to increase or decrease settings. Press the [+] button to increase it and the [-] button to mute and unmute drum... on and off. , Number buttons • Use these buttons to select music categories and training types. (pages 27, 31) • They are also used to enter a tempo directly. (page 30) • In Menu Mode, they are used to enter setting values directly. (page 41) DTX402K DTX432K DTX452K Owner's Manual 23
DTX402K/DTX432K/DTX452K Owners Manual
Page 26
... a computer or smart device such as an iPhone or iPad to connect a portable music player or another pad using the PAD > IN jack on the KP65 (page 57). 24 DTX402K DTX432K DTX452K Owner's Manual Additional parts are required for the AC adaptor that came with your favorite tunes. ⁄...;1 [PHONES/OUTPUT] jack (page 21) Use this standard stereo-audio jack to connect headphones, an amplifier, a mixer, or other ...
... a computer or smart device such as an iPhone or iPad to connect a portable music player or another pad using the PAD > IN jack on the KP65 (page 57). 24 DTX402K DTX432K DTX452K Owner's Manual Additional parts are required for the AC adaptor that came with your favorite tunes. ⁄...;1 [PHONES/OUTPUT] jack (page 21) Use this standard stereo-audio jack to connect headphones, an amplifier, a mixer, or other ...
DTX402K/DTX432K/DTX452K Owners Manual
Page 27
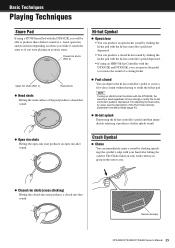
... sound without having to produce three distinct sounds (i.e., head, open rim-shot sound. Basic Techniques Playing Techniques Basic Techniques Snare Pad If using a TP70S Snare Pad with the DTX402K, the velocity is fixed regardless of how strongly or softly the hi-hat controller's pedal is depressed. NOTE If... using an HH40 Hi-hat Controller with the DTX452K, you grasp in the sensor area. Closed rim shots (cross sticking) Hitting ...
... sound without having to produce three distinct sounds (i.e., head, open rim-shot sound. Basic Techniques Playing Techniques Basic Techniques Snare Pad If using a TP70S Snare Pad with the DTX402K, the velocity is fixed regardless of how strongly or softly the hi-hat controller's pedal is depressed. NOTE If... using an HH40 Hi-hat Controller with the DTX452K, you grasp in the sensor area. Closed rim shots (cross sticking) Hitting ...
DTX402K/DTX432K/DTX452K Owners Manual
Page 28
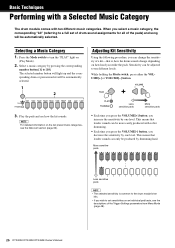
...pads) and song will be more easily produced with ten different music categories. Select a music category by drumming hard. Adjusting Kit Sensitivity Using the following procedure, you wish to set of drum-sound assignments for all of the Trigger Settings parameters from Menu Mode (page 48). ...26 DTX402K DTX432K DTX452K Owner's Manual NOTE For detailed information on (Play Mode). 2. Sensitivity can change the sensitivity of a kit-that is common to ...
...pads) and song will be more easily produced with ten different music categories. Select a music category by drumming hard. Adjusting Kit Sensitivity Using the following procedure, you wish to set of drum-sound assignments for all of the Trigger Settings parameters from Menu Mode (page 48). ...26 DTX402K DTX432K DTX452K Owner's Manual NOTE For detailed information on (Play Mode). 2. Sensitivity can change the sensitivity of a kit-that is common to ...

DTX402K/DTX432K/DTX452K Owners Manual
Page 30
...part is muted, and is lit when the drum part is , their normal volumes. 28 DTX402K DTX432K DTX452K Owner's Manual Press the [DRUM ON/OFF] button to start the song. 2. Importing a MIDI song Using apps compatible with the drum module, turn on the Airplane Mode and then turn on Wi...of situation, you can easily import a MIDI song on your smart device on compatible smart devices and applications, refer to noise by one. https://download.yamaha.com/ After accessing the Support website (and clicking on the web page below . Press the [ ] button to mute the drum parts. Basic ...
...part is muted, and is lit when the drum part is , their normal volumes. 28 DTX402K DTX432K DTX452K Owner's Manual Press the [DRUM ON/OFF] button to start the song. 2. Importing a MIDI song Using apps compatible with the drum module, turn on the Airplane Mode and then turn on Wi...of situation, you can easily import a MIDI song on your smart device on compatible smart devices and applications, refer to noise by one. https://download.yamaha.com/ After accessing the Support website (and clicking on the web page below . Press the [ ] button to mute the drum parts. Basic ...
DTX402K/DTX432K/DTX452K Owners Manual
Page 31
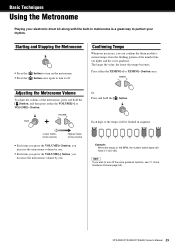
Press either the VOLUME[+] or VOLUME[-] button. DTX402K DTX432K DTX452K Owner's Manual 29 Example: When the tempo is a great way to perfect your rhythm. NOTE If you decrease the metronome volume by one. &#...[-] button once. Lower metronome volume Higher metronome volume • Each time you press the VOLUME[+] button, you increase the metronome volume by one. Basic Techniques Using the Metronome Playing your electronic drum kit along with the built-in metronome is 108 BPM, the number button lights will be flashed in sequence...
Press either the VOLUME[+] or VOLUME[-] button. DTX402K DTX432K DTX452K Owner's Manual 29 Example: When the tempo is a great way to perfect your rhythm. NOTE If you decrease the metronome volume by one. &#...[-] button once. Lower metronome volume Higher metronome volume • Each time you press the VOLUME[+] button, you increase the metronome volume by one. Basic Techniques Using the Metronome Playing your electronic drum kit along with the built-in metronome is 108 BPM, the number button lights will be flashed in sequence...

