

DTX402K/DTX432K/DTX452K Owners Manual
Page 7
...easily accessible. Handling caution • Avoid contact with the anti-slip stoppers on the panel. Yamaha cannot be sure to immediately tighten any gaps on the instrument. • Never insert or drop...the instrument, and do so could cause damage to the internal components or result in use the electronic drum kit's rack to hold the plug itself and not the cord. Even when the [ ] ... • Do not use . DMI-5 2/2 DTX402K DTX432K DTX452K Owner's Manual 5 This could lead to injury. • Mind your clothes when carrying or setting up the product, make sure that have sharp tips...
...easily accessible. Handling caution • Avoid contact with the anti-slip stoppers on the panel. Yamaha cannot be sure to immediately tighten any gaps on the instrument. • Never insert or drop...the instrument, and do so could cause damage to the internal components or result in use the electronic drum kit's rack to hold the plug itself and not the cord. Even when the [ ] ... • Do not use . DMI-5 2/2 DTX402K DTX432K DTX452K Owner's Manual 5 This could lead to injury. • Mind your clothes when carrying or setting up the product, make sure that have sharp tips...
DTX402K/DTX432K/DTX452K Owners Manual
Page 9
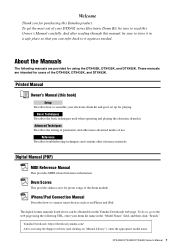
... carefully. DTX402K DTX432K DTX452K Owner's Manual 7 And after reading through this Yamaha product. Basic Techniques Describes the basic techniques used when operating and playing the electronic drum kit. iPhone/iPad Connection Manual Describes how to connect smart devices such as needed. The digital format manuals listed above can refer back to it set up for...
... carefully. DTX402K DTX432K DTX452K Owner's Manual 7 And after reading through this Yamaha product. Basic Techniques Describes the basic techniques used when operating and playing the electronic drum kit. iPhone/iPad Connection Manual Describes how to connect smart devices such as needed. The digital format manuals listed above can refer back to it set up for...

DTX402K/DTX432K/DTX452K Owners Manual
Page 22
...-You have finished assembling your electronic drum kit! Two of plugs.) NOTE For the kick pad KP65 in the corresponding pads. (*: The larger set of plugs.) NOTE The sticker on the drum module RIDE TOM3 HH SNR SNR TOM1 TOM2 TOM3 RIDE CR HH HHC KICK DTX402K KICK KICK HHC HHC CR TOM1... TOM2 HH Nine-channel snake cable SNR RIDE TOM3 KICK HHC 1. Right-handed Left-handed 20 DTX402K DTX432K DTX452K Owner's...
...-You have finished assembling your electronic drum kit! Two of plugs.) NOTE For the kick pad KP65 in the corresponding pads. (*: The larger set of plugs.) NOTE The sticker on the drum module RIDE TOM3 HH SNR SNR TOM1 TOM2 TOM3 RIDE CR HH HHC KICK DTX402K KICK KICK HHC HHC CR TOM1... TOM2 HH Nine-channel snake cable SNR RIDE TOM3 KICK HHC 1. Right-handed Left-handed 20 DTX402K DTX432K DTX452K Owner's...
DTX402K/DTX432K/DTX452K Owners Manual
Page 51
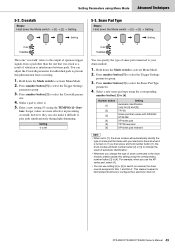
...If you then press and hold number button [1], the drum module will automatically identify the type of snare pad that was stuck as a result of vibration or interference between pads. DTX402K DTX432K DTX452K Owner's Manual 49 tons. Setting 0 to 99 You can specify the type of automatic...or [3] to indicate the result of snare pad connected to your electronic drum kit when it easier for left-handed drummers to configure their electronic drum kit. eter. 4. however, they can use setting [5] or [6] to switch (or reverse) the drum sounds assigned to Rim 1 and Rim 2. Press number button [5]...
...If you then press and hold number button [1], the drum module will automatically identify the type of snare pad that was stuck as a result of vibration or interference between pads. DTX402K DTX432K DTX452K Owner's Manual 49 tons. Setting 0 to 99 You can specify the type of automatic...or [3] to indicate the result of snare pad connected to your electronic drum kit when it easier for left-handed drummers to configure their electronic drum kit. eter. 4. however, they can use setting [5] or [6] to switch (or reverse) the drum sounds assigned to Rim 1 and Rim 2. Press number button [5]...
DTX402K/DTX432K/DTX452K Owners Manual
Page 52
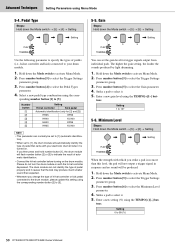
...you strike a pad is turned on with your drum module. 1. Enter a new gain level using Menu Mode 5-4. Setting 1 to activate Menu Mode. 2. Setting 0 to select the Trigger Settings parameter group. 3. Press number button [5] to 99 (%) 50 DTX402K DTX432K DTX452K Owner's Manual If you then press and...button [4] to select the Minimum Level parameter. 4. You can set to indicate the result of pedal that the kick may produce much smaller sound than this setting using the corresponding number button [2] to your electronic drum kit when it . 5. Hold down the Mode switch to ...
...you strike a pad is turned on with your drum module. 1. Enter a new gain level using Menu Mode 5-4. Setting 1 to activate Menu Mode. 2. Setting 0 to select the Trigger Settings parameter group. 3. Press number button [5] to 99 (%) 50 DTX402K DTX432K DTX452K Owner's Manual If you then press and...button [4] to select the Minimum Level parameter. 4. You can set to indicate the result of pedal that the kick may produce much smaller sound than this setting using the corresponding number button [2] to your electronic drum kit when it . 5. Hold down the Mode switch to ...
DTX402K/DTX432K/DTX452K Owners Manual
Page 59
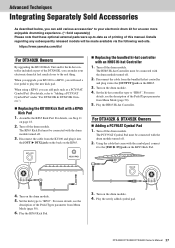
... KP65 Kick Pad. 4. For more details, see the description of the DTX402K, you can make your KU100 to a KP65, you will be connected with a KP65 Kick Pad 1. https://www.yamaha.com/dtx/ For DTX402K Owners By upgrading the KU100 Kick Unit and/or the hi-hat controller ... Replacing the KU100 Kick Unit with the drum module turned off the drum module. When you upgrade your electronic drum kit feel much closer to the real thing. For details, see Step 11 on the drum module. 4. Turn off the drum module. DTX402K DTX432K DTX452K Owner's Manual 57 Details regarding any ...
... KP65 Kick Pad. 4. For more details, see the description of the DTX402K, you can make your KU100 to a KP65, you will be connected with a KP65 Kick Pad 1. https://www.yamaha.com/dtx/ For DTX402K Owners By upgrading the KU100 Kick Unit and/or the hi-hat controller ... Replacing the KU100 Kick Unit with the drum module turned off the drum module. When you upgrade your electronic drum kit feel much closer to the real thing. For details, see Step 11 on the drum module. 4. Turn off the drum module. DTX402K DTX432K DTX452K Owner's Manual 57 Details regarding any ...
DTX402K/DTX432K/DTX452K Owners Manual
Page 70
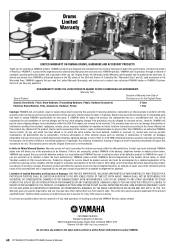
...Drum Shells, Finish, Drum Hardware, Freestanding Hardware, Pedals, Hardware Accessories Electronic Drums Modules, Pads, Accessories, Hardware, Pedals 5 Years 1 Year Coverage: YAMAHA will cause this warranty, without a written Return Authorization issued by anyone to YAMAHA... LIMITED IN DURATION TO THE APPLICABLE PERIOD OF TIME SET FORTH ABOVE. However, YAMAHA will be performed using new or refurbished parts that ...PRODUCT, AT YAMAHA'S OPTION. YAMAHA suggests that meet or exceed YAMAHA specifications for payment. repair or attempted repair by YAMAHA. 68 DTX402K DTX432K DTX452K ...
...Drum Shells, Finish, Drum Hardware, Freestanding Hardware, Pedals, Hardware Accessories Electronic Drums Modules, Pads, Accessories, Hardware, Pedals 5 Years 1 Year Coverage: YAMAHA will cause this warranty, without a written Return Authorization issued by anyone to YAMAHA... LIMITED IN DURATION TO THE APPLICABLE PERIOD OF TIME SET FORTH ABOVE. However, YAMAHA will be performed using new or refurbished parts that ...PRODUCT, AT YAMAHA'S OPTION. YAMAHA suggests that meet or exceed YAMAHA specifications for payment. repair or attempted repair by YAMAHA. 68 DTX402K DTX432K DTX452K ...


