
Owner's Manual
Page 3
... provides a reasonable level of assurance that are on the back of interference, which can not locate the appropriate retailer, please contact Yamaha Electronics Corp., 6600 Orangethorpe Ave. THIS DIGITAL APPARATUS DOES NOT EXCEED THE CLASS B LIMITS FOR RADIO NOISE EMISSIONS FROM DIGITAL APPARATUS AS... This reminder is found to the point of the following measures: Relocate either this product in a residential environment will not occur in the users manual, may void your use this type of objective) 0,8 mW (DVD reading) 0,3 mW (CD reading) Beam divergence 82 degrees (DVD) 54...
... provides a reasonable level of assurance that are on the back of interference, which can not locate the appropriate retailer, please contact Yamaha Electronics Corp., 6600 Orangethorpe Ave. THIS DIGITAL APPARATUS DOES NOT EXCEED THE CLASS B LIMITS FOR RADIO NOISE EMISSIONS FROM DIGITAL APPARATUS AS... This reminder is found to the point of the following measures: Relocate either this product in a residential environment will not occur in the users manual, may void your use this type of objective) 0,8 mW (DVD reading) 0,3 mW (CD reading) Beam divergence 82 degrees (DVD) 54...
Owner's Manual
Page 4
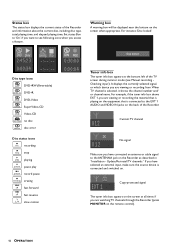
...surface of this unit, do not pull the cord. 11 Do not clean this unit with chemical solvents; CAUTION 16 Be sure to read this manual carefully. Supplied Accessories - Antenna cable - CAUTION Read this before operating your unit. 1 To assure the finest performance, please read the...the wall outlet during an electrical storm. 14 Do not attempt to use of Communications. you may cause unstable recording results. Contact qualified YAMAHA service personnel when any reason. 15 When not planning to modify or fix this unit, and/or personal injury. - In a cabinet,...
...surface of this unit, do not pull the cord. 11 Do not clean this unit with chemical solvents; CAUTION 16 Be sure to read this manual carefully. Supplied Accessories - Antenna cable - CAUTION Read this before operating your unit. 1 To assure the finest performance, please read the...the wall outlet during an electrical storm. 14 Do not attempt to use of Communications. you may cause unstable recording results. Contact qualified YAMAHA service personnel when any reason. 15 When not planning to modify or fix this unit, and/or personal injury. - In a cabinet,...

Owner's Manual
Page 5
... Loading discs 13 Disc types 13 On-screen display information 14 Index Picture Screen 18 User preferences 19 Recording 24 Before you start recording 24 Manual recording of a TV channel or from a video camera ________ 24 Timer programming 26 If a timer recording is manufactured under license from Dolby Laboratories. "Dolby," "Pro...
... Loading discs 13 Disc types 13 On-screen display information 14 Index Picture Screen 18 User preferences 19 Recording 24 Before you start recording 24 Manual recording of a TV channel or from a video camera ________ 24 Timer programming 26 If a timer recording is manufactured under license from Dolby Laboratories. "Dolby," "Pro...

Owner's Manual
Page 7
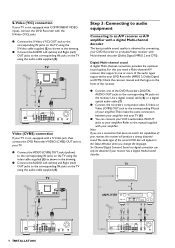
... Scan connection. You still need a video connection to send DVD playback from your TV and connect it to the ANTENNA jack at any other User Manual(s) as shown in the drawing. ● Connect the AUDIO Left (white) and Right (red) OUT jacks to the corresponding AUDIO IN jacks on the TV...
... Scan connection. You still need a video connection to send DVD playback from your TV and connect it to the ANTENNA jack at any other User Manual(s) as shown in the drawing. ● Connect the AUDIO Left (white) and Right (red) OUT jacks to the corresponding AUDIO IN jacks on the TV...
Owner's Manual
Page 8
.... Refer to your amplifier. Six Channel Digital Surround Sound via digital connection can connect your VCR's audio/video IN/OUT jacks to the manual supplied with your amplifier. S. S. TV 4 1 5 Apparatus Claims of U. TV 8 8 AMPLIFIER 8 8 7 Apparatus Claims of U. EXT 2 EXT 3 COMPONENT VIDEO Y Y ... only be obtained if your DVD Recorder to the corresponding IN jacks on the TV using the audio cable supplied (4). Check the receiver manual and the logos on the front of the receiver. ● Connect one or more of U. S-Video (Y/C) connection If your TV is...
.... Refer to your amplifier. Six Channel Digital Surround Sound via digital connection can connect your VCR's audio/video IN/OUT jacks to the manual supplied with your amplifier. S. S. TV 4 1 5 Apparatus Claims of U. TV 8 8 AMPLIFIER 8 8 7 Apparatus Claims of U. EXT 2 EXT 3 COMPONENT VIDEO Y Y ... only be obtained if your DVD Recorder to the corresponding IN jacks on the TV using the audio cable supplied (4). Check the receiver manual and the logos on the front of the receiver. ● Connect one or more of U. S-Video (Y/C) connection If your TV is...
Owner's Manual
Page 11
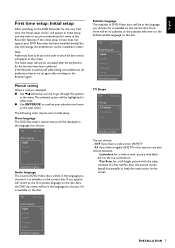
.... Initial setup Audio Language English Español Français Português Italiano Press OK to the first spoken language on the disc. Manual setting When a menu is displayed: ● Use w/v (down/up cursor) to go through the options in the menu.The selected option will be displayed in...
.... Initial setup Audio Language English Español Français Português Italiano Press OK to the first spoken language on the disc. Manual setting When a menu is displayed: ● Use w/v (down/up cursor) to go through the options in the menu.The selected option will be displayed in...

Owner's Manual
Page 13
...backward during disc playback - 6 search forward during disc playback REC VOLUME AUTO/MAN - switches the Recorder On or to select TV channels manually When the Recorder is in monitor mode. lights green when the Recorder is not operable - recording of recorder STANDBY/ON - to standby ...- Video input jack to connect a video camera or video Recorder S-VIDEO In (CAM1) - to adjust the recording volume level automatically or manually MANUAL - 3 4 to increase/decrease the recording volume level CHANNEL - stops disc playback or recording / (open/close) - lights red when the ...
...backward during disc playback - 6 search forward during disc playback REC VOLUME AUTO/MAN - switches the Recorder On or to select TV channels manually When the Recorder is in monitor mode. lights green when the Recorder is not operable - recording of recorder STANDBY/ON - to standby ...- Video input jack to connect a video camera or video Recorder S-VIDEO In (CAM1) - to adjust the recording volume level automatically or manually MANUAL - 3 4 to increase/decrease the recording volume level CHANNEL - stops disc playback or recording / (open/close) - lights red when the ...

Owner's Manual
Page 15
...Play Plus CHAPTER - A second audio program is broadcasting in stereo SAP - DTS - Current channel number RECORD - Appears when you manually adjust the recording level MPEG - The current channel is available on the current channel dB scale - DIGITAL - Active audio format FUNCTIONAL ...OVERVIEW 11 DVD+Recordable disc inserted TITLE - Video CD inserted CD - indicates recording volume when using manual controls Disc bar - Track time in progress TIMER - Total remaining recording time in hours, minutes and seconds TIME REMAIN - DVD...
...Play Plus CHAPTER - A second audio program is broadcasting in stereo SAP - DTS - Current channel number RECORD - Appears when you manually adjust the recording level MPEG - The current channel is available on the current channel dB scale - DIGITAL - Active audio format FUNCTIONAL ...OVERVIEW 11 DVD+Recordable disc inserted TITLE - Video CD inserted CD - indicates recording volume when using manual controls Disc bar - Track time in progress TIMER - Total remaining recording time in hours, minutes and seconds TIME REMAIN - DVD...
Owner's Manual
Page 20
... disc error Disc status icons 0 rec recording 9 stop stop 2 play 0 ; pause pause play playing ; If you have connected an antenna or cable signal to see 'Manual recording Checking input'). Copy-protected signal The tuner info box appears on . For example, if the tuner info box shows EXT 1, you are watching TV...
... disc error Disc status icons 0 rec recording 9 stop stop 2 play 0 ; pause pause play playing ; If you have connected an antenna or cable signal to see 'Manual recording Checking input'). Copy-protected signal The tuner info box appears on . For example, if the tuner info box shows EXT 1, you are watching TV...

Owner's Manual
Page 25
... for images that contain fast movement, like sports programs.The setting does not influence recording when using HQ or SP+ mode. You can manually insert chapter markers after recording. (See 'Managing disc content Editing') Filter mode When recording EP or EP+, select the 'Sport' setting to switch record modes...
... for images that contain fast movement, like sports programs.The setting does not influence recording when using HQ or SP+ mode. You can manually insert chapter markers after recording. (See 'Managing disc content Editing') Filter mode When recording EP or EP+, select the 'Sport' setting to switch record modes...

Owner's Manual
Page 26
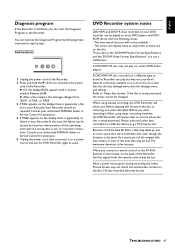
...the u (right cursor). 2 Select a VCR Plus+ Guide channel with w/v (down/up cursor), then press u (right cursor). ➤ The Automatic/Manual screen is displayed, with t/u (left /right cursor) to the previous menu. Add Delete Add Add Delete Add To exit press SYSTEM MENU VCR Plus+&#... (down/up cursor), then press ENTER/OK or u (right cursor). ➤ Automatic search and installation starts. 'Searching for example, your area, see 'Time/Date Manually.' 1 In the Installation menu, select 'Time/Date' with ENTER/OK or w (down /up cursor). 5 Enter the correct digits or press t/u (left /right...
...the u (right cursor). 2 Select a VCR Plus+ Guide channel with w/v (down/up cursor), then press u (right cursor). ➤ The Automatic/Manual screen is displayed, with t/u (left /right cursor) to the previous menu. Add Delete Add Add Delete Add To exit press SYSTEM MENU VCR Plus+&#... (down/up cursor), then press ENTER/OK or u (right cursor). ➤ Automatic search and installation starts. 'Searching for example, your area, see 'Time/Date Manually.' 1 In the Installation menu, select 'Time/Date' with ENTER/OK or w (down /up cursor). 5 Enter the correct digits or press t/u (left /right...

Owner's Manual
Page 27
... is displayed, with the cursor on the currently selected option. 2 Press the w (down /up cursor). If you press SYSTEM MENU, you will return to select 'Manual.' 3 Press ENTER/OK. ➤ The Time/Date screen appears. 4 Adjust 'Time,' 'AM/PM,' 'Year,' 'Month,' 'Date,' and 'Day- light saving' if required. Change values... each entry with ENTER/OK. 8 To end, press SYSTEM MENU repeatedly to remove the menus. ➤ The time and date will be set manually. Time/date Manual Time AM/PM Year Month Date Daylight Saving 03: 46 PM 2001 06 16 On To exit press SYSTEM MENU 4 Press SYSTEM MENU to...
... is displayed, with the cursor on the currently selected option. 2 Press the w (down /up cursor). If you press SYSTEM MENU, you will return to select 'Manual.' 3 Press ENTER/OK. ➤ The Time/Date screen appears. 4 Adjust 'Time,' 'AM/PM,' 'Year,' 'Month,' 'Date,' and 'Day- light saving' if required. Change values... each entry with ENTER/OK. 8 To end, press SYSTEM MENU repeatedly to remove the menus. ➤ The time and date will be set manually. Time/date Manual Time AM/PM Year Month Date Daylight Saving 03: 46 PM 2001 06 16 On To exit press SYSTEM MENU 4 Press SYSTEM MENU to...

Owner's Manual
Page 28
...the disc is not a DVD video disc. 11: 15 am EXT 1 Press OK to open tray or press REC to other titles or chapters see 'Manual Recording - In this disc after erasing it with the option to make a new recording.You have been made . - General features.' See 'Managing Disc ... with the REC. Erasing a Title.' Notes: - Press MONITOR again to return to start recording Recordings on the disc to disc viewing only at the Recorder. Manual recording of one or more information about how to go to erase disc. 24 RECORDING TITLE 1 DVD+RW TITLE 2 CHAPTER 1 CHAPTER 2 CHAPTER 3 CHAPTER 1...
...the disc is not a DVD video disc. 11: 15 am EXT 1 Press OK to open tray or press REC to other titles or chapters see 'Manual Recording - In this disc after erasing it with the option to make a new recording.You have been made . - General features.' See 'Managing Disc ... with the REC. Erasing a Title.' Notes: - Press MONITOR again to return to start recording Recordings on the disc to disc viewing only at the Recorder. Manual recording of one or more information about how to go to erase disc. 24 RECORDING TITLE 1 DVD+RW TITLE 2 CHAPTER 1 CHAPTER 2 CHAPTER 3 CHAPTER 1...

Owner's Manual
Page 29
...start recording on a DVD+RW disc by briefly pressing REC, a recording on DVD+RW will show the current disc position, and 'MANUAL' disappears. Manual audio control You can resume recording by pressing REC VOLUME AUTO/MAN again. ➤ The display will show 'DISC FULL.' RECORDING 25 English... Screen appears showing the most recent recording. The following : ● Hold the REC for recording from the equipment connected to DV, the manual audio control is disabled.The REC VOLUME AUTO/ MAN is active only during the loudest parts of the recording. 3 Return to complete the ...
...start recording on a DVD+RW disc by briefly pressing REC, a recording on DVD+RW will show the current disc position, and 'MANUAL' disappears. Manual audio control You can resume recording by pressing REC VOLUME AUTO/MAN again. ➤ The display will show 'DISC FULL.' RECORDING 25 English... Screen appears showing the most recent recording. The following : ● Hold the REC for recording from the equipment connected to DV, the manual audio control is disabled.The REC VOLUME AUTO/ MAN is active only during the loudest parts of the recording. 3 Return to complete the ...

Owner's Manual
Page 32
... t (left cursor) and re-enter the information. 17 Confirm with ENTER/OK. ➤ When all information is correct and complete. Set it manually (See 'Time/Date Manually') or adjust the Clock channel (See 'Time/Date Automatic.') Data error Solution: ● Make sure all information is correct, the data is stored...
... t (left cursor) and re-enter the information. 17 Confirm with ENTER/OK. ➤ When all information is correct and complete. Set it manually (See 'Time/Date Manually') or adjust the Clock channel (See 'Time/Date Automatic.') Data error Solution: ● Make sure all information is correct, the data is stored...
Owner's Manual
Page 46
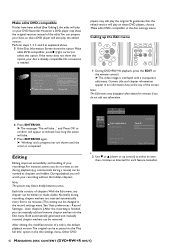
...players may show this option. Current title and chapter information appear in the record settings menu. For instance; During playback you can manually add and remove chapter markers via the 'Play full title' option in the disc settings menu. Normally during playback (e.g. Other ... 3 and 4 as chapters and hidden. Settings for each feature hereafter. 42 MANAGING DISC CONTENT (DVD+RW/+R ONLY) Both automatically generated and manually inserted chapter markers can be marked as explained above. 5 If the Disc Information Screen shows the option 'Make edits DVD-compatible,' press u (...
...players may show this option. Current title and chapter information appear in the record settings menu. For instance; During playback you can manually add and remove chapter markers via the 'Play full title' option in the disc settings menu. Normally during playback (e.g. Other ... 3 and 4 as chapters and hidden. Settings for each feature hereafter. 42 MANAGING DISC CONTENT (DVD+RW/+R ONLY) Both automatically generated and manually inserted chapter markers can be marked as explained above. 5 If the Disc Information Screen shows the option 'Make edits DVD-compatible,' press u (...

Owner's Manual
Page 47
.... 3 Select 'Delete all markers in this title.' 4 Press ENTER/OK on the remote control to confirm ➤ 'This will delete all chapter markers (manually and automatically generated) fin the current title. Changing the index picture To define the current video frame as a miniature picture to be appear...
.... 3 Select 'Delete all markers in this title.' 4 Press ENTER/OK on the remote control to confirm ➤ 'This will delete all chapter markers (manually and automatically generated) fin the current title. Changing the index picture To define the current video frame as a miniature picture to be appear...
Owner's Manual
Page 51
... minutes, the message changes from the remote control may be played on the display, there is apparently no failure in the Recorder. Consult your authorized YAMAHA dealer or Service Center for assistance. 4 If 'PASS' appears on most DVD players and DVDROM drives, with a counter number. A DVD+RW/+R disc... Picture Screen may not match the actual video content on certain DVD Video players. This is due to 'Adapt disc format.' When using manual recording, the DVD Recorder will not be caused by step. English Diagnosis program If the Recorder is still faulty you can start to record...
... minutes, the message changes from the remote control may be played on the display, there is apparently no failure in the Recorder. Consult your authorized YAMAHA dealer or Service Center for assistance. 4 If 'PASS' appears on most DVD players and DVDROM drives, with a counter number. A DVD+RW/+R disc... Picture Screen may not match the actual video content on certain DVD Video players. This is due to 'Adapt disc format.' When using manual recording, the DVD Recorder will not be caused by step. English Diagnosis program If the Recorder is still faulty you can start to record...

Owner's Manual
Page 55
...• VIDEO FORMAT Digital Compression MPEG2 for DVD MPEG1 for Remote Control - Resolution • Vertical Resolution VCD • Horiz. Divide - Automatic/Manual Chapter Marker insertion - Fast Forward/Backward (three speeds) - Repeat (Chapter / Title / All) or (Track / All) - A-B Repeat - ... ohms Standard (IEC type) PROGRAMMING Number of lines Playback Recording Internal tuner PAL/SECAM 50Hz 625 • • - Erase - Automatic/Manual Audio Recording Level DISC PLAYBACK - Next / Previous Title / Track / Chapter - Intro Scan - Backup Presets & Timer Events: 1 year...
...• VIDEO FORMAT Digital Compression MPEG2 for DVD MPEG1 for Remote Control - Resolution • Vertical Resolution VCD • Horiz. Divide - Automatic/Manual Chapter Marker insertion - Fast Forward/Backward (three speeds) - Repeat (Chapter / Title / All) or (Track / All) - A-B Repeat - ... ohms Standard (IEC type) PROGRAMMING Number of lines Playback Recording Internal tuner PAL/SECAM 50Hz 625 • • - Erase - Automatic/Manual Audio Recording Level DISC PLAYBACK - Next / Previous Title / Track / Chapter - Intro Scan - Backup Presets & Timer Events: 1 year...