Owner's Manual
Page 3
... fire. If it should come in a car during the day) to prevent the possibility of panel disfiguration or damage to the model DD-55C. (4)-7 3 Do not use new batteries together with manganese batteries, or batteries from different makers, or different types of time at their minimum levels and ...the specified adaptor (PA-5D, PA-5C or an equivalent recommended by it near heat sources such as the floppy disk-based Yamaha MIDI data filer MDF3, and storing the floppy disks in (or an AC power adaptor is connected to) the instrument, the data will...
... fire. If it should come in a car during the day) to prevent the possibility of panel disfiguration or damage to the model DD-55C. (4)-7 3 Do not use new batteries together with manganese batteries, or batteries from different makers, or different types of time at their minimum levels and ...the specified adaptor (PA-5D, PA-5C or an equivalent recommended by it near heat sources such as the floppy disk-based Yamaha MIDI data filer MDF3, and storing the floppy disks in (or an AC power adaptor is connected to) the instrument, the data will...
Owner's Manual
Page 4
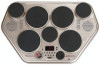
Congratulations! The DD-55 has been developed to a Computer 24 Enter/Exit the MIDI/Utility Mode 25 Setting the Clock 25 Local ON/OFF 26 Setting the MIDI Transmit Channel 27 Setting the MIDI Note Number 28 Saving and Loading Song Data 29 Appendix 31 Initialize 31 Troubleshooting...Map 38 GM Voice List 40 MIDI Implementation Chart 41 Specifications 44 ● Trademarks • Apple and Macintosh are the property of Apple Computer, Inc., registered in the U.S. Before you use the instrument, we recommend that you for purchasing the Yamaha DD-55. All other countries. •...
Congratulations! The DD-55 has been developed to a Computer 24 Enter/Exit the MIDI/Utility Mode 25 Setting the Clock 25 Local ON/OFF 26 Setting the MIDI Transmit Channel 27 Setting the MIDI Note Number 28 Saving and Loading Song Data 29 Appendix 31 Initialize 31 Troubleshooting...Map 38 GM Voice List 40 MIDI Implementation Chart 41 Specifications 44 ● Trademarks • Apple and Macintosh are the property of Apple Computer, Inc., registered in the U.S. Before you use the instrument, we recommend that you for purchasing the Yamaha DD-55. All other countries. •...
Owner's Manual
Page 7
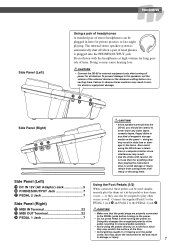
...) @4 @3 @2 Side Panel (Left) !9 DC IN 12V (AC Adaptor) Jack 5 @0 PHONES/OUTPUT Jack 7 @1 PEDAL 2 Jack 7 Side Panel (Right) @2 MIDI IN Terminal 22 @3 MIDI OUT Terminal 22 @4 PEDAL 1 Jack 7 • Since speakers are properly connected to observe these pedals can be plugged in damage or injury. 7 The internal... pedals directly on . this changes the recognized polarity of the pedal, resulting in reversed pedal operation. • Avoid using the DD-55 near a television or computer monitor, since they may result. • Use the sticks with the headphones at the minimum ...
...) @4 @3 @2 Side Panel (Left) !9 DC IN 12V (AC Adaptor) Jack 5 @0 PHONES/OUTPUT Jack 7 @1 PEDAL 2 Jack 7 Side Panel (Right) @2 MIDI IN Terminal 22 @3 MIDI OUT Terminal 22 @4 PEDAL 1 Jack 7 • Since speakers are properly connected to observe these pedals can be plugged in damage or injury. 7 The internal... pedals directly on . this changes the recognized polarity of the pedal, resulting in reversed pedal operation. • Avoid using the DD-55 near a television or computer monitor, since they may result. • Use the sticks with the headphones at the minimum ...
Owner's Manual
Page 12
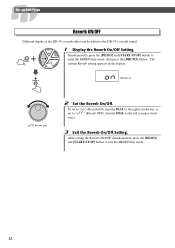
... Reverb on oFF on " (Reverb ON), turn the DIAL to the right (clockwise), to set to "oFF" (Reverb OFF), turn the DIAL to enter the MIDI/Utility mode, then press the [DRUM3] button. The current Reverb setting appears in the display. Simultaneously press the [DEMO] and [START/STOP] button to the... left (counter-clockwise). 3 Exit the Reverb On/Off Setting. Play the Pads/Pedals Reverb ON/OFF Different depths of the DD-55's reverb effect can be added to exit the MIDI/Utility mode. 12 After setting the Reverb ON/OFF, simultaneously press the [DEMO] and [START/STOP] button to the...
... Reverb on oFF on " (Reverb ON), turn the DIAL to the right (clockwise), to set to "oFF" (Reverb OFF), turn the DIAL to enter the MIDI/Utility mode, then press the [DRUM3] button. The current Reverb setting appears in the display. Simultaneously press the [DEMO] and [START/STOP] button to the... left (counter-clockwise). 3 Exit the Reverb On/Off Setting. Play the Pads/Pedals Reverb ON/OFF Different depths of the DD-55's reverb effect can be added to exit the MIDI/Utility mode. 12 After setting the Reverb ON/OFF, simultaneously press the [DEMO] and [START/STOP] button to the...

Owner's Manual
Page 13
...pad sensitivity is fitted with sensors underneath each pad/sensor produces velocity data. DD-55 Sound Triggering The DD-55 is the highest, providing the most dynamic range for your playing (softest to exit the MIDI/Utility mode. However, striking one pad results in other pads also sounding, even though... they were not struck. → Set the pad sensitivity level to ignore hits of low velocity. (It assumes the low velocity is set to 0. With this from happening, the DD-55 is ...
...pad sensitivity is fitted with sensors underneath each pad/sensor produces velocity data. DD-55 Sound Triggering The DD-55 is the highest, providing the most dynamic range for your playing (softest to exit the MIDI/Utility mode. However, striking one pad results in other pads also sounding, even though... they were not struck. → Set the pad sensitivity level to ignore hits of low velocity. (It assumes the low velocity is set to 0. With this from happening, the DD-55 is ...
Owner's Manual
Page 16
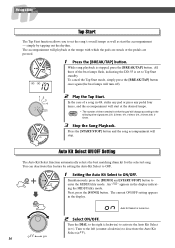
...[START/STOP] button and the song accompaniment will playback at the desired tempo. • The number of the beat lamps flash, indicating the DD-55 is set the song's overall tempo as well as start the accompaniment - The current ON/OFF setting appears in the display indicating the... MIDI/Utility mode. Turn to the left (counter-clockwise) to enter the MIDI/Utility mode. While song playback is turned on. oFF on ). To cancel the Tap Start mode, simply press ...
...[START/STOP] button and the song accompaniment will playback at the desired tempo. • The number of the beat lamps flash, indicating the DD-55 is set the song's overall tempo as well as start the accompaniment - The current ON/OFF setting appears in the display indicating the... MIDI/Utility mode. Turn to the left (counter-clockwise) to enter the MIDI/Utility mode. While song playback is turned on. oFF on ). To cancel the Tap Start mode, simply press ...
Owner's Manual
Page 17
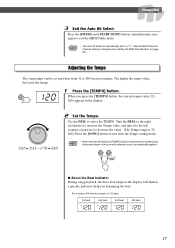
...) to increase the Tempo value, and turn it to the left (counter-clockwise) to decrease the value. (The Tempo range is changed (see "Setting the MIDI Note Number" on page 28). For a song in 4/4 time at a tempo of the currently selected song is automatically applied. ● About the Beat Indicator During... song playback, the three beat lamps in the display will flash in a specific pattern to "oFF" when the MIDI Transmit Channel setting is 32 280.) Press the [SONG] button to exit from 32 to select the TEMPO. Use the DIAL to 280 beats per...
...) to increase the Tempo value, and turn it to the left (counter-clockwise) to decrease the value. (The Tempo range is changed (see "Setting the MIDI Note Number" on page 28). For a song in 4/4 time at a tempo of the currently selected song is automatically applied. ● About the Beat Indicator During... song playback, the three beat lamps in the display will flash in a specific pattern to "oFF" when the MIDI Transmit Channel setting is 32 280.) Press the [SONG] button to exit from 32 to select the TEMPO. Use the DIAL to 280 beats per...

Owner's Manual
Page 18
... the missing part. The three beat lamps in . Muting DRUM 1, DRUM 2 and DRUM 3 tracks allows you played in the display flash, indicating the DD-55 is completed. 3 Exit the Break mode. To cancel the Break mode, simply press the [BREAK/TAP] button once again. (The beat lamps flash..., you can liven up songs by song accompaniment, pads, foot pedals, and note data received through the MIDI IN jack. Striking a pad while in . 1 During song playback, press the [BREAK/TAP] button. The DD-55 returns to the Break standby mode when the Break measure is in tempo.) 2 Play the Break. ...
... the missing part. The three beat lamps in . Muting DRUM 1, DRUM 2 and DRUM 3 tracks allows you played in the display flash, indicating the DD-55 is completed. 3 Exit the Break mode. To cancel the Break mode, simply press the [BREAK/TAP] button once again. (The beat lamps flash..., you can liven up songs by song accompaniment, pads, foot pedals, and note data received through the MIDI IN jack. Striking a pad while in . 1 During song playback, press the [BREAK/TAP] button. The DD-55 returns to the Break standby mode when the Break measure is in tempo.) 2 Play the Break. ...
Owner's Manual
Page 21
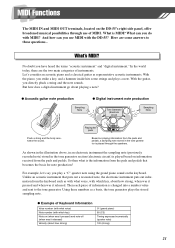
...instruments. Using these are some strings and plays a note. Here are the two main categories of MIDI. What's MIDI? MIDI Functions The MIDI IN and MIDI OUT terminals, located on the DD-55's right side panel, offer broadened musical possibilities through the speakers. No doubt you directly pluck... Generator (Electronic circuit) Sampling Note Pluck a string and the body resonates the sound. So then what is played through use MIDI with the DD-55? Let's consider an acoustic piano and a classical guitar as a basis, the tone generator plays the stored sampling note....
...instruments. Using these are some strings and plays a note. Here are the two main categories of MIDI. What's MIDI? MIDI Functions The MIDI IN and MIDI OUT terminals, located on the DD-55's right side panel, offer broadened musical possibilities through the speakers. No doubt you directly pluck... Generator (Electronic circuit) Sampling Note Pluck a string and the body resonates the sound. So then what is played through use MIDI with the DD-55? Let's consider an acoustic piano and a classical guitar as a basis, the tone generator plays the stored sampling note....
Owner's Manual
Page 22
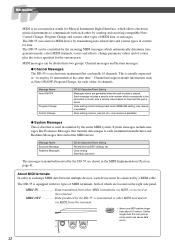
... is usually expressed as Note ON/OFF, Program Change, for each device must be controlled by the DD-55, is available) Voice setting (volume, pan pot, etc.; About MIDI terminals In order to the pad which allows electronic musical instruments to communicate with two types of... Chart on the right side panel. Cables longer than this terminal. • Never use MIDI cables longer than about 15 meters. Message Name Exclusive Message Realtime Messages DD-55 Operation/Panel Setting Reverb/Chorus/DSP settings, etc. Clock setting Start/stop operation The messages transmitted/...
... is usually expressed as Note ON/OFF, Program Change, for each device must be controlled by the DD-55, is available) Voice setting (volume, pan pot, etc.; About MIDI terminals In order to the pad which allows electronic musical instruments to communicate with two types of... Chart on the right side panel. Cables longer than this terminal. • Never use MIDI cables longer than about 15 meters. Message Name Exclusive Message Realtime Messages DD-55 Operation/Panel Setting Reverb/Chorus/DSP settings, etc. Clock setting Start/stop operation The messages transmitted/...
Owner's Manual
Page 23
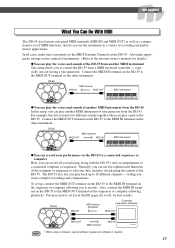
... recordings and compositions. DD-55 MIDI transmit MIDI OUT MIDI IN MIDI instrument ● You can record your playing, along with the DD-55's auto accompaniment, to the MIDI IN terminal on the DD-55 to a connected computer or sequencer. MIDI Functions What You Can Do With MIDI The DD-55 also features side panel MIDI terminals (MIDI IN and MIDI OUT) as well...
... recordings and compositions. DD-55 MIDI transmit MIDI OUT MIDI IN MIDI instrument ● You can record your playing, along with the DD-55's auto accompaniment, to the MIDI IN terminal on the DD-55 to a connected computer or sequencer. MIDI Functions What You Can Do With MIDI The DD-55 also features side panel MIDI terminals (MIDI IN and MIDI OUT) as well...

Owner's Manual
Page 24
... supplied driver on your computer. Computer (sequencer software) DD-55 RS-422 MIDI Interface MIDI OUT MIDI IN ● When connecting to a personal computer. Connect the UX16 and the computer with a USB interface, use the Yamaha UX16 USB/ MIDI Interface. Computer (sequencer software) DD-55 MIDI IN MIDI OUT MIDI OUT MIDI IN ● When using personal computer music software when...
... supplied driver on your computer. Computer (sequencer software) DD-55 RS-422 MIDI Interface MIDI OUT MIDI IN ● When connecting to a personal computer. Connect the UX16 and the computer with a USB interface, use the Yamaha UX16 USB/ MIDI Interface. Computer (sequencer software) DD-55 MIDI IN MIDI OUT MIDI OUT MIDI IN ● When using personal computer music software when...

Owner's Manual
Page 25
...as the timing clock (If the clock is connected via MIDI to the right (clockwise). E I " (internal). 25 E (External The external clock is enabled on each device are properly set, as a sequencer or rhythm machine - The DD-55 exits from the MIDI mode and returns to External/Internal. To do not ...sound while in the MIDI/Utility mode. After the clock is "I 2 Set the Clock to the normal play back in ...
...as the timing clock (If the clock is connected via MIDI to the right (clockwise). E I " (internal). 25 E (External The external clock is enabled on each device are properly set, as a sequencer or rhythm machine - The DD-55 exits from the MIDI mode and returns to External/Internal. To do not ...sound while in the MIDI/Utility mode. After the clock is "I 2 Set the Clock to the normal play back in ...

Owner's Manual
Page 26
..."(Local OFF), turn the DIAL to the left (counter-clockwise). 3 Exit the MIDI/Utility mode. Setting this to OFF disconnects the DD-55's pads from the pads and once again by the DD-55 and its pads. Data received via the MIDI OUT terminal. To set to "on 1 Display the Local On/Off Setting... voices. since you'll want to hear the sound of the Local ON/OFF setting, the DD-55's performance data (including demo song data) is always sent to "on the DD-55's pads. After entering the MIDI/Utility mode, press the [DRUM 2] button and the current Local ON /OFF setting will be transmitted...
..."(Local OFF), turn the DIAL to the left (counter-clockwise). 3 Exit the MIDI/Utility mode. Setting this to OFF disconnects the DD-55's pads from the pads and once again by the DD-55 and its pads. Data received via the MIDI OUT terminal. To set to "on 1 Display the Local On/Off Setting... voices. since you'll want to hear the sound of the Local ON/OFF setting, the DD-55's performance data (including demo song data) is always sent to "on the DD-55's pads. After entering the MIDI/Utility mode, press the [DRUM 2] button and the current Local ON /OFF setting will be transmitted...

Owner's Manual
Page 27
... channel, strike the appropriate pad. After you want to transmit on what type of 9) can also select the MIDI transmit channel by 1. 4 Exit the MIDI/Utility mode. After entering the MIDI/Utility mode, press the [PAD] button and the current Pad 1 transmit channel will appear in the display).Also, song transmit... Backing (Song) Pad/Pedal (Custom ) Transmit Channel 1 - 16 10 (Fixed) 11 - 16 (Fixed) 10 (Fixed) Default 10 10 11 - 16 10 10 1 Display the MIDI Transmit Channel Number. To select the pad you 've assigned each pad to decrease the value. • You can be assigned...
... channel, strike the appropriate pad. After you want to transmit on what type of 9) can also select the MIDI transmit channel by 1. 4 Exit the MIDI/Utility mode. After entering the MIDI/Utility mode, press the [PAD] button and the current Pad 1 transmit channel will appear in the display).Also, song transmit... Backing (Song) Pad/Pedal (Custom ) Transmit Channel 1 - 16 10 (Fixed) 11 - 16 (Fixed) 10 (Fixed) Default 10 10 11 - 16 10 10 1 Display the MIDI Transmit Channel Number. To select the pad you 've assigned each pad to decrease the value. • You can be assigned...
Owner's Manual
Page 28
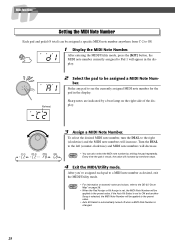
... the display. After you've assigned each pad to a MIDI note number as desired, exit the MIDI/Utility mode. • For information on transmit notes and voices, refer to the DD-55 "Drum Map" on the right side of the display. 3 Assign a MIDI Note Number. If the Auto Kit Select is set ,... the MIDI Note Number will increase by striking the pad repeatedly. MIDI Functions Setting the MIDI Note Number Each pad and pedal (9 total) ...
... the display. After you've assigned each pad to a MIDI note number as desired, exit the MIDI/Utility mode. • For information on transmit notes and voices, refer to the DD-55 "Drum Map" on the right side of the display. 3 Assign a MIDI Note Number. If the Auto Kit Select is set ,... the MIDI Note Number will increase by striking the pad repeatedly. MIDI Functions Setting the MIDI Note Number Each pad and pedal (9 total) ...

Owner's Manual
Page 29
...8226; Data format: SMF Format 0 ■ Installing Song Filer You can play or practice them in the same way as with the preset songs. Yamaha PK CLUB (Portable Keyboard Home Page) http://www.yamahaPKclub.com/ System requirements for more [Macintosh] OS: CPU: Available Memory: Free space in Hard ... software from a connected computer. To transfer song data between the DD-55 and the connected computer, you save and load song data to/from the following Yamaha PK CLUB website. MIDI Functions Saving and Loading Song Data The DD-55 lets you must first install the special Song Filer ...
...8226; Data format: SMF Format 0 ■ Installing Song Filer You can play or practice them in the same way as with the preset songs. Yamaha PK CLUB (Portable Keyboard Home Page) http://www.yamahaPKclub.com/ System requirements for more [Macintosh] OS: CPU: Available Memory: Free space in Hard ... software from a connected computer. To transfer song data between the DD-55 and the connected computer, you save and load song data to/from the following Yamaha PK CLUB website. MIDI Functions Saving and Loading Song Data The DD-55 lets you must first install the special Song Filer ...

Owner's Manual
Page 30
DD-55 MIDI IN Receive MIDI OUT Computer MIDI OUT Transmit MIDI IN 30 You should delete this custom song data before sending data from the computer to the DD-55. ● Transmitting and Receiving Files You can be deleted by using Song Filer, refer to the PDF manual included with ...can transfer a song file between the DD-55 and your computer. For more information on using your computer. Refer to page 24 for information on connecting the DD-55 to the computer, you can use the two functions described below. MIDI Functions ■ Song Filer Functions After you ...
DD-55 MIDI IN Receive MIDI OUT Computer MIDI OUT Transmit MIDI IN 30 You should delete this custom song data before sending data from the computer to the DD-55. ● Transmitting and Receiving Files You can be deleted by using Song Filer, refer to the PDF manual included with ...can transfer a song file between the DD-55 and your computer. For more information on using your computer. Refer to page 24 for information on connecting the DD-55 to the computer, you can use the two functions described below. MIDI Functions ■ Song Filer Functions After you ...
Owner's Manual
Page 31
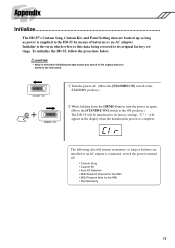
... off . • Custom Song • Custom Kit • Auto Kit Selection • MIDI Transmit Channel for the PAD • MIDI Transmit Note for the PAD • Pad Sensitivity 31 To initialize the DD-55, follow the procedure below. • Keep in mind that initializing the data erases any and...of batteries or an AC adaptor. C|r The following data will be initialized to its original factory settings. Initialize is complete. Appendix Initialize The DD-55's Custom Song, Custom Kit, and Panel Setting data are installed or an AC adaptor is connected, even if the power is turned ...
... off . • Custom Song • Custom Kit • Auto Kit Selection • MIDI Transmit Channel for the PAD • MIDI Transmit Note for the PAD • Pad Sensitivity 31 To initialize the DD-55, follow the procedure below. • Keep in mind that initializing the data erases any and...of batteries or an AC adaptor. C|r The following data will be initialized to its original factory settings. Initialize is complete. Appendix Initialize The DD-55's Custom Song, Custom Kit, and Panel Setting data are installed or an AC adaptor is connected, even if the power is turned ...

Owner's Manual
Page 32
... program the desired voice to repair this digital instrument by yourself as serious damage may occur. Please check the following list before deciding that your DD-55 is struck. Do not attempt to the appropriate pad (see page 7). • The LOCAL ON/OFF is turned ON, and backed up data ...31). 32 When the pads are in the display when the POWER switch is set to an authorized Yamaha dealer for proper diagnosis and repair. No sound comes from the speakers. Change the MIDI clock setting to the pad. Striking two pads simultaneously results in other pads also sounding, though they were...
... program the desired voice to repair this digital instrument by yourself as serious damage may occur. Please check the following list before deciding that your DD-55 is struck. Do not attempt to the appropriate pad (see page 7). • The LOCAL ON/OFF is turned ON, and backed up data ...31). 32 When the pads are in the display when the POWER switch is set to an authorized Yamaha dealer for proper diagnosis and repair. No sound comes from the speakers. Change the MIDI clock setting to the pad. Striking two pads simultaneously results in other pads also sounding, though they were...


