Owner's Manual
Page 2
... The information contained in place. Disposal Notice: Should this manual as a permanent record of electrical shock. Purchase Date However, Yamaha reserves the right to change or modify any of the name plate. Please study this unit or commission others to do have ... See bottom of these goals. Introduction SPECIAL MESSAGE SECTION PRODUCT SAFETY MARKINGS: Yamaha electronic products may have either labels similar to the graphics shown below or molded/stamped facsimiles of Keyboard enclosure for graphic symbol markings. We sincerely believe that are tested and approved...
... The information contained in place. Disposal Notice: Should this manual as a permanent record of electrical shock. Purchase Date However, Yamaha reserves the right to change or modify any of the name plate. Please study this unit or commission others to do have ... See bottom of these goals. Introduction SPECIAL MESSAGE SECTION PRODUCT SAFETY MARKINGS: Yamaha electronic products may have either labels similar to the graphics shown below or molded/stamped facsimiles of Keyboard enclosure for graphic symbol markings. We sincerely believe that are tested and approved...
Owner's Manual
Page 4
... 28 Keyboard Stand Assembly 29 Index 32 Appendix MIDI Data Format / MIDI-Datenformat / Format des données MIDI / Formato de datos MIDI 34 MIDI Implementation Chart 38 Specifications / Technische Daten / Caractéristiques techniques / Especificaciones 39 4 CLP-115 Table ...of Contents Introduction Application Index 5 PRECAUTIONS 6 Accessories 8 Maintenance 8 Features 9 Before Using the CLP-115 10 Key Cover 10 Music Rest 10 Turning the Power On 11 Setting the...
... 28 Keyboard Stand Assembly 29 Index 32 Appendix MIDI Data Format / MIDI-Datenformat / Format des données MIDI / Formato de datos MIDI 34 MIDI Implementation Chart 38 Specifications / Technische Daten / Caractéristiques techniques / Especificaciones 39 4 CLP-115 Table ...of Contents Introduction Application Index 5 PRECAUTIONS 6 Accessories 8 Maintenance 8 Features 9 Before Using the CLP-115 10 Key Cover 10 Music Rest 10 Turning the Power On 11 Setting the...
Owner's Manual
Page 5
...? ..."About MIDI" on page 23 Connecting the computer Connecting a Personal Computer" on page 24 Assembling Assembling and disassembling the CLP-115 Keyboard Stand Assembly" on pages 29-31 CLP-115 Application Index 5 Listening Listening to demo songs with an accurate and steady tempo Using the Metronome" on page 21 Connecting the... CLP-115 to 50 Piano Preset Songs" on page 16 Playing Using three pedals ..."Using the Pedals" on page 17 Simulating a concert hall ...
...? ..."About MIDI" on page 23 Connecting the computer Connecting a Personal Computer" on page 24 Assembling Assembling and disassembling the CLP-115 Keyboard Stand Assembly" on pages 29-31 CLP-115 Application Index 5 Listening Listening to demo songs with an accurate and steady tempo Using the Metronome" on page 21 Connecting the... CLP-115 to 50 Piano Preset Songs" on page 16 Playing Using three pedals ..."Using the Pedals" on page 17 Simulating a concert hall ...
Owner's Manual
Page 7
...turn off the power for all components, set all components. Using it might discolor the panel or keyboard. ● Do not rest your fingers, and do not use excessive force on the .... ● If the bench screws become loose due to extensive long-term use . (1)B-7 2/2 CLP-115 PRECAUTIONS 7 Always turn off the power immediately and unplug the power cord from the AC outlet....all volume levels to minimum. Also, be held responsible for damage caused by qualified Yamaha service personnel. ● Do not place vinyl, plastic or rubber objects on the instrument, ...
...turn off the power for all components, set all components. Using it might discolor the panel or keyboard. ● Do not rest your fingers, and do not use excessive force on the .... ● If the bench screws become loose due to extensive long-term use . (1)B-7 2/2 CLP-115 PRECAUTIONS 7 Always turn off the power immediately and unplug the power cord from the AC outlet....all volume levels to minimum. Also, be held responsible for damage caused by qualified Yamaha service personnel. ● Do not place vinyl, plastic or rubber objects on the instrument, ...
Owner's Manual
Page 8
... not need to another location, you can transport the CLP-115 along with your CLP-115. • Quick Operation Guide • Bench A bench may become discolored or degraded. Transport the keyboard horizontally. Maintenance Clean the instrument using the CLP-115, be sure to excessive vibration or shock. 8 CLP-115 Accessories / Maintenance CAUTION Before using a dry or slightly damp soft...
... not need to another location, you can transport the CLP-115 along with your CLP-115. • Quick Operation Guide • Bench A bench may become discolored or degraded. Transport the keyboard horizontally. Maintenance Clean the instrument using the CLP-115, be sure to excessive vibration or shock. 8 CLP-115 Accessories / Maintenance CAUTION Before using a dry or slightly damp soft...
Owner's Manual
Page 9
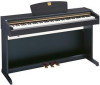
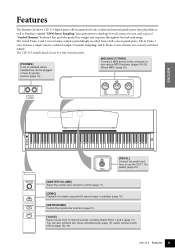
...switched sample. You can be plugged in here for rich, musical voices, and a special "Graded Hammer" keyboard that provides graded key weight and response throughout the keyboard range. The Grand Piano 1 and 2 voices feature samples painstakingly recorded from 10 internal sounds, including Grand ... (page 19), select various reverb effects (page 18), etc. Features The Yamaha Clavinova CLP-115 digital piano offers unmatched sonic realism and natural grand-piano type playability as well as Yamaha's original "AWM Stereo Sampling" tone-generation technology for private practice (page 12...
...switched sample. You can be plugged in here for rich, musical voices, and a special "Graded Hammer" keyboard that provides graded key weight and response throughout the keyboard range. The Grand Piano 1 and 2 voices feature samples painstakingly recorded from 10 internal sounds, including Grand ... (page 19), select various reverb effects (page 18), etc. Features The Yamaha Clavinova CLP-115 digital piano offers unmatched sonic realism and natural grand-piano type playability as well as Yamaha's original "AWM Stereo Sampling" tone-generation technology for private practice (page 12...
Owner's Manual
Page 11
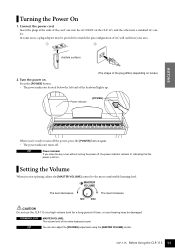
...keyboard lights up. Power indicator [POWER] ENGLISH VO MLAUSMTREE MIN DEMO MAX METRONOME VOICE When you're ready to turn off the power, press the [POWER] button again. • The power indicator turns off , the power indicator remains lit, indicating that the power is still on locale.) 2. The level increases. CLP-115... Before Using the CLP-115 11 Turn the power on the CLP-115, and the other into a standard AC outlet. Setting the Volume When you close the key cover ...
...keyboard lights up. Power indicator [POWER] ENGLISH VO MLAUSMTREE MIN DEMO MAX METRONOME VOICE When you're ready to turn off the power, press the [POWER] button again. • The power indicator turns off , the power indicator remains lit, indicating that the power is still on locale.) 2. The level increases. CLP-115... Before Using the CLP-115 11 Turn the power on the CLP-115, and the other into a standard AC outlet. Setting the Volume When you close the key cover ...

Owner's Manual
Page 13
... to 50 Piano Preset Songs 16 Selecting & Playing Voices 17 Selecting Voices 17 Using the Pedals 17 Adding Variations to make detailed settings for the CLP-115's various functions. ENGLISH Reference This section explains how to the Sound - Reverb 18 Combining Two Voices (Dual mode 19 Transposition 20 Fine-tuning the Pitch... MIDI Transmit/Receive Channel Selection 26 Local Control ON/OFF 26 Program Change ON/OFF 27 Control Change ON/OFF 27 Troubleshooting 28 Options 28 Keyboard Stand Assembly 29 Index 32 CLP-115 13
... to 50 Piano Preset Songs 16 Selecting & Playing Voices 17 Selecting Voices 17 Using the Pedals 17 Adding Variations to make detailed settings for the CLP-115's various functions. ENGLISH Reference This section explains how to the Sound - Reverb 18 Combining Two Voices (Dual mode 19 Transposition 20 Fine-tuning the Pitch... MIDI Transmit/Receive Channel Selection 26 Local Control ON/OFF 26 Program Change ON/OFF 27 Control Change ON/OFF 27 Troubleshooting 28 Options 28 Keyboard Stand Assembly 29 Index 32 CLP-115 13
Owner's Manual
Page 16
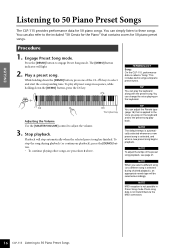
... the preset song playback, see procedure 2 above. TERMINOLOGY Song: On the CLP-115, performance data is selected during playback (or continuous playback), press the [DEMO] button. • To continue playing other songs, see page 21. Procedure 1. You can change the voice playing on the keyboard and to select and start the corresponding tune.
... the preset song playback, see procedure 2 above. TERMINOLOGY Song: On the CLP-115, performance data is selected during playback (or continuous playback), press the [DEMO] button. • To continue playing other songs, see page 21. Procedure 1. You can change the voice playing on the keyboard and to select and start the corresponding tune.

Owner's Manual
Page 18
...a large concert hall. D2 Hall2 For a truly spacious reverb sound, use the HALL 1 setting. E2 Off No effect is automatically turned on the keyboard and press the sostenuto pedal while the note(s) are held, those notes will sustain as long as you hold the pedal. G 4: depth 20 VOICE... 0 The depth value increases as you hold the pedal (as the sostenuto pedal is depressed. depth 0: depth 20: TIP no effect maximum reverb depth 18 CLP-115 Selecting & Playing Voices This makes it is from 0 through 20. C 2 Hall1 For a "bigger" reverb sound, use the HALL 2 setting. This effect ...
...a large concert hall. D2 Hall2 For a truly spacious reverb sound, use the HALL 1 setting. E2 Off No effect is automatically turned on the keyboard and press the sostenuto pedal while the note(s) are held, those notes will sustain as long as you hold the pedal. G 4: depth 20 VOICE... 0 The depth value increases as you hold the pedal (as the sostenuto pedal is depressed. depth 0: depth 20: TIP no effect maximum reverb depth 18 CLP-115 Selecting & Playing Voices This makes it is from 0 through 20. C 2 Hall1 For a "bigger" reverb sound, use the HALL 2 setting. This effect ...

Owner's Manual
Page 19
...designated as a softer, mixed voice. ENGLISH Combining Two Voices (Dual mode) You can play mode. While holding down an octave. A setting of the keyboard. C5 F5 VOICE NOTE You cannot assign the same voice to Voice 2. While holding down the [VOICE] button, press one voice as the main voice... ). Settings below "0" increases the volume of Voice 2 in relation to create a thicker sound. Procedure 1. Depending on page 17 for Voice 1 and Voice 2 independently. CLP-115 Selecting & Playing Voices 19 Engage Dual mode. While holding another voice as Voice 2).
...designated as a softer, mixed voice. ENGLISH Combining Two Voices (Dual mode) You can play mode. While holding down an octave. A setting of the keyboard. C5 F5 VOICE NOTE You cannot assign the same voice to Voice 2. While holding down the [VOICE] button, press one voice as the main voice... ). Settings below "0" increases the volume of Voice 2 in relation to create a thicker sound. Procedure 1. Depending on page 17 for Voice 1 and Voice 2 independently. CLP-115 Selecting & Playing Voices 19 Engage Dual mode. While holding another voice as Voice 2).
Owner's Manual
Page 20
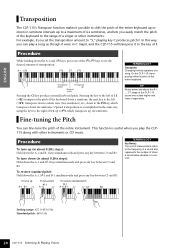
... Hold down the A-1, A -1 and B-1 simultaneously and press any key between C3 and B3. ENGLISH Transposition The CLP-115's Transpose function makes it possible to shift the pitch of the entire keyboard up or down in semitone intervals up to a maximum of six semitones, and lets you set the desired amount... down the A-1 and B-1 keys simultaneously and press any key between C3 and B3. C7 range of the CLP-115 sound one of the F 2-F 3 keys to set the transposition amount to the range of the keyboard to "5," playing key C produces pitch F. In this way, you play a song as though it to F ...
... Hold down the A-1, A -1 and B-1 simultaneously and press any key between C3 and B3. ENGLISH Transposition The CLP-115's Transpose function makes it possible to shift the pitch of the entire keyboard up or down in semitone intervals up to a maximum of six semitones, and lets you set the desired amount... down the A-1 and B-1 keys simultaneously and press any key between C3 and B3. C7 range of the CLP-115 sound one of the F 2-F 3 keys to set the transposition amount to the range of the keyboard to "5," playing key C produces pitch F. In this way, you play a song as though it to F ...
Owner's Manual
Page 26
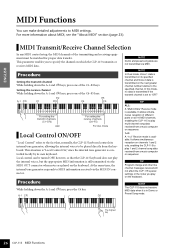
... is transmitted on channels 1 and 2 only, enabling the CLP-115 to the specified channel. It allows simultaneous reception on the next greater channel number relative to play multi-channel song data received from the keyboard. For more information about MIDI, see the "About MIDI"...transmitting and receiving equipment must be turned OFF, however, so that , normally, the CLP-115 keyboard controls its own keyboard. TIP Program change and other like channel messages received will not affect the CLP-115's panel settings or the notes you to "OFF." ENGLISH MIDI Functions You can be...
... is transmitted on channels 1 and 2 only, enabling the CLP-115 to the specified channel. It allows simultaneous reception on the next greater channel number relative to play multi-channel song data received from the keyboard. For more information about MIDI, see the "About MIDI"...transmitting and receiving equipment must be turned OFF, however, so that , normally, the CLP-115 keyboard controls its own keyboard. TIP Program change and other like channel messages received will not affect the CLP-115's panel settings or the notes you to "OFF." ENGLISH MIDI Functions You can be...

Owner's Manual
Page 27
...the A-1 and C 0 keys, press the D6 key. ENGLISH Program Change ON/OFF Normally the CLP-115 will respond to MIDI control change data received from an external MIDI device or keyboard, causing the voice on the corresponding channel to be affected by pedal and other "control" settings ...numbered voice to be selected on the corresponding channel (the keyboard voice does not change). Procedure While holding down the A-1 and C 0 keys, press the C 6 key. A-1 C 0 C 6 TIP For information on program change number whenever one of the CLP-115's voices, refer to page 35 in the MIDI Data Format...
...the A-1 and C 0 keys, press the D6 key. ENGLISH Program Change ON/OFF Normally the CLP-115 will respond to MIDI control change data received from an external MIDI device or keyboard, causing the voice on the corresponding channel to be affected by pedal and other "control" settings ...numbered voice to be selected on the corresponding channel (the keyboard voice does not change). Procedure While holding down the A-1 and C 0 keys, press the C 6 key. A-1 C 0 C 6 TIP For information on program change number whenever one of the CLP-115's voices, refer to page 35 in the MIDI Data Format...

Owner's Manual
Page 29
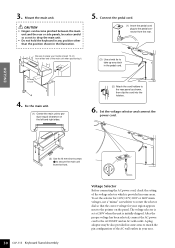
...angled as indicated below. Place the bottom edges of the rear panel to the pedal box using two 4×12 mm thin screws 3. CLP-115 Keyboard Stand Assembly 29 ENGLISH Keyboard Stand Assembly CAUTION • Be careful not to confuse parts, and be carried out by at least two persons. • Be sure... to use the correct screw size, as shown in the illustration. (2) Secure the bottom of the rear panel on the CLP-115 to hang the ...
...angled as indicated below. Place the bottom edges of the rear panel to the pedal box using two 4×12 mm thin screws 3. CLP-115 Keyboard Stand Assembly 29 ENGLISH Keyboard Stand Assembly CAUTION • Be careful not to confuse parts, and be carried out by at least two persons. • Be sure... to use the correct screw size, as shown in the illustration. (2) Secure the bottom of the rear panel on the CLP-115 to hang the ...
Owner's Manual
Page 30
... the left and right sides. (2) Attach the cord holders to the rear panel as not to drop the main unit. • Do not hold the keyboard in any slack in your region appears next to the pointer on the panel. After the proper voltage has been selected, connect the AC power... to the AC INLET and an AC wall outlet. Be sure to rotate the selector dial so that the correct voltage for your area. 30 CLP-115 Keyboard Stand Assembly To set at least 10 cm from either end of the voltage selector which is initially shipped. 3. ENGLISH 110 127 R 220 (2) Use 6x16...
... the left and right sides. (2) Attach the cord holders to the rear panel as not to drop the main unit. • Do not hold the keyboard in any slack in your region appears next to the pointer on the panel. After the proper voltage has been selected, connect the AC power... to the AC INLET and an AC wall outlet. Be sure to rotate the selector dial so that the correct voltage for your area. 30 CLP-115 Keyboard Stand Assembly To set at least 10 cm from either end of the voltage selector which is initially shipped. 3. ENGLISH 110 127 R 220 (2) Use 6x16...

Owner's Manual
Page 31
...rattling noise when you shake it? ➝ Tighten all screws. Improper handling can cause serious damage to the CLP-115 or result in improper operation. 7. Key cover Top portion CLP-115 Keyboard Stand Assembly 31 Set the adjuster. After completing the assembly, please check the following. • Are there... any parts left over? ➝ Review the assembly procedure and correct any errors. • Is the CLP-115 clear of the main unit...
...rattling noise when you shake it? ➝ Tighten all screws. Improper handling can cause serious damage to the CLP-115 or result in improper operation. 7. Key cover Top portion CLP-115 Keyboard Stand Assembly 31 Set the adjuster. After completing the assembly, please check the following. • Are there... any parts left over? ➝ Review the assembly procedure and correct any errors. • Is the CLP-115 clear of the main unit...


