
Owner's Manual
Page 1
Retain this YAMAHA Compact Disc Player. WARNING TO REDUCE THE RISK OF FIRE OR ELECTRIC SHOCK, DO NOT EXPOSE THIS UNIT TO RAIN OR MOISTURE. CDX-880/580/480 Natural Sound Compact Disc Player Random Access Programmable Play Random-Sequence Play Single Track...USER-SERVICEABLE PARTS INSIDE, REFER SERVICING TO QUALIFIED SERVICE PERSONNEL. • Explanation of Graphical Symbols The lightning flash with a Compatible YAMAHA Tape Disk Display Brightness Changing Capability Remote Control Capability Thank you to persons. OWNER'S MANUAL CONTENTS Safety Instructions 2 Connections 4 Identification...
Retain this YAMAHA Compact Disc Player. WARNING TO REDUCE THE RISK OF FIRE OR ELECTRIC SHOCK, DO NOT EXPOSE THIS UNIT TO RAIN OR MOISTURE. CDX-880/580/480 Natural Sound Compact Disc Player Random Access Programmable Play Random-Sequence Play Single Track...USER-SERVICEABLE PARTS INSIDE, REFER SERVICING TO QUALIFIED SERVICE PERSONNEL. • Explanation of Graphical Symbols The lightning flash with a Compatible YAMAHA Tape Disk Display Brightness Changing Capability Remote Control Capability Thank you to persons. OWNER'S MANUAL CONTENTS Safety Instructions 2 Connections 4 Identification...
Owner's Manual
Page 2
...by the manufacturer. 8 Ventilation - For example, the unit should be situated on or pinched by playing it is too late, YAMAHA and the Electronic Industries Association's Consumer Electronics Group recommend you to avoid prolonged IMPORTANT! Objects have fallen, or liquid has been spilled... Periods - The unit has been exposed to operate normally or exhibits a marked change in a safe place for US customers only) YAMAHA and the Electronic Industries Association's Consumer Electronics Group want you to get the most importantly, without annoying blaring or distortion - We Want...
...by the manufacturer. 8 Ventilation - For example, the unit should be situated on or pinched by playing it is too late, YAMAHA and the Electronic Industries Association's Consumer Electronics Group recommend you to avoid prolonged IMPORTANT! Objects have fallen, or liquid has been spilled... Periods - The unit has been exposed to operate normally or exhibits a marked change in a safe place for US customers only) YAMAHA and the Electronic Industries Association's Consumer Electronics Group want you to get the most importantly, without annoying blaring or distortion - We Want...
Owner's Manual
Page 3
... clean, dry cloth. 7 Be sure to accessories and/or another product use force on switches, knobs or cords. To prevent damage by Yamaha Corporation of this product to read this compact disc player is turned off . When moving the set , contact your authority, granted by the ...cord from the objective lens surface on the Optical Pickup Block. this type of interference, which can not locate the appropriate retailer, please contact Yamaha Electronics Corp., U.S.A. 6660 Orangethorpe Ave, Buena Park, CA 90620. When disconnecting the power cord from windows, heat sources, and too much ...
... clean, dry cloth. 7 Be sure to accessories and/or another product use force on switches, knobs or cords. To prevent damage by Yamaha Corporation of this product to read this compact disc player is turned off . When moving the set , contact your authority, granted by the ...cord from the objective lens surface on the Optical Pickup Block. this type of interference, which can not locate the appropriate retailer, please contact Yamaha Electronics Corp., U.S.A. 6660 Orangethorpe Ave, Buena Park, CA 90620. When disconnecting the power cord from windows, heat sources, and too much ...
Owner's Manual
Page 4
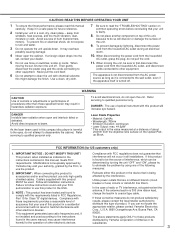
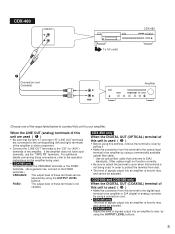
...the placement of this unit causes noise to other equipment, such as a tuner, separate them from each other. CDX-880 LINE OUT VARIABLE FIXED DIGITAL OUT OPTICAL COAXIAL CDX-880 – Connection cord (included) To AC outlet — Optical fiber cable (not included) ˜ Connection... cord (not included) CD OPTICAL COAXIAL DIGITAL IN Amplifier CDX-580 LINE OUT DIGITAL OUT CDX-580 – Connection cord (included) ...
...the placement of this unit causes noise to other equipment, such as a tuner, separate them from each other. CDX-880 LINE OUT VARIABLE FIXED DIGITAL OUT OPTICAL COAXIAL CDX-880 – Connection cord (included) To AC outlet — Optical fiber cable (not included) ˜ Connection... cord (not included) CD OPTICAL COAXIAL DIGITAL IN Amplifier CDX-580 LINE OUT DIGITAL OUT CDX-580 – Connection cord (included) ...
Owner's Manual
Page 5
...the terminal's cover when this unit to your amplifier. and cannot be adjusted by using the OUTPUT LEVEL buttons. 5 CDX-480 LINE OUT – Connection cord (included) To AC outlet CDX-480 Amplifier CD Choose one of the ways listed below to connect this terminal is not being used ( – ) ...• Be sure that conforms to EIAJ standards. by using the OUTPUT LEVEL buttons. CDX-880 only When the DIGITAL OUT (OPTICAL)...
...the terminal's cover when this unit to your amplifier. and cannot be adjusted by using the OUTPUT LEVEL buttons. 5 CDX-480 LINE OUT – Connection cord (included) To AC outlet CDX-480 Amplifier CD Choose one of the ways listed below to connect this terminal is not being used ( – ) ...• Be sure that conforms to EIAJ standards. by using the OUTPUT LEVEL buttons. CDX-880 only When the DIGITAL OUT (OPTICAL)...
Owner's Manual
Page 6
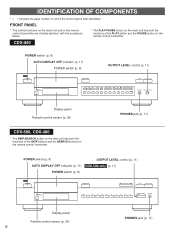
.../CLOSE STOP PLAY/PAUSE PROG TAPE PEAK SPACE INDEX REPEAT RANDOM SKIP +10 1 2 3 4 5 6 7 8 SEARCH 9 0 TIME PHONES OUTPUT LEVEL Display panel Remote control sensor (p. 20) CDX-580, CDX-480 * The SKIP/SEARCH button on the main unit has both the functions of the SKIP buttons and the SEARCH buttons on the remote control transmitter...
.../CLOSE STOP PLAY/PAUSE PROG TAPE PEAK SPACE INDEX REPEAT RANDOM SKIP +10 1 2 3 4 5 6 7 8 SEARCH 9 0 TIME PHONES OUTPUT LEVEL Display panel Remote control sensor (p. 20) CDX-580, CDX-480 * The SKIP/SEARCH button on the main unit has both the functions of the SKIP buttons and the SEARCH buttons on the remote control transmitter...
Owner's Manual
Page 7
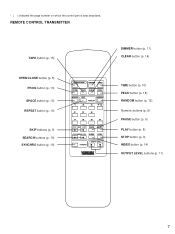
* ( ) indicates the page number on which the control part is best described. OUTPUT LEVEL + SYNCHRO TIME button (p. 10) PEAK button (p. 18) RANDOM button (p. 12) Numeric buttons (p. 9) PAUSE button (p. 9) PLAY button (p. 8) STOP button (p. 9) INDEX button (p. 14) OUTPUT LEVEL buttons (p. 11) 7 REMOTE CONTROL TRANSMITTER TAPE button (p. 15) DIMMER button (p. 11) CLEAR button (p. 14) OPEN/CLOSE button (p. 8) PROG button (p. 13) SPACE button (p. 10) REPEAT button (p. 10) SKIP buttons (p. 9) SEARCH buttons (p. 10) SYNCHRO button (p. 19) OPEN/CLOSE DIMMER TIME PROG TAPE CLEAR PEAK SPACE ...
* ( ) indicates the page number on which the control part is best described. OUTPUT LEVEL + SYNCHRO TIME button (p. 10) PEAK button (p. 18) RANDOM button (p. 12) Numeric buttons (p. 9) PAUSE button (p. 9) PLAY button (p. 8) STOP button (p. 9) INDEX button (p. 14) OUTPUT LEVEL buttons (p. 11) 7 REMOTE CONTROL TRANSMITTER TAPE button (p. 15) DIMMER button (p. 11) CLEAR button (p. 14) OPEN/CLOSE button (p. 8) PROG button (p. 13) SPACE button (p. 10) REPEAT button (p. 10) SKIP buttons (p. 9) SEARCH buttons (p. 10) SYNCHRO button (p. 19) OPEN/CLOSE DIMMER TIME PROG TAPE CLEAR PEAK SPACE ...
Owner's Manual
Page 8
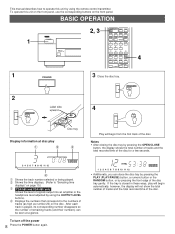
... - To operate this unit by using the OUTPUT LEVEL buttons. Displays the numbers that correspond to "Selecting time displays" on page 10.) Ž CDX-580 and CDX-480 only Shows the level of signals output into an amplifier or the headphone level adjusted by using the remote control transmitter. This manual describes...
... - To operate this unit by using the OUTPUT LEVEL buttons. Displays the numbers that correspond to "Selecting time displays" on page 10.) Ž CDX-580 and CDX-480 only Shows the level of signals output into an amplifier or the headphone level adjusted by using the remote control transmitter. This manual describes...
Owner's Manual
Page 9
... button, otherwise the selected track is continuously changed to higher numbers (or lower numbers). • CDX-580 and CDX-480 only When using the SKIP/SEARCH button on the disc will be used to stop mode. • CDX-880 only If a button is pressed and held, the track number is played forward (or backward...
... button, otherwise the selected track is continuously changed to higher numbers (or lower numbers). • CDX-580 and CDX-480 only When using the SKIP/SEARCH button on the disc will be used to stop mode. • CDX-880 only If a button is pressed and held, the track number is played forward (or backward...
Owner's Manual
Page 10
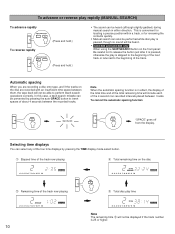
... (although slightly garbled) during manual search in effect, the display of the total time and of the total remaining time will be heard. • CDX-580 and CDX-480 only When using the SKIP/SEARCH button on the disc are recording a disc onto tape, and if the tracks on the front panel: Be...
... (although slightly garbled) during manual search in effect, the display of the total time and of the total remaining time will be heard. • CDX-580 and CDX-480 only When using the SKIP/SEARCH button on the disc are recording a disc onto tape, and if the tracks on the front panel: Be...

Owner's Manual
Page 11
...Slightly dim When you can change brightness of the display in three degrees by pressing the DIMMER button. To close the control door CDX-880 only When it is illuminated. During play During stopped or paused Normal illumination Normal illumination Dim DIMMER Dim "OFF" * While...the illumination) by pressing the DIMMER button. OUTPUT LEVEL + 11 Changing brightness of the display CDX-880, CDX-580 You can change the brightness of the display (or turn off .) CDX-480 If desired, you listen with headphones Connect the headphones to the amplifier. AUTO DISPLAY OFF Dim ...
...Slightly dim When you can change brightness of the display in three degrees by pressing the DIMMER button. To close the control door CDX-880 only When it is illuminated. During play During stopped or paused Normal illumination Normal illumination Dim DIMMER Dim "OFF" * While...the illumination) by pressing the DIMMER button. OUTPUT LEVEL + 11 Changing brightness of the display CDX-880, CDX-580 You can change the brightness of the display (or turn off .) CDX-480 If desired, you listen with headphones Connect the headphones to the amplifier. AUTO DISPLAY OFF Dim ...

Owner's Manual
Page 12
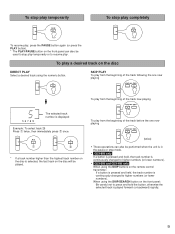
The repeat play mode will change whenever you press the REPEAT button. (OFF) SINGLE REPEAT FULL REPEAT S/F REPEAT SINGLE (S) REPEAT A single track is repeatedly played. * This is also available in the programmed-play mode and the random-sequence play mode. (If the repeat play mode is switched off when the random-sequence play mode is functioning, when the POWER is switched on again, the unit will begin the random-sequence play automatically. (This feature is available for timer play.) • If the SKIP button is pressed during random-sequence play , the next randomly programmed...
The repeat play mode will change whenever you press the REPEAT button. (OFF) SINGLE REPEAT FULL REPEAT S/F REPEAT SINGLE (S) REPEAT A single track is repeatedly played. * This is also available in the programmed-play mode and the random-sequence play mode. (If the repeat play mode is switched off when the random-sequence play mode is functioning, when the POWER is switched on again, the unit will begin the random-sequence play automatically. (This feature is available for timer play.) • If the SKIP button is pressed during random-sequence play , the next randomly programmed...
Owner's Manual
Page 13
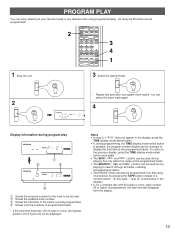
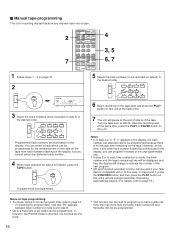
You can be programmed. 2 OPEN/CLOSE DIMMER TIME PROG TAPE CLEAR PEAK SPACE 1 S/F 2 RANDOM REPEAT 3 +10 4 5 6 7 8 9 0 SKIP PAUSE PLAY SEARCH INDEX STOP - OUTPUT LEVEL + SYNCHRO 3 4 1 1 Stop the unit. To return to the previous display, press the TIME display mode-select button once again. • The SKIP ( and ) button can be used during playing, but only within the range of the programmed tracks. • The SEARCH ( and ) button can be used during playing to search through all tracks, including unprogrammed tracks. • The PAUSE mode can also be ...
You can be programmed. 2 OPEN/CLOSE DIMMER TIME PROG TAPE CLEAR PEAK SPACE 1 S/F 2 RANDOM REPEAT 3 +10 4 5 6 7 8 9 0 SKIP PAUSE PLAY SEARCH INDEX STOP - OUTPUT LEVEL + SYNCHRO 3 4 1 1 Stop the unit. To return to the previous display, press the TIME display mode-select button once again. • The SKIP ( and ) button can be used during playing, but only within the range of the programmed tracks. • The SEARCH ( and ) button can be used during playing to search through all tracks, including unprogrammed tracks. • The PAUSE mode can also be ...

Owner's Manual
Page 14
Play will begin from the start from the last index number point on that disc, play will start of the selected track. • The index number can be checked one will be corrected by pressing the SKIP button. To correct programmed data 1. After the correction has been completed, once again press the PROG button or the PLAY button. The index system is stopped. • Open the disc tray. • Switch off the power. To cancel a programmed setting There are included. • If an index number is selected that is illuminated. 14 Each time the SKIP button is pressed, ...
Play will begin from the start from the last index number point on that disc, play will start of the selected track. • The index number can be checked one will be corrected by pressing the SKIP button. To correct programmed data 1. After the correction has been completed, once again press the PROG button or the PLAY button. The index system is stopped. • Open the disc tray. • Switch off the power. To cancel a programmed setting There are included. • If an index number is selected that is illuminated. 14 Each time the SKIP button is pressed, ...
Owner's Manual
Page 15
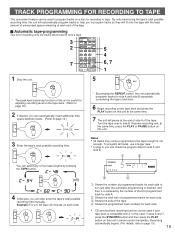
Example: For a C-64 tape (32 minutes on each side. Ž Shows the side of the tape. Shows the programmed track numbers for recording only the tracks which best fit onto a tape. 3 OPEN/CLOSE DIMMER TIME PROG TAPE CLEAR PEAK 2 SPACE S/F RANDOM REPEAT 1 2 3 +10 4 5 6 7 8 9 0 7 SKIP PAUSE PLAY SEARCH INDEX STOP - To program all tracks, use a longer tape. • In step 5, you to page 18.) 2 If desired, you can also enter the tape's total possible recording time manually. In this case, in turn just after the automatic programming is finished, and then...
Example: For a C-64 tape (32 minutes on each side. Ž Shows the side of the tape. Shows the programmed track numbers for recording only the tracks which best fit onto a tape. 3 OPEN/CLOSE DIMMER TIME PROG TAPE CLEAR PEAK 2 SPACE S/F RANDOM REPEAT 1 2 3 +10 4 5 6 7 8 9 0 7 SKIP PAUSE PLAY SEARCH INDEX STOP - To program all tracks, use a longer tape. • In step 5, you to page 18.) 2 If desired, you can also enter the tape's total possible recording time manually. In this case, in turn just after the automatic programming is finished, and then...
Owner's Manual
Page 16
Recording automatically begins. (For details, refer to side B. Notes • If, in step 3 or 5, "E rr" appears in the display, the track number just selected cannot be recorded on side A) in the desired order. 1 2 3 + 10 4 5 6 7 8 9 0 * Programmed track numbers are illuminated on the display. In this unit at the end of side A of 25 tracks can be programmed. Turn the tape over to page 19.) A pause mode is programmed. Notes on tape programming • To check, cancel or correct program data, refer to indicate the number of the next program. • CD synchronized...
Recording automatically begins. (For details, refer to side B. Notes • If, in step 3 or 5, "E rr" appears in the display, the track number just selected cannot be recorded on side A) in the desired order. 1 2 3 + 10 4 5 6 7 8 9 0 * Programmed track numbers are illuminated on the display. In this unit at the end of side A of 25 tracks can be programmed. Turn the tape over to page 19.) A pause mode is programmed. Notes on tape programming • To check, cancel or correct program data, refer to indicate the number of the next program. • CD synchronized...
Owner's Manual
Page 17
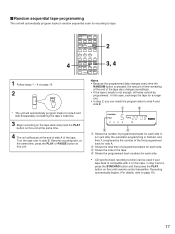
Notes • Because the programmed data changes every time the RANDOM button is pressed, the amount of time remaining at the end of side A of the tape. In this case, in step 3 and 4, press the SYNCHRO button and then press the PLAY button on this case, exchange the tape for recording to page 19.) 17 In this unit. OUTPUT LEVEL + SYNCHRO 2 3, 4 1 Follow steps 1 - 4 on page 15. 2 RANDOM * The unit will automatically program tracks for side A and side B separately considering the tape's total time. 3 Begin recording on the tape deck and press the PLAY button on this unit's remote ...
Notes • Because the programmed data changes every time the RANDOM button is pressed, the amount of time remaining at the end of side A of the tape. In this case, in step 3 and 4, press the SYNCHRO button and then press the PLAY button on this case, exchange the tape for recording to page 19.) 17 In this unit. OUTPUT LEVEL + SYNCHRO 2 3, 4 1 Follow steps 1 - 4 on page 15. 2 RANDOM * The unit will automatically program tracks for side A and side B separately considering the tape's total time. 3 Begin recording on the tape deck and press the PLAY button on this unit's remote ...
Owner's Manual
Page 18
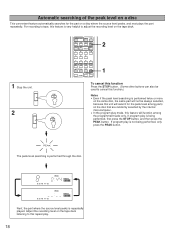
Automatic searching of the peak level on a disc This convenient feature automatically searches for the peak level among the programmed tracks only. OUTPUT LEVEL + SYNCHRO 2 1 1 Stop the unit. OPEN/CLOSE DIMMER TIME PROG TAPE CLEAR PEAK SPACE S/F RANDOM REPEAT 1 2 3 +10 4 5 6 7 8 9 0 SKIP PAUSE PLAY SEARCH INDEX STOP - STOP 2 PEAK To cancel this function Press the STOP button. (Some other buttons can also be always selected, because this feature will function among parts on a disc where the source level peaks, and next plays the part repeatedly. If program...
Automatic searching of the peak level on a disc This convenient feature automatically searches for the peak level among the programmed tracks only. OUTPUT LEVEL + SYNCHRO 2 1 1 Stop the unit. OPEN/CLOSE DIMMER TIME PROG TAPE CLEAR PEAK SPACE S/F RANDOM REPEAT 1 2 3 +10 4 5 6 7 8 9 0 SKIP PAUSE PLAY SEARCH INDEX STOP - STOP 2 PEAK To cancel this function Press the STOP button. (Some other buttons can also be always selected, because this feature will function among parts on a disc where the source level peaks, and next plays the part repeatedly. If program...
Owner's Manual
Page 19
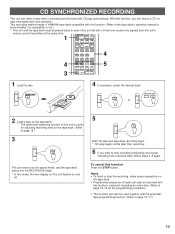
... tape deck enters into the REC/PAUSE mode. * In this mode, the time display on this function Press the STOP button. This recording method needs a YAMAHA tape deck compatible with CD play begins a little later than recording. 6 If you can also be recorded with this unit's remote control transmitter at the...
... tape deck enters into the REC/PAUSE mode. * In this mode, the time display on this function Press the STOP button. This recording method needs a YAMAHA tape deck compatible with CD play begins a little later than recording. 6 If you can also be recorded with this unit's remote control transmitter at the...
Owner's Manual
Page 20
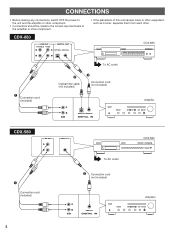
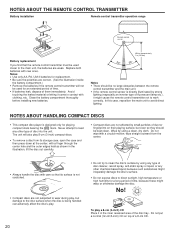
Avoid touching the leaked material or letting it come in contact with new ones. Clean the battery compartment thoroughly before installing new batteries. 30° Within approximately 7 m (23 feet) 30° Notes • There should be used closer to the main unit, the batteries are weak. No! NOTES ABOUT THE REMOTE CONTROL TRANSMITTER Battery installation 1 Remote control transmitter operation range 3 Remote control sensor 2 Battery replacement If you find that its storage case, open the case and then press down at the center; with a finger through the center hole and the ...
Avoid touching the leaked material or letting it come in contact with new ones. Clean the battery compartment thoroughly before installing new batteries. 30° Within approximately 7 m (23 feet) 30° Notes • There should be used closer to the main unit, the batteries are weak. No! NOTES ABOUT THE REMOTE CONTROL TRANSMITTER Battery installation 1 Remote control transmitter operation range 3 Remote control sensor 2 Battery replacement If you find that its storage case, open the case and then press down at the center; with a finger through the center hole and the ...
