Owners Manual
Page 5
...you have the basic elements of a high-performance computer recording system that you for years to the AUDIOGRAM interface 8 3. Contents Introduction 5 Contents 5 Features 6 Setup 7 Quick Guide 8 1. Adjusting Level 9... 104 Dimensional Diagrams 104 Block Diagram and Level Diagram 105 About the accessory disk 106 AUDIOGRAM 6 Owner's Manual 5 Installing Cubase AI 8 2. Mixing with Cubase AI 10 6.... beginning use, so that is easy to set up and operate. The AUDIOGRAM 6 includes a USB audio interface for digital audio data transfer, and Cubase AI DAW (Digital Audio Workstation)...
...you have the basic elements of a high-performance computer recording system that you for years to the AUDIOGRAM interface 8 3. Contents Introduction 5 Contents 5 Features 6 Setup 7 Quick Guide 8 1. Adjusting Level 9... 104 Dimensional Diagrams 104 Block Diagram and Level Diagram 105 About the accessory disk 106 AUDIOGRAM 6 Owner's Manual 5 Installing Cubase AI 8 2. Mixing with Cubase AI 10 6.... beginning use, so that is easy to set up and operate. The AUDIOGRAM 6 includes a USB audio interface for digital audio data transfer, and Cubase AI DAW (Digital Audio Workstation)...

Owners Manual
Page 6
Stereo audio data is transferred in the AUDIOGRAM package, offers versatile, high-performance hard-disk recording capability. Cubase AI DAW Software Supplied (page 8) Cubase AI software, included in both directions-from microphones and ... distortion by compressing excessive peaks in your computer via the supplied USB cable. Introduction Features Connect To Your Computer via a Single USB Cable (page 8) The AUDIOGRAM interface connects to your computer's operating system, so there's no need to install any extra driver software. No Driver Installation Required (page 8) The...
Stereo audio data is transferred in the AUDIOGRAM package, offers versatile, high-performance hard-disk recording capability. Cubase AI DAW Software Supplied (page 8) Cubase AI software, included in both directions-from microphones and ... distortion by compressing excessive peaks in your computer via the supplied USB cable. Introduction Features Connect To Your Computer via a Single USB Cable (page 8) The AUDIOGRAM interface connects to your computer's operating system, so there's no need to install any extra driver software. No Driver Installation Required (page 8) The...

Owners Manual
Page 8
...AI software . "*" indicates where the version number appears in all gear that is connected. 8 AUDIOGRAM 6 Owner's Manual Be sure to turn the PHANTOM +48V switch on : 2 Step Connecting to the AUDIOGRAM interface 1 Turn all required fields for recording and mixdown. Select MIC ( ) if a ...microphone is connected, or INST ( ) if a guitar or similar instrument is to be connected to the AUDIOGRAM off or to standby mode (except the ...
...AI software . "*" indicates where the version number appears in all gear that is connected. 8 AUDIOGRAM 6 Owner's Manual Be sure to turn the PHANTOM +48V switch on : 2 Step Connecting to the AUDIOGRAM interface 1 Turn all required fields for recording and mixdown. Select MIC ( ) if a ...microphone is connected, or INST ( ) if a guitar or similar instrument is to be connected to the AUDIOGRAM off or to standby mode (except the ...

Owners Manual
Page 9
...switch on or off when phantom power is being applied to the AUDIOGRAM interface. Failure to observe these will light to indicate that could cause hearing loss or device damage. 3 Connect the AUDIOGRAM interface to your computer using the supplied USB cable. If the instrument or... etc.) and ending with the monitor speakers (powered speakers). 1 Turn on the instruments and microphones. 2 If you are connected to the AUDIOGRAM interface. 3 Adjust the channel GAIN controls so that only a condenser microphone is complete before turning this occurs, wait until the level indicator PEAK ...
...switch on or off when phantom power is being applied to the AUDIOGRAM interface. Failure to observe these will light to indicate that could cause hearing loss or device damage. 3 Connect the AUDIOGRAM interface to your computer using the supplied USB cable. If the instrument or... etc.) and ending with the monitor speakers (powered speakers). 1 Turn on the instruments and microphones. 2 If you are connected to the AUDIOGRAM interface. 3 Adjust the channel GAIN controls so that only a condenser microphone is complete before turning this occurs, wait until the level indicator PEAK ...
Owners Manual
Page 10
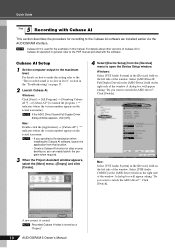
...If the ASIO Direct Sound Full Duplex Driver dialog window appears, click [OK]. Click [Switch]. A new project is stored as a "Project." 10 AUDIOGRAM 6 Owner's Manual For details on how to make the setting refer to launch the program. ("*" indicates where the version number appears in the [Devices]... right side of the window. A dialog box will appear asking "Do you want to the Cubase AI software we installed earlier via the AUDIOGRAM interface. Quick Guide 5 Step Recording with the software. Cubase AI Setup 1 Set the computer output to open the Device Setup window. section in...
...If the ASIO Direct Sound Full Duplex Driver dialog window appears, click [OK]. Click [Switch]. A new project is stored as a "Project." 10 AUDIOGRAM 6 Owner's Manual For details on how to make the setting refer to launch the program. ("*" indicates where the version number appears in the [Devices]... right side of the window. A dialog box will appear asking "Do you want to the Cubase AI software we installed earlier via the AUDIOGRAM interface. Quick Guide 5 Step Recording with the software. Cubase AI Setup 1 Set the computer output to open the Device Setup window. section in...

Owners Manual
Page 13
...finish recording the track, click the Transport panel [Stop] button. Check signal levels to be sent to Cubase AI for recording using the AUDIOGRAM level indicators while the DAW control is set to about 1 o'clock. Rewind Forward Stop Record Start 4 Select [Mixer] from the [File] ...'s Manual 13 To hear playback of the mixer window, and the channel level will be displayed via the AUDIOGRAM interface, adjust the volume with minimum noise, the AUDIOGRAM signal levels should be set to insure against losing large amounts of the recorded section, then click the Transport panel ...
...finish recording the track, click the Transport panel [Stop] button. Check signal levels to be sent to Cubase AI for recording using the AUDIOGRAM level indicators while the DAW control is set to about 1 o'clock. Rewind Forward Stop Record Start 4 Select [Mixer] from the [File] ...'s Manual 13 To hear playback of the mixer window, and the channel level will be displayed via the AUDIOGRAM interface, adjust the volume with minimum noise, the AUDIOGRAM signal levels should be set to insure against losing large amounts of the recorded section, then click the Transport panel ...

Owners Manual
Page 16
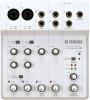
... levels prior to the computer. In addition to transferring audio data between the AUDIOGRAM interface and the computer, the USB cable supplies power from Cubase AI sent to the AUDIOGRAM interface. NOTE Yamaha recommends that you set the MASTER LEVEL control to turn off power amplifi...cable be used either as separate mono channels or as the balance between the various channels. As the knob is applied to the AUDIOGRAM interface via the supplied USB cable. B PHANTOM +48V (CH1) Switch/Indicator (only for increased subjective level. E MASTER LEVEL Control ...
... levels prior to the computer. In addition to transferring audio data between the AUDIOGRAM interface and the computer, the USB cable supplies power from Cubase AI sent to the AUDIOGRAM interface. NOTE Yamaha recommends that you set the MASTER LEVEL control to turn off power amplifi...cable be used either as separate mono channels or as the balance between the various channels. As the knob is applied to the AUDIOGRAM interface via the supplied USB cable. B PHANTOM +48V (CH1) Switch/Indicator (only for increased subjective level. E MASTER LEVEL Control ...

Owners Manual
Page 17
...For setup details refer to "USB Audio CODEC." 4. Windows 7/Vista: 1. Set "Device volume" to open the "Sound" dialog window. 2. Troubleshooting The AUDIOGRAM interface won't turn on the computer. From the [START] menu click [Control Panel], then double-click the "Sound" icon to "High." 4. from the ... connected properly, or are not using other device(s) and connecting only the Yamaha USB device. If not, right-click the "USB Audio CODEC" icon and select "Set as Default Device." If so, try connecting the AUDIOGRAM interface directly to a USB port on . ❑ Is the included USB...
...For setup details refer to "USB Audio CODEC." 4. Windows 7/Vista: 1. Set "Device volume" to open the "Sound" dialog window. 2. Troubleshooting The AUDIOGRAM interface won't turn on the computer. From the [START] menu click [Control Panel], then double-click the "Sound" icon to "High." 4. from the ... connected properly, or are not using other device(s) and connecting only the Yamaha USB device. If not, right-click the "USB Audio CODEC" icon and select "Set as Default Device." If so, try connecting the AUDIOGRAM interface directly to a USB port on . ❑ Is the included USB...