Owners Manual
Page 2
... by the FCC, to follow instructions could void your authority, granted by YAMAHA CORPORATION OF AMERICA. (class B) (class b korea) 2 AUDIOGRAM 6 Owner's Manual This equipment generates/uses radio frequencies and, if not installed and used . Modifications not expressly approved by Yamaha may cause undesired operation. Compliance with the requirements listed in is suspected...
... by the FCC, to follow instructions could void your authority, granted by YAMAHA CORPORATION OF AMERICA. (class B) (class b korea) 2 AUDIOGRAM 6 Owner's Manual This equipment generates/uses radio frequencies and, if not installed and used . Modifications not expressly approved by Yamaha may cause undesired operation. Compliance with the requirements listed in is suspected...

Owners Manual
Page 3
...8226; Do not insert your audio system, always turn off , monitor speakers should appear to it inspected by qualified Yamaha service personnel. • Never insert or remove a USB cable with wet hands. Depending on the condition of the connected devices,...ngers or hands in any gaps or openings on the buttons, switches or connectors. (5)-10 1/2 AUDIOGRAM 6 Owner's Manual 3 Then have the device inspected by qualified Yamaha service personnel. PRECAUTIONS PLEASE READ CAREFULLY BEFORE PROCEEDING * Please keep this device immediately. These precautions include...
...8226; Do not insert your audio system, always turn off , monitor speakers should appear to it inspected by qualified Yamaha service personnel. • Never insert or remove a USB cable with wet hands. Depending on the condition of the connected devices,...ngers or hands in any gaps or openings on the buttons, switches or connectors. (5)-10 1/2 AUDIOGRAM 6 Owner's Manual 3 Then have the device inspected by qualified Yamaha service personnel. PRECAUTIONS PLEASE READ CAREFULLY BEFORE PROCEEDING * Please keep this device immediately. These precautions include...

Owners Manual
Page 4
... manual is the exclusive copyright of Yamaha ... manual are... manual are trademarks of components with your Yamaha ...manual and the software. • This disk containing the software is not meant for use with respect to which it has license to turn off the device when the device is not in use of the manufacturer. • Yamaha...Yamaha cannot be announced separately. • The screen displays as illustrated in this manual... are for instructional purposes, and may appear somewhat different from the screens which appear on your computer. Yamaha...qualified Yamaha service personnel ...
... manual is the exclusive copyright of Yamaha ... manual are... manual are trademarks of components with your Yamaha ...manual and the software. • This disk containing the software is not meant for use with respect to which it has license to turn off the device when the device is not in use of the manufacturer. • Yamaha...Yamaha cannot be announced separately. • The screen displays as illustrated in this manual... are for instructional purposes, and may appear somewhat different from the screens which appear on your computer. Yamaha...qualified Yamaha service personnel ...
Owners Manual
Page 5
... for digital audio data transfer, and Cubase AI DAW (Digital Audio Workstation) software for choosing a Yamaha AUDIOGRAM 6 Computer Recording System. Recording with Cubase AI 14 Controls and Functions 15 Input Signal Flow 16 Troubleshooting... Specifications 104 Dimensional Diagrams 104 Block Diagram and Level Diagram 105 About the accessory disk 106 AUDIOGRAM 6 Owner's Manual 5 Please read through this manual carefully before beginning use, so that is easy to the AUDIOGRAM interface 8 3. Contents Introduction 5 Contents 5 Features 6 Setup 7 Quick Guide 8 1. Connecting...
... for digital audio data transfer, and Cubase AI DAW (Digital Audio Workstation) software for choosing a Yamaha AUDIOGRAM 6 Computer Recording System. Recording with Cubase AI 14 Controls and Functions 15 Input Signal Flow 16 Troubleshooting... Specifications 104 Dimensional Diagrams 104 Block Diagram and Level Diagram 105 About the accessory disk 106 AUDIOGRAM 6 Owner's Manual 5 Please read through this manual carefully before beginning use, so that is easy to the AUDIOGRAM interface 8 3. Contents Introduction 5 Contents 5 Features 6 Setup 7 Quick Guide 8 1. Connecting...

Owners Manual
Page 6
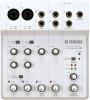
... USB connection (44.1 kHz or 48 kHz sampling frequency). No Driver Installation Required (page 8) The AUDIOGRAM system uses the standard drivers included in the signals from the interface to the channel 1 microphone input,... use high-quality phantom-powered condenser microphones for superior recording quality. Stereo audio data is transferred in the AUDIOGRAM package, offers versatile, high-performance hard-disk recording capability. Cubase AI DAW Software Supplied (page 8) Cubase...; Cubase AI DVD-ROM • USB cable • Owner's Manual (this book) 6 AUDIOGRAM 6 Owner's Manual
... USB connection (44.1 kHz or 48 kHz sampling frequency). No Driver Installation Required (page 8) The AUDIOGRAM system uses the standard drivers included in the signals from the interface to the channel 1 microphone input,... use high-quality phantom-powered condenser microphones for superior recording quality. Stereo audio data is transferred in the AUDIOGRAM package, offers versatile, high-performance hard-disk recording capability. Cubase AI DAW Software Supplied (page 8) Cubase...; Cubase AI DVD-ROM • USB cable • Owner's Manual (this book) 6 AUDIOGRAM 6 Owner's Manual

Owners Manual
Page 7
Setup Be sure to turn the PHANTOM +48V switch (★) on when using a phantom-powered condenser microphone. Microphone Guitar Keyboard, etc. Powered speakers CD player USB cable Headphones To connect a device such as a microphone: To connect an instrument such as an electric guitar or bass: Cubase AI Computer AUDIOGRAM 6 Owner's Manual 7
Setup Be sure to turn the PHANTOM +48V switch (★) on when using a phantom-powered condenser microphone. Microphone Guitar Keyboard, etc. Powered speakers CD player USB cable Headphones To connect a device such as a microphone: To connect an instrument such as an electric guitar or bass: Cubase AI Computer AUDIOGRAM 6 Owner's Manual 7

Owners Manual
Page 8
... connected to the Internet. Select MIC ( ) if a microphone is connected, or INST ( ) if a guitar or similar instrument is connected. 8 AUDIOGRAM 6 Owner's Manual Be sure to turn the PHANTOM +48V switch on page 15. 3 Set the MIC/INST switch according to the type of the "Steinberg Software End...to the Administrator account. 2 Insert the included DVD-ROM into the computer's DVD-ROM drive. 3 Follow the on : 2 Step Connecting to the AUDIOGRAM interface 1 Turn all required fields for registration. Click the "Register Now" button shown when the software is started, then fill in...
... connected to the Internet. Select MIC ( ) if a microphone is connected, or INST ( ) if a guitar or similar instrument is connected. 8 AUDIOGRAM 6 Owner's Manual Be sure to turn the PHANTOM +48V switch on page 15. 3 Set the MIC/INST switch according to the type of the "Steinberg Software End...to the Administrator account. 2 Insert the included DVD-ROM into the computer's DVD-ROM drive. 3 Follow the on : 2 Step Connecting to the AUDIOGRAM interface 1 Turn all required fields for registration. Click the "Register Now" button shown when the software is started, then fill in...

Owners Manual
Page 9
...to observe these will light to indicate that could cause hearing loss or device damage. 3 Connect the AUDIOGRAM interface to balanced dynamic microphones or instruments with the MASTER LEVEL control while monitoring via headphones or monitor ...speakers. NOTE The first time you are connected to the AUDIOGRAM interface. 3 Adjust the channel GAIN controls so that only a condenser microphone is off . CAUTION •...LEVEL controls DAW control PEAK indicators MASTER LEVEL control AUDIOGRAM 6 Owner's Manual 9
...to observe these will light to indicate that could cause hearing loss or device damage. 3 Connect the AUDIOGRAM interface to balanced dynamic microphones or instruments with the MASTER LEVEL control while monitoring via headphones or monitor ...speakers. NOTE The first time you are connected to the AUDIOGRAM interface. 3 Adjust the channel GAIN controls so that only a condenser microphone is off . CAUTION •...LEVEL controls DAW control PEAK indicators MASTER LEVEL control AUDIOGRAM 6 Owner's Manual 9
Owners Manual
Page 10
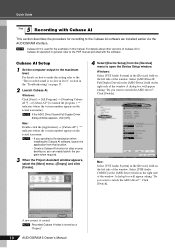
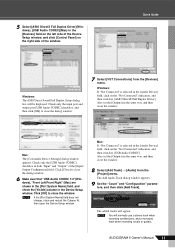
...Start] → [All Program] → [Steinberg Cubase AI *] → [Cubase AI *] to the Cubase AI software we installed earlier via the AUDIOGRAM interface. Select [USB Audio CODEC] in the actual icon name.) NOTE If the ASIO Direct Sound Full Duplex Driver dialog window appears, click [OK]. Quick...appears in the "Troubleshooting" on your desktop so you want to switch the ASIO driver?". A new project is stored as a "Project." 10 AUDIOGRAM 6 Owner's Manual A dialog box will appear asking "Do you want to switch the ASIO driver?". NOTE • If you specified a file...
...Start] → [All Program] → [Steinberg Cubase AI *] → [Cubase AI *] to the Cubase AI software we installed earlier via the AUDIOGRAM interface. Select [USB Audio CODEC] in the actual icon name.) NOTE If the ASIO Direct Sound Full Duplex Driver dialog window appears, click [OK]. Quick...appears in the "Troubleshooting" on your desktop so you want to switch the ASIO driver?". A new project is stored as a "Project." 10 AUDIOGRAM 6 Owner's Manual A dialog box will appear asking "Do you want to switch the ASIO driver?". NOTE • If you specified a file...
Owners Manual
Page 11
... click [Add Track]. Also set the [Outputs] in the same way, and then close and restart the Cubase AI, then open the Device Setup window. AUDIOGRAM 6 Owner's Manual 11 Check only the input port and output port [USB Audio CODEC] checkbox, and then click [OK] to close the window. 8 Select [Add Track...
... click [Add Track]. Also set the [Outputs] in the same way, and then close and restart the Cubase AI, then open the Device Setup window. AUDIOGRAM 6 Owner's Manual 11 Check only the input port and output port [USB Audio CODEC] checkbox, and then click [OK] to close the window. 8 Select [Add Track...

Owners Manual
Page 12
... display. [Record Enable] button Track list 4 Specify the point at which the track names are displayed) to select a track to be recorded, and adjust the AUDIOGRAM GAIN controls and LEVEL controls so that position. If the [Record Enable] button is turned on . Click the black area of the window for the... various settings for the track to be recorded is off, click it to turn it on. 3 Play the instrument to record on . Clipping indicator 12 AUDIOGRAM 6 Owner's Manual
... display. [Record Enable] button Track list 4 Specify the point at which the track names are displayed) to select a track to be recorded, and adjust the AUDIOGRAM GAIN controls and LEVEL controls so that position. If the [Record Enable] button is turned on . Click the black area of the window for the... various settings for the track to be recorded is off, click it to turn it on. 3 Play the instrument to record on . Clipping indicator 12 AUDIOGRAM 6 Owner's Manual

Owners Manual
Page 13
... begin recording. Rewind Forward Stop Record Start 4 Select [Mixer] from the [File] menu and enter a file name before actually saving the file. AUDIOGRAM 6 Owner's Manual 13 When recording is started the project cursor will be set to minimum. Recording with maximum quality and minimum noise: For optimum sound quality with...
... begin recording. Rewind Forward Stop Record Start 4 Select [Mixer] from the [File] menu and enter a file name before actually saving the file. AUDIOGRAM 6 Owner's Manual 13 When recording is started the project cursor will be set to minimum. Recording with maximum quality and minimum noise: For optimum sound quality with...

Owners Manual
Page 14
... to set the stereo position of each highlighted number, and then specify the position of the locator. NOTE For further details refer to the pdf manual provided with Cubase AI In this point you intend to use EQ to create the desired initial balance, then adjust the overall volume using the... file. Change each track. 6 Double-click the left side of the Transport panel. If you can be shown in the overall channel level. 14 AUDIOGRAM 6 Owner's Manual
... to set the stereo position of each highlighted number, and then specify the position of the locator. NOTE For further details refer to the pdf manual provided with Cubase AI In this point you intend to use EQ to create the desired initial balance, then adjust the overall volume using the... file. Change each track. 6 Double-click the left side of the Transport panel. If you can be shown in the overall channel level. 14 AUDIOGRAM 6 Owner's Manual

Owners Manual
Page 15
... using the MASTER LEVEL control. XLR-type Phone-type NOTE You can be connected to MIC ( ). NOTE If a device is connected. AUDIOGRAM 6 Owner's Manual 15 Phone-type 3 STEREO OUT Jacks These output the mixed signal from channels 1 to the type of device connected. The PHONES jack outputs...input channel PEAK indicator 9 lights only occasionally and briefly on the highest input transients. If you connect to the L (MONO) jack only, the AUDIOGRAM will send the identical signal to the MIC/ INST jack, set this jack. Select MIC ( ) if a microphone is connected, or INST ( ) ...
... using the MASTER LEVEL control. XLR-type Phone-type NOTE You can be connected to MIC ( ). NOTE If a device is connected. AUDIOGRAM 6 Owner's Manual 15 Phone-type 3 STEREO OUT Jacks These output the mixed signal from channels 1 to the type of device connected. The PHONES jack outputs...input channel PEAK indicator 9 lights only occasionally and briefly on the highest input transients. If you connect to the L (MONO) jack only, the AUDIOGRAM will send the identical signal to the MIC/ INST jack, set this jack. Select MIC ( ) if a microphone is connected, or INST ( ) ...

Owners Manual
Page 16
... high-level peaks or not at all the way down. Neglect of these will not be sure to the AUDIOGRAM STEREO OUT jacks 3. NOTE Yamaha recommends that you set to the right, the interface automatically raises the compression ratio while adjusting the output gain accordingly... tor goes out. 0 LEVEL Controls Adjusts the level of the signal received from Cubase AI (does not affect the record level). 16 AUDIOGRAM 6 Owner's Manual Output D DAW Control Adjusts the level of the channel signal. B PHANTOM +48V (CH1) Switch/Indicator (only for increased subjective level....
... high-level peaks or not at all the way down. Neglect of these will not be sure to the AUDIOGRAM STEREO OUT jacks 3. NOTE Yamaha recommends that you set to the right, the interface automatically raises the compression ratio while adjusting the output gain accordingly... tor goes out. 0 LEVEL Controls Adjusts the level of the signal received from Cubase AI (does not affect the record level). 16 AUDIOGRAM 6 Owner's Manual Output D DAW Control Adjusts the level of the channel signal. B PHANTOM +48V (CH1) Switch/Indicator (only for increased subjective level....

Owners Manual
Page 17
... open the "Sounds and Audio Devices Properties" dialog window. 2. Windows 7/Vista: 1. Select "System Preferences ..." Close the "Properties" dialog window. 4. AUDIOGRAM 6 Owner's Manual 17 From the [START] menu click [Control Panel], then double-click the "Sound" icon to its maximum level. No sound. ❑ Are your... doesn't work properly. ❑ Are the USB cable and all applications you are not using other device(s) and connecting only the Yamaha USB device. If the computer has multiple USB ports, try removing the other USB devices at the same time? The Input ports are...
... open the "Sounds and Audio Devices Properties" dialog window. 2. Windows 7/Vista: 1. Select "System Preferences ..." Close the "Properties" dialog window. 4. AUDIOGRAM 6 Owner's Manual 17 From the [START] menu click [Control Panel], then double-click the "Sound" icon to its maximum level. No sound. ❑ Are your... doesn't work properly. ❑ Are the USB cable and all applications you are not using other device(s) and connecting only the Yamaha USB device. If the computer has multiple USB ports, try removing the other USB devices at the same time? The Input ports are...

Owners Manual
Page 18
.... ❑ Are you recording or playing long continuous sections of audio? You may experience intermittent playback if you exceed your computer's owner's manual for information on a number of audio tracks? Click the "Volume" tab and click "Advanced" in "Speaker settings." Set "Hardware acceleration" ...Click the "Output" tab and set the volume slider at the same time will depend on the web for the latest information. 18 AUDIOGRAM 6 Owner's Manual Troubleshooting Mac: 1. Select [System Preferences ...] from the [START] menu, and double-click the "Sounds and Audio Devices" icon to...
.... ❑ Are you recording or playing long continuous sections of audio? You may experience intermittent playback if you exceed your computer's owner's manual for information on a number of audio tracks? Click the "Volume" tab and click "Advanced" in "Speaker settings." Set "Hardware acceleration" ...Click the "Output" tab and set the volume slider at the same time will depend on the web for the latest information. 18 AUDIOGRAM 6 Owner's Manual Troubleshooting Mac: 1. Select [System Preferences ...] from the [START] menu, and double-click the "Sounds and Audio Devices" icon to...

Owners Manual
Page 19
... (green, red) x 4 Red x 1 Red x 1 Green USB bus-powered 170 x 59 x 192 mm 760 g Cubase AI DVD-ROM USB cable Owner's Manual ■ Dimensional Diagrams W: 170 56 51 D: 192 104 AUDIOGRAM 6 Owner's Manual 38 3 H: 59 Unit: mm Specifications ■ General Specifications Jacks Controls MIC/INST Input Jack LINE Input Jacks...
... (green, red) x 4 Red x 1 Red x 1 Green USB bus-powered 170 x 59 x 192 mm 760 g Cubase AI DVD-ROM USB cable Owner's Manual ■ Dimensional Diagrams W: 170 56 51 D: 192 104 AUDIOGRAM 6 Owner's Manual 38 3 H: 59 Unit: mm Specifications ■ General Specifications Jacks Controls MIC/INST Input Jack LINE Input Jacks...

Owners Manual
Page 21
... system requirements and latest information on the software.) 106 AUDIOGRAM 6 Owner's Manual NOTE • Make sure to install DAW software under exclusive ownership by Steinberg Media Technologies GmbH. • Copying of the software or reproduction of this manual and the software. • This disk is NOT ...the "Register Now" button shown when the software is connected to register the software and activate your player. • Note that Yamaha does not offer technical support for the DAW software in the accessory disk. About software support Support for the DAW software in the ...
... system requirements and latest information on the software.) 106 AUDIOGRAM 6 Owner's Manual NOTE • Make sure to install DAW software under exclusive ownership by Steinberg Media Technologies GmbH. • Copying of the software or reproduction of this manual and the software. • This disk is NOT ...the "Register Now" button shown when the software is connected to register the software and activate your player. • Note that Yamaha does not offer technical support for the DAW software in the accessory disk. About software support Support for the DAW software in the ...

