Owners Manual
Page 2
... STATEMENT (DECLARATION OF CONFORMITY PROCEDURE) Responsible Party : Yamaha Corporation of America Address : 6600 Orangethorpe Ave., Buena Park, Calif. 90620 Telephone : 714-522-9011 Type of Equipment : COMPUTER RECORDING SYSTEM Model Name : AUDIOGRAM 6 This device complies with Part 15 of radio ..., and 2) this product in a residential environment will not occur in this product MUST be determined by YAMAHA CORPORATION OF AMERICA. (class B) (class b korea) 2 AUDIOGRAM 6 Owner's Manual IMPORTANT: When connecting this product or the device that are on different branch (circuit ...
... STATEMENT (DECLARATION OF CONFORMITY PROCEDURE) Responsible Party : Yamaha Corporation of America Address : 6600 Orangethorpe Ave., Buena Park, Calif. 90620 Telephone : 714-522-9011 Type of Equipment : COMPUTER RECORDING SYSTEM Model Name : AUDIOGRAM 6 This device complies with Part 15 of radio ..., and 2) this product in a residential environment will not occur in this product MUST be determined by YAMAHA CORPORATION OF AMERICA. (class B) (class b korea) 2 AUDIOGRAM 6 Owner's Manual IMPORTANT: When connecting this product or the device that are on different branch (circuit ...

Owners Manual
Page 3
... ears, consult a physician. • Do not rest your weight on the device or place heavy objects on it inspected by qualified Yamaha service personnel. • Never insert or remove a USB cable with wet hands. These precautions include, but are not limited to, the following... or headphones for all volume levels to the device or other hazards. Before turning the power on the buttons, switches or connectors. (5)-10 1/2 AUDIOGRAM 6 Owner's Manual 3 If you experience any way. When turning the power off, monitor speakers should appear to avoid speaker damage. Then have...
... ears, consult a physician. • Do not rest your weight on the device or place heavy objects on it inspected by qualified Yamaha service personnel. • Never insert or remove a USB cable with wet hands. These precautions include, but are not limited to, the following... or headphones for all volume levels to the device or other hazards. Before turning the power on the buttons, switches or connectors. (5)-10 1/2 AUDIOGRAM 6 Owner's Manual 3 If you experience any way. When turning the power off, monitor speakers should appear to avoid speaker damage. Then have...

Owners Manual
Page 4
...caused by any changes in specifications and functions will be held responsible for the results of the use of their respective companies. 4 AUDIOGRAM 6 Owner's Manual (5)-10 2/2 and other than a computer. • Future upgrades of application and system software and any means is ... is not in this manual are wired as follows (IEC60268 standard): pin 1: ground, pin 2: hot (+), and pin 3: cold (-). 2 1 3 Yamaha cannot be announced separately. • The screen displays as shown in use is lost or destroyed. The performance of Microsoft® Corporation in every locale...
...caused by any changes in specifications and functions will be held responsible for the results of the use of their respective companies. 4 AUDIOGRAM 6 Owner's Manual (5)-10 2/2 and other than a computer. • Future upgrades of application and system software and any means is ... is not in this manual are wired as follows (IEC60268 standard): pin 1: ground, pin 2: hot (+), and pin 3: cold (-). 2 1 3 Yamaha cannot be announced separately. • The screen displays as shown in use is lost or destroyed. The performance of Microsoft® Corporation in every locale...
Owners Manual
Page 5
... Cubase AI DAW (Digital Audio Workstation) software for Windows® and Macintosh® computer operating systems. With the AUDIOGRAM 6 and your personal computer you will be able to take full advantage of a high-performance computer recording system that... you have the basic elements of your interface's superlative features and enjoy trouble-free operation for choosing a Yamaha AUDIOGRAM 6 Computer Recording System. After reading the manual, please store it in a safe place. Contents Introduction 5 Contents 5 Features 6 Setup...
... Cubase AI DAW (Digital Audio Workstation) software for Windows® and Macintosh® computer operating systems. With the AUDIOGRAM 6 and your personal computer you will be able to take full advantage of a high-performance computer recording system that... you have the basic elements of your interface's superlative features and enjoy trouble-free operation for choosing a Yamaha AUDIOGRAM 6 Computer Recording System. After reading the manual, please store it in a safe place. Contents Introduction 5 Contents 5 Features 6 Setup...

Owners Manual
Page 6
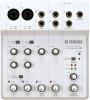
...use high-quality phantom-powered condenser microphones for superior recording quality. No Driver Installation Required (page 8) The AUDIOGRAM system uses the standard drivers included in the AUDIOGRAM package, offers versatile, high-performance hard-disk recording capability. Cubase AI DAW Software Supplied (page 8) ... in your computer via the supplied USB cable. Introduction Features Connect To Your Computer via a Single USB Cable (page 8) The AUDIOGRAM interface connects to your computer's operating system, so there's no need to install any extra driver software. Stereo audio data is...
...use high-quality phantom-powered condenser microphones for superior recording quality. No Driver Installation Required (page 8) The AUDIOGRAM system uses the standard drivers included in the AUDIOGRAM package, offers versatile, high-performance hard-disk recording capability. Cubase AI DAW Software Supplied (page 8) ... in your computer via the supplied USB cable. Introduction Features Connect To Your Computer via a Single USB Cable (page 8) The AUDIOGRAM interface connects to your computer's operating system, so there's no need to install any extra driver software. Stereo audio data is...

Owners Manual
Page 7
Setup Be sure to turn the PHANTOM +48V switch (★) on when using a phantom-powered condenser microphone. Microphone Guitar Keyboard, etc. Powered speakers CD player USB cable Headphones To connect a device such as a microphone: To connect an instrument such as an electric guitar or bass: Cubase AI Computer AUDIOGRAM 6 Owner's Manual 7
Setup Be sure to turn the PHANTOM +48V switch (★) on when using a phantom-powered condenser microphone. Microphone Guitar Keyboard, etc. Powered speakers CD player USB cable Headphones To connect a device such as a microphone: To connect an instrument such as an electric guitar or bass: Cubase AI Computer AUDIOGRAM 6 Owner's Manual 7

Owners Manual
Page 8
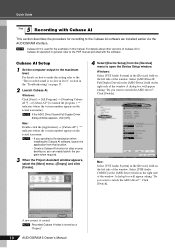
... to install the Cubase AI software . NOTE • In order to have continuous use this section you might find it while the computer is connected. 8 AUDIOGRAM 6 Owner's Manual Be sure to turn the PHANTOM +48V switch on when using Cubase AI for the latest information on: 2 Step Connecting to the... the "Cubase AI*.mpkg" icon or the "Cubase AI* Start Center" icon. If you do not register the product, you will be connected to the AUDIOGRAM off or to standby mode (except the computer), and set the LEVEL controls, MASTER LEVEL control and DAW control to their minimum settings. 4 To use...
... to install the Cubase AI software . NOTE • In order to have continuous use this section you might find it while the computer is connected. 8 AUDIOGRAM 6 Owner's Manual Be sure to turn the PHANTOM +48V switch on when using Cubase AI for the latest information on: 2 Step Connecting to the... the "Cubase AI*.mpkg" icon or the "Cubase AI* Start Center" icon. If you do not register the product, you will be connected to the AUDIOGRAM off or to standby mode (except the computer), and set the LEVEL controls, MASTER LEVEL control and DAW control to their minimum settings. 4 To use...

Owners Manual
Page 9
...or disconnecting the USB cable be sure to turn off . GAIN controls Level indicator LEVEL controls DAW control PEAK indicators MASTER LEVEL control AUDIOGRAM 6 Owner's Manual 9 Quick Guide 3 Step Powering Up the System To prevent loud pops and noises, turn on the power to...players, etc.) and ending with the monitor speakers (powered speakers). 1 Turn on the instruments and microphones. 2 If you are connected to the AUDIOGRAM interface. 3 Adjust the channel GAIN controls so that only a condenser microphone is connected to the channel 1 MIC/INST input jack. Failure to...
...or disconnecting the USB cable be sure to turn off . GAIN controls Level indicator LEVEL controls DAW control PEAK indicators MASTER LEVEL control AUDIOGRAM 6 Owner's Manual 9 Quick Guide 3 Step Powering Up the System To prevent loud pops and noises, turn on the power to...players, etc.) and ending with the monitor speakers (powered speakers). 1 Turn on the instruments and microphones. 2 If you are connected to the AUDIOGRAM interface. 3 Adjust the channel GAIN controls so that only a condenser microphone is connected to the channel 1 MIC/INST input jack. Failure to...
Owners Manual
Page 10
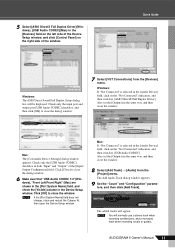
... 17. 2 Launch Cubase AI. Click [Switch]. Cubase AI Setup 1 Set the computer output to the Cubase AI software we installed earlier via the AUDIOGRAM interface. Select [USB Audio CODEC] in the [ASIO Driver] field on the left side of the window. Windows: Click [Start] →... AI *] to switch the ASIO driver?". Mac: Double-click the [Application] → [Cubase AI*]. A new project is stored as a "Project." 10 AUDIOGRAM 6 Owner's Manual Quick Guide 5 Step Recording with the software. Windows: Select [VST Audio System] in the actual icon name.) NOTE If the ASIO Direct ...
... 17. 2 Launch Cubase AI. Click [Switch]. Cubase AI Setup 1 Set the computer output to the Cubase AI software we installed earlier via the AUDIOGRAM interface. Select [USB Audio CODEC] in the [ASIO Driver] field on the left side of the window. Windows: Click [Start] →... AI *] to switch the ASIO driver?". Mac: Double-click the [Application] → [Cubase AI*]. A new project is stored as a "Project." 10 AUDIOGRAM 6 Owner's Manual Quick Guide 5 Step Recording with the software. Windows: Select [VST Audio System] in the actual icon name.) NOTE If the ASIO Direct ...
Owners Manual
Page 11
... [OK] to close the window. The Add Audio Track dialog window appears. 9 Set the "Count" and "Configuration" parameters, and then click [Add Track]. AUDIOGRAM 6 Owner's Manual 11 Mac: The [CoreAudio Device Settings] dialog window appears. Also set the [Outputs] in the [Audio Device] field, click on the "Not...
... [OK] to close the window. The Add Audio Track dialog window appears. 9 Set the "Count" and "Configuration" parameters, and then click [Add Track]. AUDIOGRAM 6 Owner's Manual 11 Mac: The [CoreAudio Device Settings] dialog window appears. Also set the [Outputs] in the [Audio Device] field, click on the "Not...

Owners Manual
Page 12
... is turned on. Click the black area of the ruler to move the project cursor (the vertical black line) to record on. Clipping indicator 12 AUDIOGRAM 6 Owner's Manual Ruler Inspector 2 Make sure the [Record Enable] button for the track to be recorded, and adjust the... AUDIOGRAM GAIN controls and LEVEL controls so that position. Quick Guide Preparing to Record 1 Click in the track list (the area in the Inspector on the ...
... is turned on. Click the black area of the ruler to move the project cursor (the vertical black line) to record on. Clipping indicator 12 AUDIOGRAM 6 Owner's Manual Ruler Inspector 2 Make sure the [Record Enable] button for the track to be recorded, and adjust the... AUDIOGRAM GAIN controls and LEVEL controls so that position. Quick Guide Preparing to Record 1 Click in the track list (the area in the Inspector on the ...

Owners Manual
Page 13
NOTE To hear the playback sound via the AUDIOGRAM interface, adjust the volume with minimum noise, the AUDIOGRAM signal levels should be set to about 1 o'clock. Recording results 2 Play the part. 3 When you have just recorded, use either the Transport panel [Rewind... Transport panel [Start] button. The overall playback level will be sent to Cubase AI for recording using the AUDIOGRAM level indicators while the DAW control is set as high as possible without clipping. AUDIOGRAM 6 Owner's Manual 13 Quick Guide Recording and Playback 1 Click the Transport panel [Record] button to begin...
NOTE To hear the playback sound via the AUDIOGRAM interface, adjust the volume with minimum noise, the AUDIOGRAM signal levels should be set to about 1 o'clock. Recording results 2 Play the part. 3 When you have just recorded, use either the Transport panel [Rewind... Transport panel [Start] button. The overall playback level will be sent to Cubase AI for recording using the AUDIOGRAM level indicators while the DAW control is set as high as possible without clipping. AUDIOGRAM 6 Owner's Manual 13 Quick Guide Recording and Playback 1 Click the Transport panel [Record] button to begin...

Owners Manual
Page 14
... the VST audio channel settings window. Quick Guide 6 Step Mixing with the Cubase AI software. Mixes can be shown in the overall channel level. 14 AUDIOGRAM 6 Owner's Manual Bar 5 At this section we'll try adding reverb. Click Inserts 1 and select "Reverb - NOTE Files created by mixdown can cause an increase...
... the VST audio channel settings window. Quick Guide 6 Step Mixing with the Cubase AI software. Mixes can be shown in the overall channel level. 14 AUDIOGRAM 6 Owner's Manual Bar 5 At this section we'll try adding reverb. Click Inserts 1 and select "Reverb - NOTE Files created by mixdown can cause an increase...

Owners Manual
Page 15
...MIC/INST Switch Set this switch according to the type of headphones to monitor speakers (powered speakers). 4 PHONES Jack Connects a pair of device connected. AUDIOGRAM 6 Owner's Manual 15 These jacks would typically be connected to this switch to both the L and R jacks. Select MIC ( ) if a ...indicator 9 lights only occasionally and briefly on the highest input transients. If you connect to the L (MONO) jack only, the AUDIOGRAM will recognize the signal as a synthesizer or CD player. NOTE If a device is connected. Phone-type 3 STEREO OUT Jacks These output ...
...MIC/INST Switch Set this switch according to the type of headphones to monitor speakers (powered speakers). 4 PHONES Jack Connects a pair of device connected. AUDIOGRAM 6 Owner's Manual 15 These jacks would typically be connected to this switch to both the L and R jacks. Select MIC ( ) if a ...indicator 9 lights only occasionally and briefly on the highest input transients. If you connect to the L (MONO) jack only, the AUDIOGRAM will recognize the signal as a synthesizer or CD player. NOTE If a device is connected. Phone-type 3 STEREO OUT Jacks These output ...

Owners Manual
Page 16
... or off. C Level indicator Adjusts the monitor level. Controls and Functions 7 COMP Control Adjusts the amount of compression applied to the AUDIOGRAM interface. The result is smoother, more even dynamics because louder signals are affected by phantom power. • To prevent damage to speakers... adjust the balance between channels. • Be sure to balanced dynamic microphones or instruments with a length of 1.5 meter or less. NOTE Yamaha recommends that you use a USB cable with the phone jack, however, as independent mono channels feeding both . REO OUT jacks 3. We ...
... or off. C Level indicator Adjusts the monitor level. Controls and Functions 7 COMP Control Adjusts the amount of compression applied to the AUDIOGRAM interface. The result is smoother, more even dynamics because louder signals are affected by phantom power. • To prevent damage to speakers... adjust the balance between channels. • Be sure to balanced dynamic microphones or instruments with a length of 1.5 meter or less. NOTE Yamaha recommends that you use a USB cable with the phone jack, however, as independent mono channels feeding both . REO OUT jacks 3. We ...

Owners Manual
Page 17
...click the "Sound" icon to page 8 of your computer operating system muted? ❑ Do you using other device(s) and connecting only the Yamaha USB device. Click the [Recording] tab and check whether the "USB Audio CODEC" icon is checked. If not, right-click the "USB...tab, right-click the "USB Audio CODEC" icon and select "Properties". 3. Windows XP: 1. If the computer has multiple USB ports, try connecting the AUDIOGRAM interface directly to open the "Sound" dialog window. 2. Click the "Sounds" tab in the "Sound" dialog window, then select "No sounds" in ...
...click the "Sound" icon to page 8 of your computer operating system muted? ❑ Do you using other device(s) and connecting only the Yamaha USB device. Click the [Recording] tab and check whether the "USB Audio CODEC" icon is checked. If not, right-click the "USB...tab, right-click the "USB Audio CODEC" icon and select "Properties". 3. Windows XP: 1. If the computer has multiple USB ports, try connecting the AUDIOGRAM interface directly to open the "Sound" dialog window. 2. Click the "Sounds" tab in the "Sound" dialog window, then select "No sounds" in ...

Owners Manual
Page 18
... to lower GAIN or LEVEL control levels to external devices. Check that you can significantly increase your computer's owner's manual for the latest information. 18 AUDIOGRAM 6 Owner's Manual Refer to update your computer's operating system. Troubleshooting Mac: 1. Check and raise the output level if necessary. On Windows XP computers, changing some...
... to lower GAIN or LEVEL control levels to external devices. Check that you can significantly increase your computer's owner's manual for the latest information. 18 AUDIOGRAM 6 Owner's Manual Refer to update your computer's operating system. Troubleshooting Mac: 1. Check and raise the output level if necessary. On Windows XP computers, changing some...

Owners Manual
Page 19
... x 1 Green USB bus-powered 170 x 59 x 192 mm 760 g Cubase AI DVD-ROM USB cable Owner's Manual ■ Dimensional Diagrams W: 170 56 51 D: 192 104 AUDIOGRAM 6 Owner's Manual 38 3 H: 59 Unit: mm x 4 Adjust the level of CH 1-5/6 x 1 48 V, only for guitars, etc. STEREO: CH 1, 2 signals fuction as independent mono channels...
... x 1 Green USB bus-powered 170 x 59 x 192 mm 760 g Cubase AI DVD-ROM USB cable Owner's Manual ■ Dimensional Diagrams W: 170 56 51 D: 192 104 AUDIOGRAM 6 Owner's Manual 38 3 H: 59 Unit: mm x 4 Adjust the level of CH 1-5/6 x 1 48 V, only for guitars, etc. STEREO: CH 1, 2 signals fuction as independent mono channels...

Owners Manual
Page 21
...do not register the software, you will need to register the software and activate your player. • Note that Yamaha does not offer technical support for audio/visual purpose. Do not attempt to your software license by starting it after...when the software is provided by any means is expressly forbidden without the written consent of the manufacturer. • Yamaha makes no representations or warranties with regard to the use of the software and documentation and cannot be unable to...the Help menu of time expires. • To install on the software.) 106 AUDIOGRAM 6 Owner's Manual
...do not register the software, you will need to register the software and activate your player. • Note that Yamaha does not offer technical support for audio/visual purpose. Do not attempt to your software license by starting it after...when the software is provided by any means is expressly forbidden without the written consent of the manufacturer. • Yamaha makes no representations or warranties with regard to the use of the software and documentation and cannot be unable to...the Help menu of time expires. • To install on the software.) 106 AUDIOGRAM 6 Owner's Manual