

Owner's Manual
Page 4
... (long) Power Cable for ZIP Drive (short) SCSI Cable for Internal Hard Disk IDE Cable for your A5000/A4000's many advanced features. Thank you get the most from your purchase of the Yamaha A5000/A4000 Professional Sampler. Please read through the essential parts of the manual carefully before beginning work with synthesizers, MIDI keyboards...
... (long) Power Cable for ZIP Drive (short) SCSI Cable for Internal Hard Disk IDE Cable for your A5000/A4000's many advanced features. Thank you get the most from your purchase of the Yamaha A5000/A4000 Professional Sampler. Please read through the essential parts of the manual carefully before beginning work with synthesizers, MIDI keyboards...

Owner's Manual
Page 5
... floppy disk, SCSI disk, CD-ROM or other media, The A5000/A4000 can import a wide range of sample files from other devices including the Yamaha EX7/5/5R, SU700, and samplers from simple ambience to enhance or radically alter the sound of applications including break...extensive range of effects from other drives. An optional AIEB1 I/O expansion board can create samples with integral effects! Features Professional Sampler With Endless Potential The A5000/A4000 provides superior sound and peformance for a wide range of samples, break-beats, or sampled phrases. Effects can even ...
... floppy disk, SCSI disk, CD-ROM or other media, The A5000/A4000 can import a wide range of sample files from other devices including the Yamaha EX7/5/5R, SU700, and samplers from simple ambience to enhance or radically alter the sound of applications including break...extensive range of effects from other drives. An optional AIEB1 I/O expansion board can create samples with integral effects! Features Professional Sampler With Endless Potential The A5000/A4000 provides superior sound and peformance for a wide range of samples, break-beats, or sampled phrases. Effects can even ...

Owner's Manual
Page 6
...Function names, key words, and other specific terms are listed in -depth look at the A5000/A4000 system and basic operating procedures. Finding Information You Need The manual offers several ways for you &#...64257;nd functions in context within the sampler's internal organization. 6 A5000/A4000 q q q q q q q q q q q q q q q q q q q q q q q q q q q q q q q q q q q q q q q q q q q q q q q q q q q q q q q q q q q q q q q q q q q q q Chapter 2 (page 31 - 56) An easy introduction ...
...Function names, key words, and other specific terms are listed in -depth look at the A5000/A4000 system and basic operating procedures. Finding Information You Need The manual offers several ways for you &#...64257;nd functions in context within the sampler's internal organization. 6 A5000/A4000 q q q q q q q q q q q q q q q q q q q q q q q q q q q q q q q q q q q q q q q q q q q q q q q q q q q q q q q q q q q q q q q q q q q q q Chapter 2 (page 31 - 56) An easy introduction ...

Owner's Manual
Page 8
...and Off 27 Sound Check 28 Tutorial Chapter 2 Sampler Basics & Essential Procedures Sampler Basics 32 Essential Procedures 37 Chapter 3 The A5000/A4000 System & Features 1. The A5000/A4000 Functions 68 A5000/A4000 Mode Organization 68 Function Tree 73 3. ... 96 Output 97 Out & Gain 97 Filter 98 Pitch 98 Amplitude EG 99 Key 99 Velocity 100 Crossfade 100 Control 101 4. LFO 143 LFO 143 8 A5000/A4000 q q q q q q q q q q q q q q q q q q q q q q q q q q q q q q q q q q q q q q q q q q q q q q q q q q q q q q q q q q q q q q q q q q q q q Basic Operation 77 Common Mode Display...
...and Off 27 Sound Check 28 Tutorial Chapter 2 Sampler Basics & Essential Procedures Sampler Basics 32 Essential Procedures 37 Chapter 3 The A5000/A4000 System & Features 1. The A5000/A4000 Functions 68 A5000/A4000 Mode Organization 68 Function Tree 73 3. ... 96 Output 97 Out & Gain 97 Filter 98 Pitch 98 Amplitude EG 99 Key 99 Velocity 100 Crossfade 100 Control 101 4. LFO 143 LFO 143 8 A5000/A4000 q q q q q q q q q q q q q q q q q q q q q q q q q q q q q q q q q q q q q q q q q q q q q q q q q q q q q q q q q q q q q q q q q q q q q Basic Operation 77 Common Mode Display...

Owner's Manual
Page 27
... devices. Power ON • Speakers or amplifiers should be switched on power to speakers and other samplers, the A5000/A4000 stores all new data into main memory only, and will lose all important data to disk before proceeding to... your equipment. [Procedure] 1. Switch off external MIDI and SCSI devices. 27 q q q q q q q q q q q q q q q q q q q q q q q q q q q q q q q q q q q q q q q q q q q q q q q q q q q q q q q A5000/A4000 • Chapter 1 Setting Up Switch off the amplifiers or speakers. 2. Switch on power to external MIDI and SCSI devices. • When powering...
... devices. Power ON • Speakers or amplifiers should be switched on power to speakers and other samplers, the A5000/A4000 stores all new data into main memory only, and will lose all important data to disk before proceeding to... your equipment. [Procedure] 1. Switch off external MIDI and SCSI devices. 27 q q q q q q q q q q q q q q q q q q q q q q q q q q q q q q q q q q q q q q q q q q q q q q q q q q q q q q q A5000/A4000 • Chapter 1 Setting Up Switch off the amplifiers or speakers. 2. Switch on power to external MIDI and SCSI devices. • When powering...

Owner's Manual
Page 28
... - to the MIDI IN-A connector (MIDI IN on the A5000/A40000 and all components are using a MIDI keyboard to control A5000/A4000 playback. [Procedure] 1. Set the A5000/A4000 MASTER VOL control to confirm proper connection of the sampler and ensure that you though a simple sound check that all ... procedure assumes that all components are ready for playback. (page 20) 2. Make sure the sampler's [PLAY] mode button is lit (press the [PLAY] button if it isn't). 8. Make sure that the A5000/A4000 STEREO OUT jacks are connected to an amplifier or mixer and that you can...
... - to the MIDI IN-A connector (MIDI IN on the A5000/A40000 and all components are using a MIDI keyboard to control A5000/A4000 playback. [Procedure] 1. Set the A5000/A4000 MASTER VOL control to confirm proper connection of the sampler and ensure that you though a simple sound check that all ... procedure assumes that all components are ready for playback. (page 20) 2. Make sure the sampler's [PLAY] mode button is lit (press the [PLAY] button if it isn't). 8. Make sure that the A5000/A4000 STEREO OUT jacks are connected to an amplifier or mixer and that you can...

Owner's Manual
Page 31
SAMPLER BASICS 32 ESSENTIAL PROCEDURES 37 q q q q q q q q q q q q q q q q q q q q q q q q q q q q q q q q q q q q q A5000/A4000 • Chapter 2 Sampler Basics & Essential Procedures 31 This chapter describes the basic steps you use your individual musical needs will ultimately determine how you 'll need to be familiar with for just about any sampling/playback project, and provides step-by-step procedures for some of the most important operations. 2 Chapter Sampler Basics & Essential Procedures Although your sampler, the basic operations and procedures are pretty much universal.
SAMPLER BASICS 32 ESSENTIAL PROCEDURES 37 q q q q q q q q q q q q q q q q q q q q q q q q q q q q q q q q q q q q q A5000/A4000 • Chapter 2 Sampler Basics & Essential Procedures 31 This chapter describes the basic steps you use your individual musical needs will ultimately determine how you 'll need to be familiar with for just about any sampling/playback project, and provides step-by-step procedures for some of the most important operations. 2 Chapter Sampler Basics & Essential Procedures Although your sampler, the basic operations and procedures are pretty much universal.

Owner's Manual
Page 32
... together and making music. Live Sources (Microphone Recording) This is to record or load the sounds you 've made yourself "on page 165. 32 Chapter 2 Sampler Basics & Essential Procedures • A5000/A4000 q q q q q q q q q q q q q q q q q q q q q q q q q q q q q q q q q q q q q q samples already recorded and saved in more detail below. Details beginning on location." Step-by -Step procedure on page 37...
... together and making music. Live Sources (Microphone Recording) This is to record or load the sounds you 've made yourself "on page 165. 32 Chapter 2 Sampler Basics & Essential Procedures • A5000/A4000 q q q q q q q q q q q q q q q q q q q q q q q q q q q q q q q q q q q q q q samples already recorded and saved in more detail below. Details beginning on location." Step-by -Step procedure on page 37...

Owner's Manual
Page 33
... other types of the sample. Step-by -Step procedure on page 44. q q q q q q q q q q q q q q q q q q q q q q q q q q q q q q q q q q q q q A5000/A4000 • Chapter 2 Sampler Basics & Essential Procedures 33 This can edit the sample data to create exactly the sound you probably won't need to specify the appropriate looping... normal sequence of the sound you want . Although you want to use a portion of editing procedures would be: 1. SAMPLER BASICS Phase 2: EDITING Making Your Samples Sound Right Once the sample(s) you intend to use have been satisfactorily recorded and ...
... other types of the sample. Step-by -Step procedure on page 44. q q q q q q q q q q q q q q q q q q q q q q q q q q q q q q q q q q q q q A5000/A4000 • Chapter 2 Sampler Basics & Essential Procedures 33 This can edit the sample data to create exactly the sound you probably won't need to specify the appropriate looping... normal sequence of the sound you want . Although you want to use a portion of editing procedures would be: 1. SAMPLER BASICS Phase 2: EDITING Making Your Samples Sound Right Once the sample(s) you intend to use have been satisfactorily recorded and ...

Owner's Manual
Page 34
... sample played across the entire note range, several split or overlapping samples played in amplitude, filter frecuency or pitch. SAMPLER BASICS 2. e.g. Step-by-Step procedure on page 47. • Envelope-generator-based amplitude, filter, or pitch... many samples each played by note velocity, envelope generator or LFO. SAMPLE 1 SAMPLE 2 SAMPLE 3 Step-by -Step procedure on page 50. 34 Chapter 2 Sampler Basics & Essential Procedures • A5000/A4000 q q q q q q q q q q q q q q q q q q q q q q q q q q q q q q q q q q q q q q Filter, EG, and LFO If you might ...
... sample played across the entire note range, several split or overlapping samples played in amplitude, filter frecuency or pitch. SAMPLER BASICS 2. e.g. Step-by-Step procedure on page 47. • Envelope-generator-based amplitude, filter, or pitch... many samples each played by note velocity, envelope generator or LFO. SAMPLE 1 SAMPLE 2 SAMPLE 3 Step-by -Step procedure on page 50. 34 Chapter 2 Sampler Basics & Essential Procedures • A5000/A4000 q q q q q q q q q q q q q q q q q q q q q q q q q q q q q q q q q q q q q q Filter, EG, and LFO If you might ...

Owner's Manual
Page 35
...but all these options allow you to create precisely the sound your music requires. Other Edit Functions The A5000/A4000 actually offers many more editable functions than the few listed above. You can produce cyclic variations in amplitude,...frecuency or pitch. q q q q q q q q q q q q q q q q q q q q q q q q q q q q q q q q q q q q q A5000/A4000 • Chapter 2 Sampler Basics & Essential Procedures 35 Step-by-Step procedure on page 117. Details beginning on page 52. 4. SAMPLER BASICS LFO LFO modulation can , for example, individually set the level, pan position, pitch, velocity response...
...but all these options allow you to create precisely the sound your music requires. Other Edit Functions The A5000/A4000 actually offers many more editable functions than the few listed above. You can produce cyclic variations in amplitude,...frecuency or pitch. q q q q q q q q q q q q q q q q q q q q q q q q q q q q q q q q q q q q q A5000/A4000 • Chapter 2 Sampler Basics & Essential Procedures 35 Step-by-Step procedure on page 117. Details beginning on page 52. 4. SAMPLER BASICS LFO LFO modulation can , for example, individually set the level, pan position, pitch, velocity response...

Owner's Manual
Page 36
... Details beginning on page 55. 2. Step-by-Step procedure on page 110. 36 Chapter 2 Sampler Basics & Essential Procedures • A5000/A4000 q q q q q q q q q q q q q q q q q q q q q q q q q q q q q q q q q q q q q q The A5000 features six high-performance effect stages, and the A4000 has three. Controller Functions Another basic but important... "building blocks" used to add the finishing touches to 16 parts on page 102. 3. After your sound. SAMPLER BASICS Phase 3: PLAYBACK Putting It All Together & Making Music Your individual samples are still a few steps you'll need...
... Details beginning on page 55. 2. Step-by-Step procedure on page 110. 36 Chapter 2 Sampler Basics & Essential Procedures • A5000/A4000 q q q q q q q q q q q q q q q q q q q q q q q q q q q q q q q q q q q q q q The A5000 features six high-performance effect stages, and the A4000 has three. Controller Functions Another basic but important... "building blocks" used to add the finishing touches to 16 parts on page 102. 3. After your sound. SAMPLER BASICS Phase 3: PLAYBACK Putting It All Together & Making Music Your individual samples are still a few steps you'll need...
Owner's Manual
Page 37
... phone plug connector (or use an appropriate adaptor) to the sampler's "L" INPUT. • Just about any high-quality dynamic or condenser microphone can be used , but the A5000/A4000 does not provide phantom power for studio-type phantom-powered ...some of this manual. 1. q q q q q q q q q q q q q q q q q q q q q q q q q q q q q q q q q q q q q A5000/A4000 • Chapter 2 Sampler Basics & Essential Procedures 37 For details on loading sample data from your A5000/A4000 as described in the Setting Up section (page 17) before attempting the procedures in the reference section...
... phone plug connector (or use an appropriate adaptor) to the sampler's "L" INPUT. • Just about any high-quality dynamic or condenser microphone can be used , but the A5000/A4000 does not provide phantom power for studio-type phantom-powered ...some of this manual. 1. q q q q q q q q q q q q q q q q q q q q q q q q q q q q q q q q q q q q q A5000/A4000 • Chapter 2 Sampler Basics & Essential Procedures 37 For details on loading sample data from your A5000/A4000 as described in the Setting Up section (page 17) before attempting the procedures in the reference section...

Owner's Manual
Page 38
... the "L" and "R" inputs, select "AD L/R". • If you have connected a mono microphone to directly re-sample the output signal from the sampler's stereo outputs. 38 Chapter 2 Sampler Basics & Essential Procedures • A5000/A4000 q q q q q q q q q q q q q q q q q q q q q q q q q q q q q q q q q q q q q q See page 153 for example, use Knob 2 to which your source is not already selected), use Knob 2 to disk. Select...
... the "L" and "R" inputs, select "AD L/R". • If you have connected a mono microphone to directly re-sample the output signal from the sampler's stereo outputs. 38 Chapter 2 Sampler Basics & Essential Procedures • A5000/A4000 q q q q q q q q q q q q q q q q q q q q q q q q q q q q q q q q q q q q q q See page 153 for example, use Knob 2 to which your source is not already selected), use Knob 2 to disk. Select...

Owner's Manual
Page 39
... of the 44.1 kHz sampling frequency. Your choices are only about 10 kHz, but this setting may be sufficient for details. 7. q q q q q q q q q q q q q q q q q q q q q q q q q q q q q q q q q q q q q A5000/A4000 • Chapter 2 Sampler Basics & Essential Procedures 39 Frequency response is selected, a mono sample will give you the highest quality (while using automatic triggering. Select a Pre-trigger Time...
... of the 44.1 kHz sampling frequency. Your choices are only about 10 kHz, but this setting may be sufficient for details. 7. q q q q q q q q q q q q q q q q q q q q q q q q q q q q q q q q q q q q q A5000/A4000 • Chapter 2 Sampler Basics & Essential Procedures 39 Frequency response is selected, a mono sample will give you the highest quality (while using automatic triggering. Select a Pre-trigger Time...

Owner's Manual
Page 40
..." and "Stop" trigger type and edge level parameters (function lines 3 and 4, respectively). If you select the "Edge/Manual" mode, recording will appear). 40 Chapter 2 Sampler Basics & Essential Procedures • A5000/A4000 q q q q q q q q q q q q q q q q q q q q q q q q q q q q q q q q q q q q q q If you wish to monitor the source via the "L-INPUT-R" jacks you are recording analog microphone or line signals via the...
..." and "Stop" trigger type and edge level parameters (function lines 3 and 4, respectively). If you select the "Edge/Manual" mode, recording will appear). 40 Chapter 2 Sampler Basics & Essential Procedures • A5000/A4000 q q q q q q q q q q q q q q q q q q q q q q q q q q q q q q q q q q q q q q If you wish to monitor the source via the "L-INPUT-R" jacks you are recording analog microphone or line signals via the...

Owner's Manual
Page 41
... the "Edge/Manual" Start Trigger mode in the display will begin as soon as you press Knob 4 (START). q q q q q q q q q q q q q q q q q q q q q q q q q q q q q q q q q q q q q A5000/A4000 • Chapter 2 Sampler Basics & Essential Procedures 41 Start Recording If you selected the "Manual" Start Trigger mode, recording will be triggered either automatically or manually. 13. The... key to go to be highlighted while recording is the total number of seconds that can be highlighted while the A5000/A4000 waits for recording to the record standby display. ESSENTIAL PROCEDURES 11.
... the "Edge/Manual" Start Trigger mode in the display will begin as soon as you press Knob 4 (START). q q q q q q q q q q q q q q q q q q q q q q q q q q q q q q q q q q q q q A5000/A4000 • Chapter 2 Sampler Basics & Essential Procedures 41 Start Recording If you selected the "Manual" Start Trigger mode, recording will be triggered either automatically or manually. 13. The... key to go to be highlighted while recording is the total number of seconds that can be highlighted while the A5000/A4000 waits for recording to the record standby display. ESSENTIAL PROCEDURES 11.

Owner's Manual
Page 42
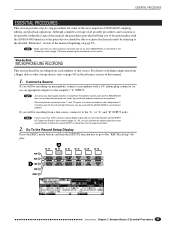
..., the recorded data is saved to use. 1. See page 208 for information on saving recorded samples to the "EDIT-Waveform" display. 42 Chapter 2 Sampler Basics & Essential Procedures • A5000/A4000 q q q q q q q q q q q q q q q q q q q q q q q q q q q q q q q q q q q q q q Go To the TRIM/LOOP Display Press the [EDIT] button and then the ...3 (ABORT) to abort the record operation without saving the recorded data to memory. • When you want to the sampler's volatile memory and will stop automatically as soon as the input signal level drops below the specified Edge Level. ...
..., the recorded data is saved to use. 1. See page 208 for information on saving recorded samples to the "EDIT-Waveform" display. 42 Chapter 2 Sampler Basics & Essential Procedures • A5000/A4000 q q q q q q q q q q q q q q q q q q q q q q q q q q q q q q q q q q q q q q Go To the TRIM/LOOP Display Press the [EDIT] button and then the ...3 (ABORT) to abort the record operation without saving the recorded data to memory. • When you want to the sampler's volatile memory and will stop automatically as soon as the input signal level drops below the specified Edge Level. ...

Owner's Manual
Page 43
... at any point during this feature. • The specified Wave Start and End points are x1, x10, x100, x1000, and x10000. q q q q q q q q q q q q q q q q q q q q q q q q q q q q q q q q q q q q q A5000/A4000 • Chapter 2 Sampler Basics & Essential Procedures 43 Solid vertical lines in the address values shows the digit currently being adjusted. Your options are saved with the sample...
... at any point during this feature. • The specified Wave Start and End points are x1, x10, x100, x1000, and x10000. q q q q q q q q q q q q q q q q q q q q q q q q q q q q q q q q q q q q q A5000/A4000 • Chapter 2 Sampler Basics & Essential Procedures 43 Solid vertical lines in the address values shows the digit currently being adjusted. Your options are saved with the sample...

Owner's Manual
Page 44
ESSENTIAL PROCEDURES Step-by pressing the [AUDITION] button. 44 Chapter 2 Sampler Basics & Essential Procedures • A5000/A4000 q q q q q q q q q q q q q q q q q q q q q q q q q q q q q q q q q q q q q q Go To the TRIM/LOOP Display If you are not already there, press the [EDIT] button and then the [TRIM/LOOP] function key to ...
ESSENTIAL PROCEDURES Step-by pressing the [AUDITION] button. 44 Chapter 2 Sampler Basics & Essential Procedures • A5000/A4000 q q q q q q q q q q q q q q q q q q q q q q q q q q q q q q q q q q q q q q Go To the TRIM/LOOP Display If you are not already there, press the [EDIT] button and then the [TRIM/LOOP] function key to ...

