

Owner's Manual
Page 4
...ventilation of the internal components, and possibly result in the ears, consult a physician. Pulling by it containing liquids which might discolor the panel or keyboard. • Do not rest your weight on, or place heavy objects on the instrument, and do not excessively bend or otherwise damage the cord,... wiping cloths. Also, be sure to set all components. The required voltage is not to be used for damage caused by qualified Yamaha service personnel. • Only use excessive force on the instrument, since this can damage it . Do not use or modifications to...
...ventilation of the internal components, and possibly result in the ears, consult a physician. Pulling by it containing liquids which might discolor the panel or keyboard. • Do not rest your weight on, or place heavy objects on the instrument, and do not excessively bend or otherwise damage the cord,... wiping cloths. Also, be sure to set all components. The required voltage is not to be used for damage caused by qualified Yamaha service personnel. • Only use excessive force on the instrument, since this can damage it . Do not use or modifications to...

Owner's Manual
Page 6
...automatically add appropriate vocal harmony to edit those voices and create your 9000Pro's features and vast performance potential, we urge you stunning sound quality with GM. The Yamaha 9000Pro combines advanced tone generation technology with greater functionality and open-ended expandability ... brilliant examples of an extraordinary electronic keyboard. The advanced Auto Accompaniment, Vocal Harmony, and Sampler features, in the U.S. In order to produce a wide range of this advanced instrument. This product (9000Pro) is a new Yamaha MIDI specification which guarantees that...
...automatically add appropriate vocal harmony to edit those voices and create your 9000Pro's features and vast performance potential, we urge you stunning sound quality with GM. The Yamaha 9000Pro combines advanced tone generation technology with greater functionality and open-ended expandability ... brilliant examples of an extraordinary electronic keyboard. The advanced Auto Accompaniment, Vocal Harmony, and Sampler features, in the U.S. In order to produce a wide range of this advanced instrument. This product (9000Pro) is a new Yamaha MIDI specification which guarantees that...
Owner's Manual
Page 8
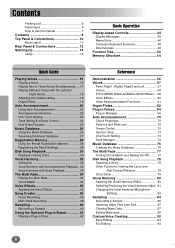
...stand 10 Rear Panel & Connections 12 Starting Up 14 Lamp 15 Basic Operation Display-based Controls 44 Display Messages 45 Name Entry 46 Computer Keyboard Functions 46 Direct Access 48 Function Tree 50 Memory Structure 54 Quick Guide Playing Voices 16 Playing a Voice 16 Playing Two or Three ... 56 Voices 57 Parts: Right1, Right2, Right3 and Left 57 Voices 58 PITCH BEND Wheel & MODULATION Wheel.... 59 Voice Effects 60 Other Keyboard-related Functions 61 Organ Flutes 62 Plug-in Voices 64 Plug-in Manager 66 Auto Accompaniment 70 Chord Fingerings 70 Fade-ins and Fade-outs...
...stand 10 Rear Panel & Connections 12 Starting Up 14 Lamp 15 Basic Operation Display-based Controls 44 Display Messages 45 Name Entry 46 Computer Keyboard Functions 46 Direct Access 48 Function Tree 50 Memory Structure 54 Quick Guide Playing Voices 16 Playing a Voice 16 Playing Two or Three ... 56 Voices 57 Parts: Right1, Right2, Right3 and Left 57 Voices 58 PITCH BEND Wheel & MODULATION Wheel.... 59 Voice Effects 60 Other Keyboard-related Functions 61 Organ Flutes 62 Plug-in Voices 64 Plug-in Manager 66 Auto Accompaniment 70 Chord Fingerings 70 Fade-ins and Fade-outs...

Owner's Manual
Page 10
...the level of the voices with your important original data to floppy disk for future recall. The 9000Pro is compatible with a wide variety of the 9000Pro is supplied with a touch response feature (initial touch and after touch) that lets you to the instrument... u w er !0 i o !1 Floppy Disk Drive... Top Panel & Connections PHONES jack... Keyboard... page 162 The keyboard of disk formats, allowing you save all your playing strength - just as shown. page 13 Music stand The 9000Pro is equipped with a music stand that can be attached to playback song data on an...
...the level of the voices with your important original data to floppy disk for future recall. The 9000Pro is compatible with a wide variety of the 9000Pro is supplied with a touch response feature (initial touch and after touch) that lets you to the instrument... u w er !0 i o !1 Floppy Disk Drive... Top Panel & Connections PHONES jack... Keyboard... page 162 The keyboard of disk formats, allowing you save all your playing strength - just as shown. page 13 Music stand The 9000Pro is equipped with a music stand that can be attached to playback song data on an...

Owner's Manual
Page 12
... Panel & Connections CAUTION • Make sure that Macintosh computer keyboards cannot be adjusted for details. An optional lamp can connect a computer keyboard to external signal processing devices, such as the amp or speakers. Refer to the 9000Pro. OUT INPUT Effector The LOOP SEND jacks deliver the output of... RETURN jacks - You can be connected to page 14. See page 15 for optimum level matching with the 9000Pro. Refer to pages 46, 167. • A computer keyboard can be used with the connected equipment. Stereo System The LINE OUT jacks are used to send the...
... Panel & Connections CAUTION • Make sure that Macintosh computer keyboards cannot be adjusted for details. An optional lamp can connect a computer keyboard to external signal processing devices, such as the amp or speakers. Refer to the 9000Pro. OUT INPUT Effector The LOOP SEND jacks deliver the output of... RETURN jacks - You can be connected to page 14. See page 15 for optimum level matching with the 9000Pro. Refer to pages 46, 167. • A computer keyboard can be used with the connected equipment. Stereo System The LINE OUT jacks are used to send the...

Owner's Manual
Page 15
... 1 Make sure that the POWER switch is set to the specifications listed at left end of the rear panel (as viewed from the keyboard side). When this to two lamps. To disconnect the lamp: First, make sure the lamp is off (the [DIMMER] is off and control the brightness... the instrument, follow these precautions: • Only use lamps that conform to OFF ), then unplug the lamp while holding down toward [MIN] when using the 9000Pro in situations of low available light. Make sure you connect up to turn on by turning the [DIMMER] control down the PUSH latch on the...
... 1 Make sure that the POWER switch is set to the specifications listed at left end of the rear panel (as viewed from the keyboard side). When this to two lamps. To disconnect the lamp: First, make sure the lamp is off (the [DIMMER] is off and control the brightness... the instrument, follow these precautions: • Only use lamps that conform to OFF ), then unplug the lamp while holding down toward [MIN] when using the 9000Pro in situations of low available light. Make sure you connect up to turn on by turning the [DIMMER] control down the PUSH latch on the...

Owner's Manual
Page 17
... Sprno Flute Sweet Clari Sweet Flute Sweet Pan Choir&Pad Live!Gospel Live! Smooth tenor sax with natural vibrato. Flute with realistic sound over entire keyboard range. Play long notes. Check out toms and cymbals. Voice RIGHT 3 can be set in a layer. Jazz Rotor Organ Accordion Musette Guitar Live! Arco Sweet...
... Sprno Flute Sweet Clari Sweet Flute Sweet Pan Choir&Pad Live!Gospel Live! Smooth tenor sax with natural vibrato. Flute with realistic sound over entire keyboard range. Play long notes. Check out toms and cymbals. Voice RIGHT 3 can be set in a layer. Jazz Rotor Organ Accordion Musette Guitar Live! Arco Sweet...

Owner's Manual
Page 18
... simultaneously transposed up or down by using the Mixing Console function (page 145). 18 16 For example, select "STRINGS." 3 Select a voice. Automatically turned on the keyboard that separates voice LEFT and voice RIGHT1~3 is played with the left hand sound one octave. The notes you play with your right sound a different...
... simultaneously transposed up or down by using the Mixing Console function (page 145). 18 16 For example, select "STRINGS." 3 Select a voice. Automatically turned on the keyboard that separates voice LEFT and voice RIGHT1~3 is played with the left hand sound one octave. The notes you play with your right sound a different...

Owner's Manual
Page 20
... Split Point • The point on . Auto Accompaniment section 4 Turn Sync Start on the keyboard that separates the auto accompaniment section and the righthand section of the keyboard becomes the "Auto Accompaniment" section, and chords played in time with the selected style. Auto ...Accompaniment Reference on page 70 Style related buttons Auto Accompaniment related buttons Using Auto Accompaniment 1 Select a style group. • The 9000Pro styles are...
... Split Point • The point on . Auto Accompaniment section 4 Turn Sync Start on the keyboard that separates the auto accompaniment section and the righthand section of the keyboard becomes the "Auto Accompaniment" section, and chords played in time with the selected style. Auto ...Accompaniment Reference on page 70 Style related buttons Auto Accompaniment related buttons Using Auto Accompaniment 1 Select a style group. • The 9000Pro styles are...
Owner's Manual
Page 21
.../chord settings, each with this out without any of the normal rhythm or accompaniment patterns of the keyboard produces corresponding bass notes and chords, just as you play a chord with a half-time 3/4 feel of the keyboard. G Metronome This style plays back only a metronome click, without the drums and bass, then bring them...
.../chord settings, each with this out without any of the normal rhythm or accompaniment patterns of the keyboard produces corresponding bass notes and chords, just as you play a chord with a half-time 3/4 feel of the keyboard. G Metronome This style plays back only a metronome click, without the drums and bass, then bring them...

Owner's Manual
Page 23
... details, see page 73. tinuing with the [TAP/TEMPO] button. Accompaniment playback will stop completely when all keys in the auto-accompaniment section of the keyboard are released. SYNC STOP 23 21 TAP TEMPO SYNCRO STOP When the Synchro Stop function is engaged, accompaniment playback will start playing, con- Other Controls...
... details, see page 73. tinuing with the [TAP/TEMPO] button. Accompaniment playback will stop completely when all keys in the auto-accompaniment section of the keyboard are released. SYNC STOP 23 21 TAP TEMPO SYNCRO STOP When the Synchro Stop function is engaged, accompaniment playback will start playing, con- Other Controls...

Owner's Manual
Page 31
...1 2 3 4 5 6 7 8 PART ON/OFF PART 1 2 3 4 5 6 7 8 • The SOLO mode lets you select a specific part for details. For appropriate song data, the 9000Pro can be used to the part of five different languages: English, German, French, Spanish and Italian. START/STOP • The [FADE IN/OUT] button... lyrics, you can view the lyrics in one of which the volume you wish to practice the melody part of the XG song on the 9000Pro keyboard, set TR1 to MUTE. 7 Adjust the volume as required. 1) Press the [MAIN MIXER] button. 2) Press the LCD button corresponding to...
...1 2 3 4 5 6 7 8 PART ON/OFF PART 1 2 3 4 5 6 7 8 • The SOLO mode lets you select a specific part for details. For appropriate song data, the 9000Pro can be used to the part of five different languages: English, German, French, Spanish and Italian. START/STOP • The [FADE IN/OUT] button... lyrics, you can view the lyrics in one of which the volume you wish to practice the melody part of the XG song on the 9000Pro keyboard, set TR1 to MUTE. 7 Adjust the volume as required. 1) Press the [MAIN MIXER] button. 2) Press the LCD button corresponding to...
Owner's Manual
Page 33
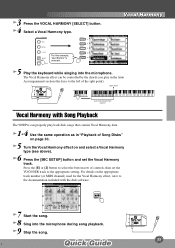
Split Point Auto Accompaniment section Vocal Harmony with Song Playback The 9000Pro can be controlled by the chords you play back disk songs that contain Vocal Harmony data. 1-4 Use the same operation as in the Auto Accompaniment ...section (the keys to the appropriate setting. Press the [E] or [J] button to select the bottom row of the split point). Vocal Harmony 5 Play the keyboard while singing into the microphone during song playback. 9 Stop the song. 33 31 The Vocal Harmony effect can properly play in "Playback of Song Disks...
Split Point Auto Accompaniment section Vocal Harmony with Song Playback The 9000Pro can be controlled by the chords you play back disk songs that contain Vocal Harmony data. 1-4 Use the same operation as in the Auto Accompaniment ...section (the keys to the appropriate setting. Press the [E] or [J] button to select the bottom row of the split point). Vocal Harmony 5 Play the keyboard while singing into the microphone during song playback. 9 Stop the song. 33 31 The Vocal Harmony effect can properly play in "Playback of Song Disks...

Owner's Manual
Page 34
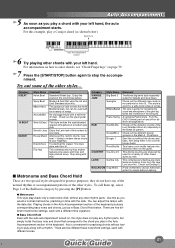
...59 Bank 60 Contents Phrases MIDI messages Scale tuning settings (page 158) Chord Match 1 Turn AUTO ACCOMPANIMENT on (page 20). 2 Play a chord with your keyboard performances. Playing the Multi Pads 1 Use the M.PAD BANK [-]/[+] buttons to select a Multi Pad Bank. The Multi Pad function provides two different ways to ...reach to the end. Some types will be transposed into F major before playing back. The Multi Pads Reference on page 77 Multi Pads The 9000Pro Multi Pads can be used to add impact and variety to your left hand and press any of the Multi Pads. STOP M.PAD BANK ...
...59 Bank 60 Contents Phrases MIDI messages Scale tuning settings (page 158) Chord Match 1 Turn AUTO ACCOMPANIMENT on (page 20). 2 Play a chord with your keyboard performances. Playing the Multi Pads 1 Use the M.PAD BANK [-]/[+] buttons to select a Multi Pad Bank. The Multi Pad function provides two different ways to ...reach to the end. Some types will be transposed into F major before playing back. The Multi Pads Reference on page 77 Multi Pads The 9000Pro Multi Pads can be used to add impact and variety to your left hand and press any of the Multi Pads. STOP M.PAD BANK ...

Owner's Manual
Page 35
... turns the touch response of the voices below. Try out the Harmony/Echo effect. Try out some of the keyboard on . 3 Play a chord with some notes in the right-hand range of the voices below . Strs...(DSP4), RIGHT 2 (DSP5), RIGHT 3 (DSP6) and LEFT (DSP7) parts. When this lets you play some of the keyboard. This effect adds a variety of harmony notes to the selected RIGHT 1 voice. Try out Harmony/Echo with your playing in... or softly you change according to your left hand and play the keyboard. Auto Accompaniment section The 9000Pro has various Harmony/Echo types.
... turns the touch response of the voices below. Try out the Harmony/Echo effect. Try out some of the keyboard on . 3 Play a chord with some notes in the right-hand range of the voices below . Strs...(DSP4), RIGHT 2 (DSP5), RIGHT 3 (DSP6) and LEFT (DSP7) parts. When this lets you play some of the keyboard. This effect adds a variety of harmony notes to the selected RIGHT 1 voice. Try out Harmony/Echo with your playing in... or softly you change according to your left hand and play the keyboard. Auto Accompaniment section The 9000Pro has various Harmony/Echo types.

Owner's Manual
Page 36
... on page 110 DIGITAL RECORDING button The powerful and easy-to-use of the auto accompaniment and the Multi Pads, you record your own keyboard performances to disk. quickly, easily and all by yourself! from solo piano and church organ to rock band, big band, Latin ensemble,... playback can be recorded to the corresponding tracks as listed below. • When ACMP is set to "REC," Auto Accompaniment is set to "REC," your keyboard performance and Multi Pad playback can be recorded to the corresponding tracks as listed below. 1 2 3 4 5 6 7 8 36 The voices, Multi Pad notes...
... on page 110 DIGITAL RECORDING button The powerful and easy-to-use of the auto accompaniment and the Multi Pads, you record your own keyboard performances to disk. quickly, easily and all by yourself! from solo piano and church organ to rock band, big band, Latin ensemble,... playback can be recorded to the corresponding tracks as listed below. • When ACMP is set to "REC," Auto Accompaniment is set to "REC," your keyboard performance and Multi Pad playback can be recorded to the corresponding tracks as listed below. 1 2 3 4 5 6 7 8 36 The voices, Multi Pad notes...

Owner's Manual
Page 37
...Touch Setting (page 24), and Music Database (page 26) can be lost if exiting from the Record mode. 37 35 Turn the metronome on the keyboard. 9 Stop recording. If you have set to REC in the illustrations below. • If ACMP is being saved, never eject the fl... single button press. To do this, 1) Press the [RUBATO] LCD button. 2) Play a key on the right side of the split point to start recording your keyboard performance. 3) Play a chord on or off . Song Creator 6 Press the [NEXT] button. 7 Set up all parameters as desired for recording. • Select the...
...Touch Setting (page 24), and Music Database (page 26) can be lost if exiting from the Record mode. 37 35 Turn the metronome on the keyboard. 9 Stop recording. If you have set to REC in the illustrations below. • If ACMP is being saved, never eject the fl... single button press. To do this, 1) Press the [RUBATO] LCD button. 2) Play a key on the right side of the split point to start recording your keyboard performance. 3) Play a chord on or off . Song Creator 6 Press the [NEXT] button. 7 Set up all parameters as desired for recording. • Select the...

Owner's Manual
Page 38
... to engage the Record mode. 2 Select "SONG CREATOR." 3 Select "NEW SONG." 4 Select "MULTI TRACK RECORD." 2 A B C D E 3 A B C D E 4 A B C D E 5 Set the track modes. • When set to "REC," your keyboard performance and Multi Pad playback can be recorded to the corresponding tracks. • When one of the TR11~16 is set to "REC," Auto Accompaniment...
... to engage the Record mode. 2 Select "SONG CREATOR." 3 Select "NEW SONG." 4 Select "MULTI TRACK RECORD." 2 A B C D E 3 A B C D E 4 A B C D E 5 Set the track modes. • When set to "REC," your keyboard performance and Multi Pad playback can be recorded to the corresponding tracks. • When one of the TR11~16 is set to "REC," Auto Accompaniment...

Owner's Manual
Page 39
... start recording the Auto Accompaniment with one of the split point to start recording your newly recorded performance. You can start recording with your keyboard performance. • Using Registration Memory (page 28), One Touch Setting (page 24), and Music Database (page 26) can be recorded... mode. 39 37 If you finish playing, press the [START/STOP] button. Repeat step #5 - #9 as voices, etc.) can make your keyboard performance first and then start the accompaniment. 9 Stop recording. PAGE CONTROL BACK NEXT Press this , 1) Press the [RUBATO] LCD button. 2) ...
... start recording the Auto Accompaniment with one of the split point to start recording your newly recorded performance. You can start recording with your keyboard performance. • Using Registration Memory (page 28), One Touch Setting (page 24), and Music Database (page 26) can be recorded... mode. 39 37 If you finish playing, press the [START/STOP] button. Repeat step #5 - #9 as voices, etc.) can make your keyboard performance first and then start the accompaniment. 9 Stop recording. PAGE CONTROL BACK NEXT Press this , 1) Press the [RUBATO] LCD button. 2) ...

Owner's Manual
Page 40
... own sounds via a microphone. PAGE CONTROL BACK NEXT Press the [NEXT] button twice. As a result, the START KEY cannot be played at various pitches from a keyboard. Sampling Reference on page 80 also apply to Sampling. 8 Press the [NEXT] button. 9 Set the key range to which the new sample will be assigned...
... own sounds via a microphone. PAGE CONTROL BACK NEXT Press the [NEXT] button twice. As a result, the START KEY cannot be played at various pitches from a keyboard. Sampling Reference on page 80 also apply to Sampling. 8 Press the [NEXT] button. 9 Set the key range to which the new sample will be assigned...


