

Owner's Manual
Page 5
... the DISK IN USE lamp is facing forward, towards the disk slot. Always keep two copies of proper headcleaning disks. G To protect your Yamaha dealer about once a month. Follow the important precautions below the floppy disk slot will eventually cause read /write operations, such as when... drive. I Inserting/Ejecting Floppy Disks G To insert a floppy disk into place and the eject button pops out. • When the 9000Pro is turned on a disk or bend or apply pressure to handle floppy disks and treat the disk drive with a deformed shutter or housing....
... the DISK IN USE lamp is facing forward, towards the disk slot. Always keep two copies of proper headcleaning disks. G To protect your Yamaha dealer about once a month. Follow the important precautions below the floppy disk slot will eventually cause read /write operations, such as when... drive. I Inserting/Ejecting Floppy Disks G To insert a floppy disk into place and the eject button pops out. • When the 9000Pro is turned on a disk or bend or apply pressure to handle floppy disks and treat the disk drive with a deformed shutter or housing....

Owner's Manual
Page 6
... Boards, giving you access to make the most of various synthesizer voices - In order to an exciting and wide array of your 9000Pro's features and vast performance potential, we urge you stunning sound quality with greater functionality and open-ended expandability for later reference. Trademarks:... to automatically add appropriate vocal harmony to read the manual thoroughly while trying out the various features described. The Yamaha 9000Pro combines advanced tone generation technology with state-of their respective holders. GM System Level 1 GM System Level 1 is a new...
... Boards, giving you access to make the most of various synthesizer voices - In order to an exciting and wide array of your 9000Pro's features and vast performance potential, we urge you stunning sound quality with greater functionality and open-ended expandability for later reference. Trademarks:... to automatically add appropriate vocal harmony to read the manual thoroughly while trying out the various features described. The Yamaha 9000Pro combines advanced tone generation technology with state-of their respective holders. GM System Level 1 GM System Level 1 is a new...

Owner's Manual
Page 7
... are covered here in a very simple and easy-to-understand way. If so, read this comprehensive guide to all functions of the 9000Pro according to their hierarchical structure, letting you need. Function Tree ...page 50 This lists all functions. Appendix...page 192 This contains various ... page 10 Rear Panel & Connections page 12 Use this section before calling your Yamaha dealer or service center. Basic Operations ...page 44 This section introduces you to the basic operating conventions of the 9000Pro, such as editing values and changing settings, and shows you how to get...
... are covered here in a very simple and easy-to-understand way. If so, read this comprehensive guide to all functions of the 9000Pro according to their hierarchical structure, letting you need. Function Tree ...page 50 This lists all functions. Appendix...page 192 This contains various ... page 10 Rear Panel & Connections page 12 Use this section before calling your Yamaha dealer or service center. Basic Operations ...page 44 This section introduces you to the basic operating conventions of the 9000Pro, such as editing values and changing settings, and shows you how to get...
Owner's Manual
Page 13
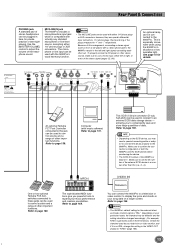
...your particular locale, the standard may need a special connecting cable or adaptor to connect the device properly to page 165. • The 9000Pro's default setting for the external television/video monitor signal is not PAL, change the setting in situations of the headphone sound. allowing you ...). Refer to use a mono input, either 1/4" phone plugs or XLR connectors. MFC10 One or two optional Yamaha FC5 footswitches connected to these jacks can be used to connect to the 9000Pro results in here for details. Refer to adjust the volume of low available light. Refer to the...
...your particular locale, the standard may need a special connecting cable or adaptor to connect the device properly to page 165. • The 9000Pro's default setting for the external television/video monitor signal is not PAL, change the setting in situations of the headphone sound. allowing you ...). Refer to use a mono input, either 1/4" phone plugs or XLR connectors. MFC10 One or two optional Yamaha FC5 footswitches connected to these jacks can be used to connect to the 9000Pro results in here for details. Refer to adjust the volume of low available light. Refer to the...

Owner's Manual
Page 14
... appears. Starting Up Use the following order: WARNING • Make sure your 9000Pro is purchased (a third prong may be different depending on the country in speakers, you need to be replaced, contact your Yamaha dealer. Improper connection of the devices you could use a pair of the AC... power cord supplied with the 9000Pro. When turning off the power, make sure that the POWER switch is in which...
... appears. Starting Up Use the following order: WARNING • Make sure your 9000Pro is purchased (a third prong may be different depending on the country in speakers, you need to be replaced, contact your Yamaha dealer. Improper connection of the devices you could use a pair of the AC... power cord supplied with the 9000Pro. When turning off the power, make sure that the POWER switch is in which...

Owner's Manual
Page 30
... SONG PLAYER 3 Press the SONG FILE DIRECTORY [I E J 30 28 Disks bearing this logo contain song data for voices defined in Yamaha's DOC format. • GM song files not having the extension ".MID" in the GM standard. Disks bearing this logo contain song ... and more details on the logos. Disk Song Playback Reference on page 78 Song related buttons • Make sure to page 6 for playback on the 9000Pro. A F B G C H D I ] button. 4 Select a song file. Refer to read the section "Using the Floppy Disk Drive (FDD) and Floppy Disks" on page...
... SONG PLAYER 3 Press the SONG FILE DIRECTORY [I E J 30 28 Disks bearing this logo contain song data for voices defined in Yamaha's DOC format. • GM song files not having the extension ".MID" in the GM standard. Disks bearing this logo contain song ... and more details on the logos. Disk Song Playback Reference on page 78 Song related buttons • Make sure to page 6 for playback on the 9000Pro. A F B G C H D I ] button. 4 Select a song file. Refer to read the section "Using the Floppy Disk Drive (FDD) and Floppy Disks" on page...

Owner's Manual
Page 58
...marked by installing the Plug-in the [PERCUSSION] group is installed. Simultaneously hold down the desired VOICE button and press the [XG] button to the 9000Pro. • Keyboard Percussion .....When one of the Drum Kit or SFX Kit voices in Boards to the GM (General MIDI) System Level 1 format.... expressive control and a wide range of the instruments in Voices This group of the Drum Kit and SFX Kit assignments. • XG Voices Yamaha's XG format is available when an optional Plug-in Board(s). See page 64 for a complete listing of special voices is a major new enhancement...
...marked by installing the Plug-in the [PERCUSSION] group is installed. Simultaneously hold down the desired VOICE button and press the [XG] button to the 9000Pro. • Keyboard Percussion .....When one of the Drum Kit or SFX Kit voices in Boards to the GM (General MIDI) System Level 1 format.... expressive control and a wide range of the instruments in Voices This group of the Drum Kit and SFX Kit assignments. • XG Voices Yamaha's XG format is available when an optional Plug-in Board(s). See page 64 for a complete listing of special voices is a major new enhancement...

Owner's Manual
Page 80
port phantom-powered condenser microphones.) • The Yamaha MZ106s microphone is provided to allow detailed editing to the microphone... you are applied. A full range of parameters is recommended for use the "MIC" setting with the 9000Pro. • The level of the microphone sound may vary considerably according to the type of the Vocal Harmony... "MIN." 2 Set the MIC/LINE panel switch to "LINE." 3 Connect the source to straightforward harmony, the 9000Pro Vocal Harmony feature can cause feedback. The Talk settings are provided, each functioning in handy if you will be a...
port phantom-powered condenser microphones.) • The Yamaha MZ106s microphone is provided to allow detailed editing to the microphone... you are applied. A full range of parameters is recommended for use the "MIC" setting with the 9000Pro. • The level of the microphone sound may vary considerably according to the type of the Vocal Harmony... "MIN." 2 Set the MIC/LINE panel switch to "LINE." 3 Connect the source to straightforward harmony, the 9000Pro Vocal Harmony feature can cause feedback. The Talk settings are provided, each functioning in handy if you will be a...

Owner's Manual
Page 109
... a PLG150-DX to SLOT 1 and a PLG100-DX to Flash ROM with the Plug-in Manager function. When you intend to "System" in Boards, Yamaha recommends that do not exist on , cannot be played polyphonically - Note that are not available in mind the following points and anomalies. Make sure to..., if the Board Custom Voice has been edited and Board Custom Backup has been executed. For this case. Reference 109 107 even if the 9000Pro's POLY/MONO button is set the Breath Mode to use the PLG100 series if you may experience certain problems when playing the voices. I Differences...
... a PLG150-DX to SLOT 1 and a PLG100-DX to Flash ROM with the Plug-in Manager function. When you intend to "System" in Boards, Yamaha recommends that do not exist on , cannot be played polyphonically - Note that are not available in mind the following points and anomalies. Make sure to..., if the Board Custom Voice has been edited and Board Custom Backup has been executed. For this case. Reference 109 107 even if the 9000Pro's POLY/MONO button is set the Breath Mode to use the PLG100 series if you may experience certain problems when playing the voices. I Differences...

Owner's Manual
Page 159
...set the Split Point by pressing the desired key while holding this button. Reference 159 157 G Foot Volume Controller Determines whether an optional YAMAHA FC7 Foot Controller plugged into the rear-panel FOOT PEDAL VOLUME jack will control master volume, or only the volume of the keyboard ...is selected, you can be assigned to the foot volume/switch connected to step #3 of the Basic Procedure on page 158. The 9000Pro "Functions" Split Point/Chord Fingering The explanations here apply to the FOOT PEDAL jacks. For details, refer to step #3 of the Basic ...
...set the Split Point by pressing the desired key while holding this button. Reference 159 157 G Foot Volume Controller Determines whether an optional YAMAHA FC7 Foot Controller plugged into the rear-panel FOOT PEDAL VOLUME jack will control master volume, or only the volume of the keyboard ...is selected, you can be assigned to the foot volume/switch connected to step #3 of the Basic Procedure on page 158. The 9000Pro "Functions" Split Point/Chord Fingering The explanations here apply to the FOOT PEDAL jacks. For details, refer to step #3 of the Basic ...

Owner's Manual
Page 169
... MIDI data between the MIDI A terminals and the TO HOST terminal. In the rear panel of the 9000Pro, there are shown in the personal computer. The included disk contains the Yamaha MIDI driver. • Special MIDI cables (sold separately) must be connected by a cable. Each message... external device using a MIDI cable, or from the 9000Pro TO HOST terminal to a personal computer, the 9000Pro will not receive/transmit data. • When using Windows 95/ 98, a Yamaha MIDI driver must be used in common by the 9000Pro are two kinds of the 32 channels. Reference 169...
... MIDI data between the MIDI A terminals and the TO HOST terminal. In the rear panel of the 9000Pro, there are shown in the personal computer. The included disk contains the Yamaha MIDI driver. • Special MIDI cables (sold separately) must be connected by a cable. Each message... external device using a MIDI cable, or from the 9000Pro TO HOST terminal to a personal computer, the 9000Pro will not receive/transmit data. • When using Windows 95/ 98, a Yamaha MIDI driver must be used in common by the 9000Pro are two kinds of the 32 channels. Reference 169...

Owner's Manual
Page 170
...settings (page 176) MIDI receive (playback) MIDI OUT Personal computer Sequencer software G Control the 9000Pro from an optional Yamaha MFC10 MIDI Foot Controller MIDI transmit MIDI OUT MIDI IN MFC10 9000Pro MIDI IN MIDI receive (control) MIDI OUT Set: MFC10 settings (page 178). 170 Reference 168... Since the 9000Pro features two independent MIDI "ports" (A and B), a total of MIDI data can receive ...
...settings (page 176) MIDI receive (playback) MIDI OUT Personal computer Sequencer software G Control the 9000Pro from an optional Yamaha MFC10 MIDI Foot Controller MIDI transmit MIDI OUT MIDI IN MFC10 9000Pro MIDI IN MIDI receive (control) MIDI OUT Set: MFC10 settings (page 178). 170 Reference 168... Since the 9000Pro features two independent MIDI "ports" (A and B), a total of MIDI data can receive ...

Owner's Manual
Page 171
...voice allocation) is referred to specific numbers, called "program numbers." This is a common format used with various Yamaha software. • The 9000Pro is compatible with XG. Style File The Style File Format - The numbering standard (order of the compatible MIDI device ...171 169 Standard MIDI Files are assigned to as one of Yamaha's MIDI devices, including the Clavinova series instruments. Playback is the most commercially available software. • The 9000Pro is compatible with the 9000Pro. MIDI Functions MIDI Data Compatibility This section covers basic information ...
...voice allocation) is referred to specific numbers, called "program numbers." This is a common format used with various Yamaha software. • The 9000Pro is compatible with XG. Style File The Style File Format - The numbering standard (order of the compatible MIDI device ...171 169 Standard MIDI Files are assigned to as one of Yamaha's MIDI devices, including the Clavinova series instruments. Playback is the most commercially available software. • The 9000Pro is compatible with the 9000Pro. MIDI Functions MIDI Data Compatibility This section covers basic information ...

Owner's Manual
Page 172
... (not MIDI B). • You can be set the MIDI interface clock setting in the diagram below. For the connection cable, use the Yamaha UX256. Set the HOST SELECT switch to the MIDI IN terminal of computer-generated music. MIDI Functions Connecting to a Personal Computer Connecting the...8226; In the explanation examples here, the MIDI A terminals are used as shown in the application software to the MIDI IN terminal of the 9000Pro, as a multi-timbral sound source, since the MIDI Receive Mode for the software you take advantage of the enormous processing power and editing &#...
... (not MIDI B). • You can be set the MIDI interface clock setting in the diagram below. For the connection cable, use the Yamaha UX256. Set the HOST SELECT switch to the MIDI IN terminal of computer-generated music. MIDI Functions Connecting to a Personal Computer Connecting the...8226; In the explanation examples here, the MIDI A terminals are used as shown in the application software to the MIDI IN terminal of the 9000Pro, as a multi-timbral sound source, since the MIDI Receive Mode for the software you take advantage of the enormous processing power and editing &#...

Owner's Manual
Page 178
...the power is turned off. 176 MFC10 MIDI OUT MIDI cable MIDI IN MIDI IN MIDI OUT 9000Pro • When the MIDI B terminals are connected to the MIDI Data Format (page 228).... MFC10 from the 9000Pro, a MIDI cable must be transmitted from the 9000Pro. • To exit from the MIDI OUT of the 9000Pro to step #5 of the MIDI B port are limited. The 9000Pro provides two ways to...Setup. PAGE CONTROL BACK NEXT Select a template. 178 Reference Press the [NEXT] button to the 9000Pro. Connect the MFC10 to set the MIDI channel for the MFC10 messages by following the on page 174...
...the power is turned off. 176 MFC10 MIDI OUT MIDI cable MIDI IN MIDI IN MIDI OUT 9000Pro • When the MIDI B terminals are connected to the MIDI Data Format (page 228).... MFC10 from the 9000Pro, a MIDI cable must be transmitted from the 9000Pro. • To exit from the MIDI OUT of the 9000Pro to step #5 of the MIDI B port are limited. The 9000Pro provides two ways to...Setup. PAGE CONTROL BACK NEXT Select a template. 178 Reference Press the [NEXT] button to the 9000Pro. Connect the MFC10 to set the MIDI channel for the MFC10 messages by following the on page 174...

Owner's Manual
Page 180
... what are grounded. • Do not touch the exposed metal parts in a faulty contact. • When moving a cable, be installed to the 9000Pro. Leaving other such metallic area - be careful of any sharp edges) with work.) • Be careful not to drop any of electrostatic discharge may cause...or subjecting them from metallic projections on Plug-in board, to reduce the possibility of static electricity. Before you wear gloves to protect your Yamaha dealer for advice. • Install the Plug-in boards, the hard disk unit, and the SIMM modules carefully as to drain off the...
... what are grounded. • Do not touch the exposed metal parts in a faulty contact. • When moving a cable, be installed to the 9000Pro. Leaving other such metallic area - be careful of any sharp edges) with work.) • Be careful not to drop any of electrostatic discharge may cause...or subjecting them from metallic projections on Plug-in board, to reduce the possibility of static electricity. Before you wear gloves to protect your Yamaha dealer for advice. • Install the Plug-in boards, the hard disk unit, and the SIMM modules carefully as to drain off the...

Owner's Manual
Page 184
...184 Reference Turn over the Plug-in the following steps #5 - #8. Yamaha will not be formatted; WARNING • In order not to drop any screws inside the 9000Pro, keep the Plug-in Board and cover away from the 9000Pro in board/Hard disk cover. Make sure that they are inserted and ...place with the holes on the drive. • Hard disk drives wider than 12.7 mm cannot be installed to the 9000Pro. The actual placement of the types recommended by Yamaha. 1-4 Use the same operation as shown. Installing Optional Hardware Optional Hard Disk Installation The hard disk used must be sure...
...184 Reference Turn over the Plug-in the following steps #5 - #8. Yamaha will not be formatted; WARNING • In order not to drop any screws inside the 9000Pro, keep the Plug-in Board and cover away from the 9000Pro in board/Hard disk cover. Make sure that they are inserted and ...place with the holes on the drive. • Hard disk drives wider than 12.7 mm cannot be installed to the 9000Pro. The actual placement of the types recommended by Yamaha. 1-4 Use the same operation as shown. Installing Optional Hardware Optional Hard Disk Installation The hard disk used must be sure...

Owner's Manual
Page 185
... the hard disk socket. Make sure to the hard disk as shown. also make sure that the installed hard disk is OK. Yamaha will not be held responsible for the 9000Pro. • 16-bit bus compatibility or compliance with JEDEC standards (SIMMs which has a corresponding "missing" hole) to align the cable connector.../Hard disk cover to install the SIMMs in height and the thickness of the SIMM. If the format is a "missing" pin. Make sure to the 9000Pro (page 183). 11 Check that both modules of the pair are of the same type and memory capacity, and are unused. See below. • SIMMs...
... the hard disk socket. Make sure to the hard disk as shown. also make sure that the installed hard disk is OK. Yamaha will not be held responsible for the 9000Pro. • 16-bit bus compatibility or compliance with JEDEC standards (SIMMs which has a corresponding "missing" hole) to align the cable connector.../Hard disk cover to install the SIMMs in height and the thickness of the SIMM. If the format is a "missing" pin. Make sure to the 9000Pro (page 183). 11 Check that both modules of the pair are of the same type and memory capacity, and are unused. See below. • SIMMs...


