

Owner's Manual
Page 2
...applicable laws. NAME PLATE LOCATION: The graphic below or molded/stamped facsimiles of these graphics appears on the enclosure. Model CLP-240/230 Serial No. In keeping with arrowhead symbol, within the equilateral triangle, is intended to alert the user to the presence of uninsulated...contain a small nonrechargable battery which (if applicable) is properly installed and used in order that you to be sure that are not covered by Yamaha. Disposal Notice: Should this page and those indicated in place. NOTICE: Service charges incurred due to lack of knowledge relating to how...
...applicable laws. NAME PLATE LOCATION: The graphic below or molded/stamped facsimiles of these graphics appears on the enclosure. Model CLP-240/230 Serial No. In keeping with arrowhead symbol, within the equilateral triangle, is intended to alert the user to the presence of uninsulated...contain a small nonrechargable battery which (if applicable) is properly installed and used in order that you to be sure that are not covered by Yamaha. Disposal Notice: Should this page and those indicated in place. NOTICE: Service charges incurred due to lack of knowledge relating to how...
Owner's Manual
Page 4
...of Contents Introduction About this Owner's Manual 3 Accessories 3 Application Index 5 Panel Controls and Terminals 8 Before Using the Clavinova 10 Key Cover 10 Music Rest 10 Music Braces (CLP-240 10 Turning the Power On 11 Setting the Volume 12 Using Headphones 12 Using the Speaker ...a USB storage device (CLP-240) ...... 58 Connecting a Personal Computer 60 Data Backup 62 Message List 63 Troubleshooting 64 Options 64 CLP-240/230: Keyboard Stand Assembly ........ 65 Handling the Floppy Disk Drive (FDD) and Floppy Disks (CLP-240 69 Installing the Floppy Disk Drive (Optional...
...of Contents Introduction About this Owner's Manual 3 Accessories 3 Application Index 5 Panel Controls and Terminals 8 Before Using the Clavinova 10 Key Cover 10 Music Rest 10 Music Braces (CLP-240 10 Turning the Power On 11 Setting the Volume 12 Using Headphones 12 Using the Speaker ...a USB storage device (CLP-240) ...... 58 Connecting a Personal Computer 60 Data Backup 62 Message List 63 Troubleshooting 64 Options 64 CLP-240/230: Keyboard Stand Assembly ........ 65 Handling the Floppy Disk Drive (FDD) and Floppy Disks (CLP-240 69 Installing the Floppy Disk Drive (Optional...

Owner's Manual
Page 7
... not wipe too hard since this can scratch the instrument's finish. • When cleaning the instrument, use . (1)B-11 2/2 CLP-240/230 Owner's Manual 7 If you want to keep to the internal Flash Memory before they have the instrument inspected by improper use or modifications...(page 55). Make sure to save (back up) data you experience any gaps on the key cover or instrument. • Never insert or drop paper, metallic, or other objects into the gaps on the bench. Yamaha cannot be lost if the power is lost due to malfunction or incorrect operation. Then have...
... not wipe too hard since this can scratch the instrument's finish. • When cleaning the instrument, use . (1)B-11 2/2 CLP-240/230 Owner's Manual 7 If you want to keep to the internal Flash Memory before they have the instrument inspected by improper use or modifications...(page 55). Make sure to save (back up) data you experience any gaps on the key cover or instrument. • Never insert or drop paper, metallic, or other objects into the gaps on the bench. Yamaha cannot be lost if the power is lost due to malfunction or incorrect operation. Then have...
Owner's Manual
Page 10
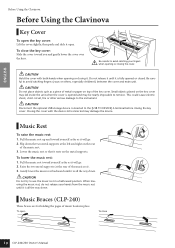
...supports at the rear of the key cover. To lower the music rest: 1. CAUTION Do not try to remove. To close 10 CLP-240/230 Owner's Manual ENGLISH Before Using the Clavinova Before Using the Clavinova Key Cover To open the key cover: Lift the cover slightly, then push and slide it open... To close the key cover: Slide the cover toward yourself as far as a piece of metal...
...supports at the rear of the key cover. To lower the music rest: 1. CAUTION Do not try to remove. To close 10 CLP-240/230 Owner's Manual ENGLISH Before Using the Clavinova Before Using the Clavinova Key Cover To open the key cover: Lift the cover slightly, then push and slide it open... To close the key cover: Slide the cover toward yourself as far as a piece of metal...

Owner's Manual
Page 11
... rated for the voltage in your area.) Do NOT modify the plug provided with the CLP-240/230. The type of the AC wall outlets in your Yamaha dealer. ENGLISH Before Using the Clavinova Turning the Power On 1.Connect the power cord. In some areas a plug adaptor may be replaced, ... to be different depending on the bottom panel). The use of the main keyboard unit near the power cord. CLP-240/230 Owner's Manual 11 When you close the key cover without turning the power off . If the plug will not fit the outlet, have a proper outlet installed by a qualifi...
... rated for the voltage in your area.) Do NOT modify the plug provided with the CLP-240/230. The type of the AC wall outlets in your Yamaha dealer. ENGLISH Before Using the Clavinova Turning the Power On 1.Connect the power cord. In some areas a plug adaptor may be replaced, ... to be different depending on the bottom panel). The use of the main keyboard unit near the power cord. CLP-240/230 Owner's Manual 11 When you close the key cover without turning the power off . If the plug will not fit the outlet, have a proper outlet installed by a qualifi...

Owner's Manual
Page 58
...as read data to the instrument, they cannot be used for advice, or visit the following web page: http://music.yamaha.com/CLP-240/ http://music.yamaha.com/CLP-230/ CAUTION Avoid frequently turning the power on the left of the panel, while switching to "B" selects the terminal panel... can connect and use a non-ID SmartMedia card. The instrument does not necessarily support all commercially available USB storage devices. Closing the cover with caution. CAUTION The format operation overwrites any previously existing data. Doing so may corrupt the data on the terminal at the bottom....
...as read data to the instrument, they cannot be used for advice, or visit the following web page: http://music.yamaha.com/CLP-240/ http://music.yamaha.com/CLP-230/ CAUTION Avoid frequently turning the power on the left of the panel, while switching to "B" selects the terminal panel... can connect and use a non-ID SmartMedia card. The instrument does not necessarily support all commercially available USB storage devices. Closing the cover with caution. CAUTION The format operation overwrites any previously existing data. Doing so may corrupt the data on the terminal at the bottom....

Owner's Manual
Page 66
ENGLISH CLP-240/230: Keyboard Stand Assembly 2. Attach B. 2-1 Place the bottom edges of B on the protection pad. Then, fix the protection pad with the adhesive tape. 2-3 2-3 Temporarily secure the bottom part using 4 x 12 mm thin screws. 2-2 3-2 Cover the top of D and E. Then, remove the two backing ... and E with the side panel pro- Place your hands at least 10 cm from either end of A when positioning it stops. 66 CLP-240/230 Owner's Manual 3-5 Remove the side panel protection pad. Mount A. 3-1 Assemble the side panel protection (cardboard) pad, as not to drop the main...
ENGLISH CLP-240/230: Keyboard Stand Assembly 2. Attach B. 2-1 Place the bottom edges of B on the protection pad. Then, fix the protection pad with the adhesive tape. 2-3 2-3 Temporarily secure the bottom part using 4 x 12 mm thin screws. 2-2 3-2 Cover the top of D and E. Then, remove the two backing ... and E with the side panel pro- Place your hands at least 10 cm from either end of A when positioning it stops. 66 CLP-240/230 Owner's Manual 3-5 Remove the side panel protection pad. Mount A. 3-1 Assemble the side panel protection (cardboard) pad, as not to drop the main...
Owner's Manual
Page 68
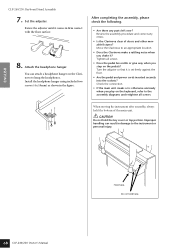
...set firmly against the floor. • Are the pedal and power cords inserted securely into the sockets? Do not hold the key cover or top portion. You can result in damage to the assembly diagrams and retighten all screws. • Does the pedal box rattle or give way... when you shake it? Turn the adjuster so that it comes in the figure. ENGLISH CLP-240/230: Keyboard Stand Assembly 7. Install the headphone hanger using included two screws (4 x 10mm) as shown in firm contact with the floor surface. 8. ...
...set firmly against the floor. • Are the pedal and power cords inserted securely into the sockets? Do not hold the key cover or top portion. You can result in damage to the assembly diagrams and retighten all screws. • Does the pedal box rattle or give way... when you shake it? Turn the adjuster so that it comes in the figure. ENGLISH CLP-240/230: Keyboard Stand Assembly 7. Install the headphone hanger using included two screws (4 x 10mm) as shown in firm contact with the floor surface. 8. ...


