
User Manual
Page 3
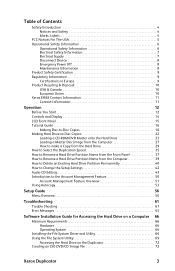
... Information 8 Product Safety Certification 9 Regulatory Information 9 Certifications in Europe 9 Product Recycling & Disposal 10 USA & Canada 10 European Union 10 Xerox EH&S Contact Information 11 Contact Information 11 Operation 12 Before You Start 12 Controls and Display 14 LCD Front Panel 15 Tutorial Guide 16 Making...Loading a CD-ROM/DVD Master onto the Hard Drive 23 Loading a Master Disc Image from the Computer 27 How to make a Copy from the Hard Drive 29 How to Select the Duplication Speed 35 How to Rename a Hard Drive Partition Name from the Front Panel...
... Information 8 Product Safety Certification 9 Regulatory Information 9 Certifications in Europe 9 Product Recycling & Disposal 10 USA & Canada 10 European Union 10 Xerox EH&S Contact Information 11 Contact Information 11 Operation 12 Before You Start 12 Controls and Display 14 LCD Front Panel 15 Tutorial Guide 16 Making...Loading a CD-ROM/DVD Master onto the Hard Drive 23 Loading a Master Disc Image from the Computer 27 How to make a Copy from the Hard Drive 29 How to Select the Duplication Speed 35 How to Rename a Hard Drive Partition Name from the Front Panel...
User Manual
Page 12
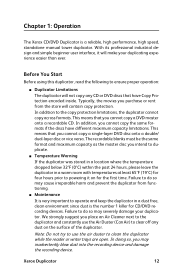
... the same format and maximum capacity as the master disc you purchase or rent from functioning. ■ Maintenance It is a reliable, high performance, high speed, standalone manual tower duplicator. Xerox Duplicator 12 Before You Start Before using this duplicator, read the following to operate and keep the duplicator in a warm room with temperatures at least 65...
... the same format and maximum capacity as the master disc you purchase or rent from functioning. ■ Maintenance It is a reliable, high performance, high speed, standalone manual tower duplicator. Xerox Duplicator 12 Before You Start Before using this duplicator, read the following to operate and keep the duplicator in a warm room with temperatures at least 65...

User Manual
Page 16
... as the source, use the up or down buttons to locate Drive 0 and press >> to select it : Xerox Duplicator 16 For a disc-to-disc copy, the Copy Source can be either bad or unable to read the disc master. XEROX 2.14 8.Select Source Step 2: Press >> to enter the Select Source menu and you should see a screen...
... as the source, use the up or down buttons to locate Drive 0 and press >> to select it : Xerox Duplicator 16 For a disc-to-disc copy, the Copy Source can be either bad or unable to read the disc master. XEROX 2.14 8.Select Source Step 2: Press >> to enter the Select Source menu and you should see a screen...

User Manual
Page 18
If you are skipped, therefore, "0010" means ten, which is less than four digits, please fill the leading spaces with 0s (any leading zero will be 0234 (Two hundred and thirty four), or 0010 (ten). Remember, the beginning zeros are planning to specify a number that 4-digit number could be skipped). To enter the number, you need to use the up or down button to enter/input a four-digit number. An example of copies for your project, you need to select the number for each digit and use >> or To specify the number of that is the number ten.
If you are skipped, therefore, "0010" means ten, which is less than four digits, please fill the leading spaces with 0s (any leading zero will be 0234 (Two hundred and thirty four), or 0010 (ten). Remember, the beginning zeros are planning to specify a number that 4-digit number could be skipped). To enter the number, you need to use the up or down button to enter/input a four-digit number. An example of copies for your project, you need to select the number for each digit and use >> or To specify the number of that is the number ten.

User Manual
Page 19
Allow 5 to 10 seconds for the duplicator to detect your master disc and blank discs have been recognized, you will see the following screen Preparing 7 Disc Detected, Go? ■ 7 indicates there are filled and the duplicator detects this, the duplicator will start or wish to speed up the process) to... tray. Therefore, if your duplicator is not completely filled with blank discs and there is no activity within 30 seconds, or if all of the following processing screen will appear. Note: By default, the Auto Start setting is selected. 19 Xerox Duplicator Step 4: After two to ...
Allow 5 to 10 seconds for the duplicator to detect your master disc and blank discs have been recognized, you will see the following screen Preparing 7 Disc Detected, Go? ■ 7 indicates there are filled and the duplicator detects this, the duplicator will start or wish to speed up the process) to... tray. Therefore, if your duplicator is not completely filled with blank discs and there is no activity within 30 seconds, or if all of the following processing screen will appear. Note: By default, the Auto Start setting is selected. 19 Xerox Duplicator Step 4: After two to ...
User Manual
Page 20
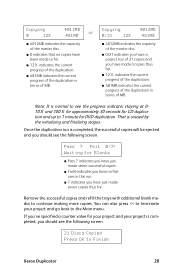
... no copies have been made so far. ■ 12% indicates the current progress of the duplication. ■ 481MB indicates the current progress of the duplication in terms of MB. ■ 4012MB indicates the capacity of the master disc. ■ 0/21 indicates you have a project size of 21 copies and you have made seven...
... no copies have been made so far. ■ 12% indicates the current progress of the duplication. ■ 481MB indicates the current progress of the duplication in terms of MB. ■ 4012MB indicates the capacity of the master disc. ■ 0/21 indicates you have a project size of 21 copies and you have made seven...

User Manual
Page 21
Note: If you happen to have inserted more than what you requested, you will receive a message that you have any failed discs (bad copies), the failed disc(s) will not be ejected automatically. You can continue to copy or you can press >> to go back to manually eject them and throw them away if they are writeonce recordable disc(s). 21 Xerox Duplicator You need . If you see the above message, you can eject the extras. Note: If you enabled the counter and the number of discs you have inserted is more discs than what you need to the Main menu.
Note: If you happen to have inserted more than what you requested, you will receive a message that you have any failed discs (bad copies), the failed disc(s) will not be ejected automatically. You can continue to copy or you can press >> to go back to manually eject them and throw them away if they are writeonce recordable disc(s). 21 Xerox Duplicator You need . If you see the above message, you can eject the extras. Note: If you enabled the counter and the number of discs you have inserted is more discs than what you need to the Main menu.
User Manual
Page 22
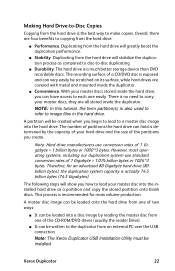
..., for mass volume production. Note: The Xerox Duplicator USB Installation Utility must be written to the duplicator from one easily. Making Hard Drive-to-Disc Copies Copying from the hard drive. ■ Performance. There is exposed and can be loaded into the installed hard drive as compared to disc-to-disc duplicating. ■ Durability. The following steps...
..., for mass volume production. Note: The Xerox Duplicator USB Installation Utility must be written to the duplicator from one easily. Making Hard Drive-to-Disc Copies Copying from the hard drive. ■ Performance. There is exposed and can be loaded into the installed hard drive as compared to disc-to-disc duplicating. ■ Durability. The following steps...
User Manual
Page 23
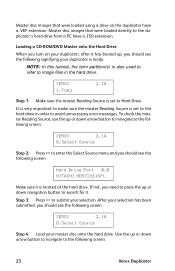
... Source, use the up or down arrow button to navigate to the duplicator's hard drive from a PC have a .VEF extension. Master disc images that were loaded directly to the following screen. 23 Xerox Duplicator It is very important to make sure the master Reading Source is set... error messages. Step 3: Press >> to search for it. XEROX 2.14 8.Select Source Step 4: Load your selection has been submitted, you should see the following screen. Master disc images that were loaded using a drive on your duplicator, after it is ready. Hard Drive Port 0.0 HITACHI HDS721616PL...
... Source, use the up or down arrow button to navigate to the duplicator's hard drive from a PC have a .VEF extension. Master disc images that were loaded directly to the following screen. 23 Xerox Duplicator It is very important to make sure the master Reading Source is set... error messages. Step 3: Press >> to search for it. XEROX 2.14 8.Select Source Step 4: Load your selection has been submitted, you should see the following screen. Master disc images that were loaded using a drive on your duplicator, after it is ready. Hard Drive Port 0.0 HITACHI HDS721616PL...

User Manual
Page 24
...the character and use up or down arrow button to navigate to the following screen. Hard Drive Setup 1.Select Partition Step 6: Load your master disc on to load your hard drive in terms of the existing partitions (if any exists, including reserved partitions) by inputting and modifying the name you... desire or you can simply choose "Auto Generate" to have a choice to the hard drive. XEROX 2.14 10.Hard Drive Setup Step 5: Press >> to enter the Hard Drive Setup menu and you should see the following screen. You now have the...
...the character and use up or down arrow button to navigate to the following screen. Hard Drive Setup 1.Select Partition Step 6: Load your master disc on to load your hard drive in terms of the existing partitions (if any exists, including reserved partitions) by inputting and modifying the name you... desire or you can simply choose "Auto Generate" to have a choice to the hard drive. XEROX 2.14 10.Hard Drive Setup Step 5: Press >> to enter the Hard Drive Setup menu and you should see the following screen. You now have the...

User Manual
Page 25
..., press >> once to OK. Press the down button repeatedly until U is displayed. and once you want to name the partition for your master disc as FUN. The system will be displayed and you should now see the following confirmation screen. Once your name selection. Press the >> button once to... the cursor is displayed. Step 11: Press the >> button to the next position. Step 10: You should now see the following screen. 25 Xerox Duplicator Make sure the cursor is displayed. The loading progress indicator will automatically append a file name suffix of .VEF.
..., press >> once to OK. Press the down button repeatedly until U is displayed. and once you want to name the partition for your master disc as FUN. The system will be displayed and you should now see the following confirmation screen. Once your name selection. Press the >> button once to... the cursor is displayed. Step 11: Press the >> button to the next position. Step 10: You should now see the following screen. 25 Xerox Duplicator Make sure the cursor is displayed. The loading progress indicator will automatically append a file name suffix of .VEF.

User Manual
Page 26
Once your master disc. ■ 423MB indicates the current MB from the master disc that has been loaded. ■ FUN.VEF indicates the name of the partition where the data is being loaded. ■ 10% indicates the current percentage of the master disc that has been loaded. Load Partition OK Press OK to Continue You can then press the >> button to go back to the Hard Drive Setup menu. and the Loading FUN.VEF 4000MB 10% 423MB ■ 4000MB indicates the total capacity of your master disc has been loaded completely, you should see the following screen.
Once your master disc. ■ 423MB indicates the current MB from the master disc that has been loaded. ■ FUN.VEF indicates the name of the partition where the data is being loaded. ■ 10% indicates the current percentage of the master disc that has been loaded. Load Partition OK Press OK to Continue You can then press the >> button to go back to the Hard Drive Setup menu. and the Loading FUN.VEF 4000MB 10% 423MB ■ 4000MB indicates the total capacity of your master disc has been loaded completely, you should see the following screen.

User Manual
Page 27
... from the Computer To load a master disc image from the source folder on the computer's hard drive and drop it . Step 1: Follow the instructions outlined in the duplicator, drag it from the computer. You should be able to open the hard drive on the duplicator in a window on your PC: Step 2: Double-...on the dup folder to open it into the dup directory on page 72. Once you have established a connection between the computer and the duplicator, you should see the contents of the duplicator's hard drive: Step 3: To load an image file onto the hard disk in "Accessing the Hard Drive on the...
... from the Computer To load a master disc image from the source folder on the computer's hard drive and drop it . Step 1: Follow the instructions outlined in the duplicator, drag it from the computer. You should be able to open the hard drive on the duplicator in a window on your PC: Step 2: Double-...on the dup folder to open it into the dup directory on page 72. Once you have established a connection between the computer and the duplicator, you should see the contents of the duplicator's hard drive: Step 3: To load an image file onto the hard disk in "Accessing the Hard Drive on the...

User Manual
Page 29
...button to navigate to the following screen. After your selection has been submitted, you should see the following screen. XEROX 2.14 8.Select Source Step 4: Go back to submit your blank discs into the writer trays (make sure the Reader tray is empty) and press >> button to copy from the...you should see the following screen. Copy 2.14 Step 5: Start the Copying Process Insert your selection. How to make a Copy from . 29 Xerox Duplicator It is very important to make sure the master Reading Source is set to hard drive. You will be asked to choose which hard drive...
...button to navigate to the following screen. After your selection has been submitted, you should see the following screen. XEROX 2.14 8.Select Source Step 4: Go back to submit your blank discs into the writer trays (make sure the Reader tray is empty) and press >> button to copy from the...you should see the following screen. Copy 2.14 Step 5: Start the Copying Process Insert your selection. How to make a Copy from . 29 Xerox Duplicator It is very important to make sure the master Reading Source is set to hard drive. You will be asked to choose which hard drive...

User Manual
Page 31
...cursor is displayed. You should see the following screen. After your counter value. To input the desired quantity, do the following screen. 31 Xerox Duplicator Press the down button to select the number for each digit and use the up or down button repeatedly until 0 is located at the first... position. For example, if you want to submit your hard drive partition and blank discs have 0021 displayed. Press the >> button once to move the cursor to detect your blank discs for the duplicator to the next position. To enter the number, you need to use the >> or >....
...cursor is displayed. You should see the following screen. After your counter value. To input the desired quantity, do the following screen. 31 Xerox Duplicator Press the down button to select the number for each digit and use the up or down button repeatedly until 0 is located at the first... position. For example, if you want to submit your hard drive partition and blank discs have 0021 displayed. Press the >> button once to move the cursor to detect your blank discs for the duplicator to the next position. To enter the number, you need to use the >> or >....

User Manual
Page 32
... be different depending upon your duplicator is not completely filled with blank discs and there is no activity within 30 seconds, or if all of blank discs you are not using auto start automatically. Once the number of your blank discs. Xerox Duplicator 32 Note: By default, ...the Auto Start setting is selected. Step 9: After 2 or 3 seconds of processing time, one of discs detected on the screen, allow 10-15 seconds for the duplicator to Auto. Therefore, if your machine...
... be different depending upon your duplicator is not completely filled with blank discs and there is no activity within 30 seconds, or if all of blank discs you are not using auto start automatically. Once the number of your blank discs. Xerox Duplicator 32 Note: By default, ...the Auto Start setting is selected. Step 9: After 2 or 3 seconds of processing time, one of discs detected on the screen, allow 10-15 seconds for the duplicator to Auto. Therefore, if your machine...

User Manual
Page 33
... is normal to see the following screen. Once the duplication run . ■ 7 indicates you have made zero copies thus far. ■ H indicates you are copying from a hard drive image. ■ 4012MB indicates the capacity of the master disc. ■ 481MB indicates the current MB from a ...% 481MB 0/21 12% 481MB ■ 4012MB indicates the capacity of the master disc. ■ 481MB indicates the current MB from the master disc that has been copied. ■ 12% indicates the current progress of the duplication. ■ 0 indicates that has been copied. ■ 12% indicates the ...
... is normal to see the following screen. Once the duplication run . ■ 7 indicates you have made zero copies thus far. ■ H indicates you are copying from a hard drive image. ■ 4012MB indicates the capacity of the master disc. ■ 481MB indicates the current MB from a ...% 481MB 0/21 12% 481MB ■ 4012MB indicates the capacity of the master disc. ■ 481MB indicates the current MB from the master disc that has been copied. ■ 12% indicates the current progress of the duplication. ■ 0 indicates that has been copied. ■ 12% indicates the ...

User Manual
Page 34
.... Note: If you happen to the Main menu. You will receive a message regarding having inserted more discs than what you can continue to manually eject them and throw them away if they are writeonce recordable disc(s) Xerox Duplicator 34 You can eject the extras. Note: If you enabled the counter and the number of...
.... Note: If you happen to the Main menu. You will receive a message regarding having inserted more discs than what you can continue to manually eject them and throw them away if they are writeonce recordable disc(s) Xerox Duplicator 34 You can eject the extras. Note: If you enabled the counter and the number of...

User Manual
Page 35
... time, it has booted up or down the duplication speed will reduce the failure rates greatly. ■ Duplication Quality. If your duplicates. XEROX 2.14 7. Those circumstances are different types of your master disc condition is a good choice to lower down the speed to produce the best quality duplicates. XEROX 1. Select Burn Speed Step 2: Enter Speed Selection menu...
... time, it has booted up or down the duplication speed will reduce the failure rates greatly. ■ Duplication Quality. If your duplicates. XEROX 2.14 7. Those circumstances are different types of your master disc condition is a good choice to lower down the speed to produce the best quality duplicates. XEROX 1. Select Burn Speed Step 2: Enter Speed Selection menu...

User Manual
Page 37
Hard Drive Setup 3. XEROX 2.14 10. Choose Partition [FUN.VEF] 4000MB Note: Partitions that were loaded directly to the duplicator's hard drive from the Front Panel NOTE: In this tutorial, the term partition(s) is also used to refer to image files in the... screen. Partitions that have a .ISO extension. Select Partition Step 3: Use up or down arrow button to navigate to the following confirmation screen. 37 Xerox Duplicator Hard Drive Setup Step 2: Press >> to enter the Hard Drive Setup menu and you are asked to the hard drive partition, or loading a partition...
Hard Drive Setup 3. XEROX 2.14 10. Choose Partition [FUN.VEF] 4000MB Note: Partitions that were loaded directly to the duplicator's hard drive from the Front Panel NOTE: In this tutorial, the term partition(s) is also used to refer to image files in the... screen. Partitions that have a .ISO extension. Select Partition Step 3: Use up or down arrow button to navigate to the following confirmation screen. 37 Xerox Duplicator Hard Drive Setup Step 2: Press >> to enter the Hard Drive Setup menu and you are asked to the hard drive partition, or loading a partition...