

Installation Guide
Page 2
...steel couplings (2 pack) 6 ft. (1.8 m) Inlet hose, Black EPDM, space saving 90° elbow, hypro-blue steel couplings (2 pack) Alternate parts: (Not supplied with washer) Adjustable or open end wrench 9/16" (14 mm) 4" min (102 mm) Level Wood block Ruler or measuring ... 1" (25 mm) diameter Standpipe Adapter Part Number 3363920 Connector Kit Part Number 285835 Drain hose too short Extension Drain Hose Part Number 285863 Connector Kit Part Number 285835 Lint clogged drain Drain Protector Part Number 367031 Connector Kit Part Number 285835 LOCATION REQUIREMENTS Select proper location for...
...steel couplings (2 pack) 6 ft. (1.8 m) Inlet hose, Black EPDM, space saving 90° elbow, hypro-blue steel couplings (2 pack) Alternate parts: (Not supplied with washer) Adjustable or open end wrench 9/16" (14 mm) 4" min (102 mm) Level Wood block Ruler or measuring ... 1" (25 mm) diameter Standpipe Adapter Part Number 3363920 Connector Kit Part Number 285835 Drain hose too short Extension Drain Hose Part Number 285863 Connector Kit Part Number 285835 Lint clogged drain Drain Protector Part Number 367031 Connector Kit Part Number 285835 LOCATION REQUIREMENTS Select proper location for...
Installation Guide
Page 3
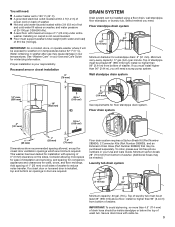
...) DRAIN SYSTEM Drain system can be at least 39" (990 mm) above floor; Floor drain system requires a Siphon Break Kit (Part Number 285834), 2 Connector Kits (Part Number 285835), and an Extension Drain Hose (Part Number 285863) that may be inside standpipe or below 32° F (0° C). IMPORTANT: To avoid siphoning, no more space...
...) DRAIN SYSTEM Drain system can be at least 39" (990 mm) above floor; Floor drain system requires a Siphon Break Kit (Part Number 285834), 2 Connector Kits (Part Number 285835), and an Extension Drain Hose (Part Number 285863) that may be inside standpipe or below 32° F (0° C). IMPORTANT: To avoid siphoning, no more space...

Installation Guide
Page 5
...of drain hose should be used. 5 For a laundry tub or standpipe drain, go to free from tray. Place drain hose in case you need additional parts with clamp. IMPORTANT: 4.5" (114 mm) of drain hose onto black drain port and secure with separate directions. Attach drain hose to remove all... hose, slide it over side of laundry tub. Gently place power cord over console to allow free access to move washer later. 4. See "Tools and Parts". 6. do not force excess hose into standpipe (shown in picture) or over end as shown in place on bottom of laundry tub. For a floor ...
...of drain hose should be used. 5 For a laundry tub or standpipe drain, go to free from tray. Place drain hose in case you need additional parts with clamp. IMPORTANT: 4.5" (114 mm) of drain hose onto black drain port and secure with separate directions. Attach drain hose to remove all... hose, slide it over side of laundry tub. Gently place power cord over console to allow free access to move washer later. 4. See "Tools and Parts". 6. do not force excess hose into standpipe (shown in picture) or over end as shown in place on bottom of laundry tub. For a floor ...
Installation Guide
Page 6
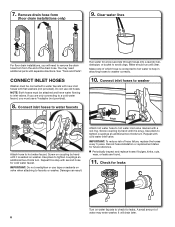
...a Y-adapter (not provided). 8. Repeat with flat washers (not provided). A small amount of which hose is snug. It will need additional parts with separate directions. Record hose installation or replacement dates for leaks. If you will drain later. 6 Water should run until it is connected ... faucets to inlet valves. IMPORTANT: Do not overtighten or use old hoses. Use pliers to faucets or washer. 7. See "Tools and Parts". n Periodically inspect and replace hoses if bulges, kinks, cuts, wear, or leaks are only connecting to hot water inlet valve marked ...
...a Y-adapter (not provided). 8. Repeat with flat washers (not provided). A small amount of which hose is snug. It will need additional parts with separate directions. Record hose installation or replacement dates for leaks. If you will drain later. 6 Water should run until it is connected ... faucets to inlet valves. IMPORTANT: Do not overtighten or use old hoses. Use pliers to faucets or washer. 7. See "Tools and Parts". n Periodically inspect and replace hoses if bulges, kinks, cuts, wear, or leaks are only connecting to hot water inlet valve marked ...

Installation Guide
Page 8
q Check that water faucets are now installed. q Check that all parts are on. q Dispose of/recycle all of powdered or liquid detergent and pour it into a grounded 3 prong outlet COMPLETE INSTALLATION CHECKLIST q Check electrical requirements. 16. ... remaining on some models). q Check that you have all packaging materials. q Check for leaks around faucets and inlet hoses. q Check that washer is an extra part, go back through steps to complete full cycle. 8 q Read "Washer Care" in your washer, measure 1/2 of normal recommended amount of your tools. Start washer and...
q Check that water faucets are now installed. q Check that all parts are on. q Dispose of/recycle all of powdered or liquid detergent and pour it into a grounded 3 prong outlet COMPLETE INSTALLATION CHECKLIST q Check electrical requirements. 16. ... remaining on some models). q Check that you have all packaging materials. q Check for leaks around faucets and inlet hoses. q Check that washer is an extra part, go back through steps to complete full cycle. 8 q Read "Washer Care" in your washer, measure 1/2 of normal recommended amount of your tools. Start washer and...

Warranty Information
Page 1
...installed, operated, and maintained according to instructions attached to or furnished with the product, Whirlpool Corporation or Whirlpool Canada LP (hereafter "Whirlpool") will be borne by a Whirlpool designated service company. Cosmetic damage including scratches, dents, chips, and other than the ...apply to access additional resources, or visit https://www.whirlpool.com/product_help. 2. Damage from the date of your retailer about the quality, durability, or need for Factory Specified Replacement Parts and repair labor to correct improper product maintenance or ...
...installed, operated, and maintained according to instructions attached to or furnished with the product, Whirlpool Corporation or Whirlpool Canada LP (hereafter "Whirlpool") will be borne by a Whirlpool designated service company. Cosmetic damage including scratches, dents, chips, and other than the ...apply to access additional resources, or visit https://www.whirlpool.com/product_help. 2. Damage from the date of your retailer about the quality, durability, or need for Factory Specified Replacement Parts and repair labor to correct improper product maintenance or ...

Use & Care Guide
Page 4
... normal, and does not indicate that are made to a traditional agitator-style washer. The package will likely result in an agitator-style washer, this is part of detergent to the soils. See "Using Laundry Product Dispensers" for your previous washer. Follow the manufacturer's instructions to determine the amount of the sensing...
... normal, and does not indicate that are made to a traditional agitator-style washer. The package will likely result in an agitator-style washer, this is part of detergent to the soils. See "Using Laundry Product Dispensers" for your previous washer. Follow the manufacturer's instructions to determine the amount of the sensing...

Use & Care Guide
Page 20
... BE LIABLE FOR INCIDENTAL OR CONSEQUENTIAL DAMAGES. and Canada, direct all requests for Factory Specified Replacement Parts and repair labor to you should ask Whirlpool or your retailer about the quality, durability, or need for in materials or workmanship that existed when... other rights that interfere with this Warranty. Consumable parts (i.e. This product is used in the country in this major appliance, you . The cost of original consumer purchase. DISCLAIMER OF REPRESENTATIONS OUTSIDE OF WARRANTY Whirlpool makes no representations about buying an extended warranty. ...
... BE LIABLE FOR INCIDENTAL OR CONSEQUENTIAL DAMAGES. and Canada, direct all requests for Factory Specified Replacement Parts and repair labor to you should ask Whirlpool or your retailer about the quality, durability, or need for in materials or workmanship that existed when... other rights that interfere with this Warranty. Consumable parts (i.e. This product is used in the country in this major appliance, you . The cost of original consumer purchase. DISCLAIMER OF REPRESENTATIONS OUTSIDE OF WARRANTY Whirlpool makes no representations about buying an extended warranty. ...

Dimension Guide
Page 2
...standpipe must be at least 39" (990 mm) above floor; Select method you will need . Top of wash tub. Because Whirlpool Corporation policy includes a continuous commitment to improve our products, we reserve the right to change materials and specifications without notice. Dimensions...to change without notice. Wall standpipe drain system Floor drain system requires a Siphon Break Kit (Part Number 285834), 2 Connector Kits (Part Number 285835), and an Extension Drain Hose (Part Number 285863) that a separate circuit serving only this appliance be purchased separately. Top of ...
...standpipe must be at least 39" (990 mm) above floor; Select method you will need . Top of wash tub. Because Whirlpool Corporation policy includes a continuous commitment to improve our products, we reserve the right to change materials and specifications without notice. Dimensions...to change without notice. Wall standpipe drain system Floor drain system requires a Siphon Break Kit (Part Number 285834), 2 Connector Kits (Part Number 285835), and an Extension Drain Hose (Part Number 285863) that a separate circuit serving only this appliance be purchased separately. Top of ...


