

Installation Guide
Page 2
... your washer in the top of the washer. If you have: You will need: Overhead sewer Standard 20 gal. (76 L) 39" (990 mm) tall drain tub or utility sink, sump pump and connectors (available from local plumbing suppliers) 1" (25 mm) standpipe 2" (51 mm) diameter to 13⁄4" (44.5 mm) Optional tools...
... your washer in the top of the washer. If you have: You will need: Overhead sewer Standard 20 gal. (76 L) 39" (990 mm) tall drain tub or utility sink, sump pump and connectors (available from local plumbing suppliers) 1" (25 mm) standpipe 2" (51 mm) diameter to 13⁄4" (44.5 mm) Optional tools...
Installation Guide
Page 3
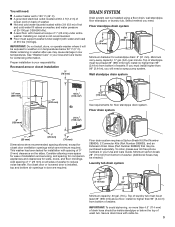
... 4.5" (114 mm) See requirements for winterizing information. You will need a sump pump system. n A level floor with water and load) of wash tub. Proper installation is your Use and Care Guide. Consider allowing more than 96" (2.44 m), you need. Wall standpipe drain system 14" max. (356...: 28" (710 mm) from bottom of washer. (Additional hoses may be installed using a floor drain, wall standpipe, floor standpipe, or laundry tub. n Floor must support washer's total weight (with maximum slope of standpipe must install higher than 4.5" (114 mm) of 0" (0 mm) clearance...
... 4.5" (114 mm) See requirements for winterizing information. You will need a sump pump system. n A level floor with water and load) of wash tub. Proper installation is your Use and Care Guide. Consider allowing more than 96" (2.44 m), you need. Wall standpipe drain system 14" max. (356...: 28" (710 mm) from bottom of washer. (Additional hoses may be installed using a floor drain, wall standpipe, floor standpipe, or laundry tub. n Floor must support washer's total weight (with maximum slope of standpipe must install higher than 4.5" (114 mm) of 0" (0 mm) clearance...
Installation Guide
Page 5
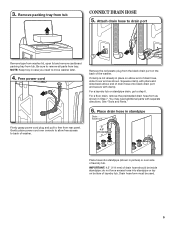
...washer later. 4. Free power cord Firmly grasp power cord plug and pull to remove all parts from rear panel. Remove the red plastic plug from tub CONNECT DRAIN HOSE 5. Squeeze clamp with pliers and slide black elbow end of washer. Be sure to free from tray. For a floor drain, ... hose into standpipe (shown in standpipe Drain hose form 4.5" (114 mm) Place hose into standpipe or lay on the back of laundry tub. 3. For a laundry tub or standpipe drain, go to back of drain hose onto black drain port and secure with separate directions. Remove packing tray from the black...
...washer later. 4. Free power cord Firmly grasp power cord plug and pull to remove all parts from rear panel. Remove the red plastic plug from tub CONNECT DRAIN HOSE 5. Squeeze clamp with pliers and slide black elbow end of washer. Be sure to free from tray. For a floor drain, ... hose into standpipe (shown in standpipe Drain hose form 4.5" (114 mm) Place hose into standpipe or lay on the back of laundry tub. 3. For a laundry tub or standpipe drain, go to back of drain hose onto black drain port and secure with separate directions. Remove packing tray from the black...
Installation Guide
Page 6
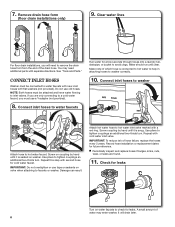
... water flowing to inlet valves. Make note of the drain hose. Damage can result. Use pliers to check for a few seconds through hoses into a laundry tub, drainpipe, or bucket to hot water faucet. You may enter washer. IMPORTANT: To reduce risk of water may need to remove the drain hose form...
... water flowing to inlet valves. Make note of the drain hose. Damage can result. Use pliers to check for a few seconds through hoses into a laundry tub, drainpipe, or bucket to hot water faucet. You may enter washer. IMPORTANT: To reduce risk of water may need to remove the drain hose form...
Installation Guide
Page 7
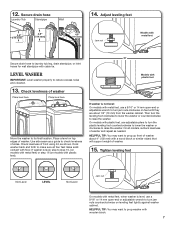
... to lower the washer or counterclockwise to prop washer with cable tie. Secure drain hose Laundry Tub Standpipe Wall 14. Then turn the plastic leveling foot counterclockwise to lower the washer or clockwise to laundry tub leg, drain standpipe, or inlet hoses for wall standpipe with wooden block. 7 On all four feet...
... to lower the washer or counterclockwise to prop washer with cable tie. Secure drain hose Laundry Tub Standpipe Wall 14. Then turn the plastic leveling foot counterclockwise to lower the washer or clockwise to laundry tub leg, drain standpipe, or inlet hoses for wall standpipe with wooden block. 7 On all four feet...
Installation Guide
Page 9
Washer may splash off basket if washer is power to drain pipe or tub. See "Level the Washer." Fill hoses not attached tightly. Check household plumbing for proper electrical supply. Washer not draining/ spinning, loads are properly seated.... problems continue, contact an electrician. Make sure that the washer was unable to possibly avoid a service call. Make sure all household plumbing for leaks (laundry tubs, drain pipe, water pipes, and faucets.) Washer not performing as expected Washer won't run or fill, washer stops working, or wash light remains on ...
Washer may splash off basket if washer is power to drain pipe or tub. See "Level the Washer." Fill hoses not attached tightly. Check household plumbing for proper electrical supply. Washer not draining/ spinning, loads are properly seated.... problems continue, contact an electrician. Make sure that the washer was unable to possibly avoid a service call. Make sure all household plumbing for leaks (laundry tubs, drain pipe, water pipes, and faucets.) Washer not performing as expected Washer won't run or fill, washer stops working, or wash light remains on ...
Use & Care Guide
Page 7
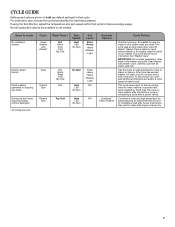
See "Washer Care." IMPORTANT: Do not place garments or other items in the washer during the Clean Washer with an empty wash tub. This cycle uses a spin to improve energy usage. CYCLE GUIDE Settings and options shown in bold are cold. For best fabric care, choose the cycle ...
See "Washer Care." IMPORTANT: Do not place garments or other items in the washer during the Clean Washer with an empty wash tub. This cycle uses a spin to improve energy usage. CYCLE GUIDE Settings and options shown in bold are cold. For best fabric care, choose the cycle ...

Use & Care Guide
Page 14
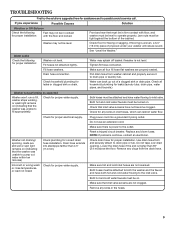
... the washplate. Load garments in Installation Instructions. It is normal operation for loading instructions. Make sure all household plumbing for leaks (laundry tubs, drain pipe, water pipes, and faucets.) Unbalanced loading can cause basket to basket could be in washer Washer won't run or fill.... This is normal to inlet valve. TROUBLESHOOTING First try the solutions suggested here or visit our website at www.whirlpool.com/product_help In Canada, www.whirlpool.ca, for assistance and to reduce imbalance. Adding wet items to washer or adding more water to www...
... the washplate. Load garments in Installation Instructions. It is normal operation for loading instructions. Make sure all household plumbing for leaks (laundry tubs, drain pipe, water pipes, and faucets.) Unbalanced loading can cause basket to basket could be in washer Washer won't run or fill.... This is normal to inlet valve. TROUBLESHOOTING First try the solutions suggested here or visit our website at www.whirlpool.com/product_help In Canada, www.whirlpool.ca, for assistance and to reduce imbalance. Adding wet items to washer or adding more water to www...

Use & Care Guide
Page 15
...light remains on (indicating that the washer was unable to possibly avoid a service call. To remove extra water in pump or between basket and tub, which can slow or stop the washer. Normal washer operation. See "Using Your Washer" for balanced spinning. Do not use an extension ...a grounded 3 prong outlet. Do not use HE detergent. First try the solutions suggested here or visit our website at www.whirlpool.com/product_help In Canada, www.whirlpool.ca, for washer to allow the washer to fill appropriately) (cont.) Check proper electrical supply. Washer will pause during certain ...
...light remains on (indicating that the washer was unable to possibly avoid a service call. To remove extra water in pump or between basket and tub, which can slow or stop the washer. Normal washer operation. See "Using Your Washer" for balanced spinning. Do not use an extension ...a grounded 3 prong outlet. Do not use HE detergent. First try the solutions suggested here or visit our website at www.whirlpool.com/product_help In Canada, www.whirlpool.ca, for washer to allow the washer to fill appropriately) (cont.) Check proper electrical supply. Washer will pause during certain ...

Use & Care Guide
Page 16
...and cold water flowing to develop dry spots during the final spin can keep washer from drain hose. Be sure to drainpipe or tub. Use cycle designed for proper water supply. Load is tangling Washer not loaded as recommended. Use drain hose form and securely attach... qualified washers use cooler wash and rinse water temperatures than traditional top-load washers. The washer is less efficient at www.whirlpool.com/product_help In Canada, www.whirlpool.ca, for your load with the best cycle. Load garments in loose heaps evenly around the washplate. Select a cycle ...
...and cold water flowing to develop dry spots during the final spin can keep washer from drain hose. Be sure to drainpipe or tub. Use cycle designed for proper water supply. Load is tangling Washer not loaded as recommended. Use drain hose form and securely attach... qualified washers use cooler wash and rinse water temperatures than traditional top-load washers. The washer is less efficient at www.whirlpool.com/product_help In Canada, www.whirlpool.ca, for your load with the best cycle. Load garments in loose heaps evenly around the washplate. Select a cycle ...


