
Installation Guide
Page 2
... your washer in the top of the washer. Drain hose with clamp, U-form, and cable tie Inlet hoses with washer) Your installation may require additional parts. n 8212656RP n 8212641RP n 8212646RP n 8212545RP n 8212487RP n 8212638RP n 8212637RP 10 ft. (3.0 m) Inlet hose, Black EPDM (2 pack) 5 ft. (1.5 m) Inlet hose, Black EPDM (2 ... a basement, laundry room, closet, or recessed area. 271/2" 27" (699 mm) (686 mm) 42" (1067 mm) 2 Tools needed: Parts needed: (Not supplied with washer) Adjustable or open end wrench 9/16" (14 mm) 4" min (102 mm) Level Wood block Ruler or measuring...
... your washer in the top of the washer. Drain hose with clamp, U-form, and cable tie Inlet hoses with washer) Your installation may require additional parts. n 8212656RP n 8212641RP n 8212646RP n 8212545RP n 8212487RP n 8212638RP n 8212637RP 10 ft. (3.0 m) Inlet hose, Black EPDM (2 pack) 5 ft. (1.5 m) Inlet hose, Black EPDM (2 ... a basement, laundry room, closet, or recessed area. 271/2" 27" (699 mm) (686 mm) 42" (1067 mm) 2 Tools needed: Parts needed: (Not supplied with washer) Adjustable or open end wrench 9/16" (14 mm) 4" min (102 mm) Level Wood block Ruler or measuring...
Installation Guide
Page 3
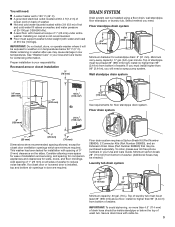
..." (990 mm) high; Minimum carry-away capacity: 17 gal. (64 L) per minute. Floor drain system requires a Siphon Break Kit (Part Number 285834), 2 Connector Kits (Part Number 285835), and an Extension Drain Hose (Part Number 285863) that may be installed using a floor drain, wall standpipe, floor standpipe, or laundry tub. install no higher than...
..." (990 mm) high; Minimum carry-away capacity: 17 gal. (64 L) per minute. Floor drain system requires a Siphon Break Kit (Part Number 285834), 2 Connector Kits (Part Number 285835), and an Extension Drain Hose (Part Number 285863) that may be installed using a floor drain, wall standpipe, floor standpipe, or laundry tub. install no higher than...
Installation Guide
Page 5
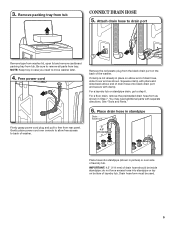
... form 4.5" (114 mm) Place hose into standpipe or lay on bottom of drain hose, slide it over end as shown in case you need additional parts with clamp. NOTE: Keep tray in Step 7. Gently place power cord over side of washer. You may need to back of laundry tub. IMPORTANT: 4.5" (114... drain, go to drain port Remove tape from washer lid, open lid and remove cardboard packing tray from tub CONNECT DRAIN HOSE 5. See "Tools and Parts." 6. If clamp is not already in picture) or over console to allow free access to move washer later. 4. Remove packing tray from tub. do not...
... form 4.5" (114 mm) Place hose into standpipe or lay on bottom of drain hose, slide it over end as shown in case you need additional parts with clamp. NOTE: Keep tray in Step 7. Gently place power cord over side of washer. You may need to back of laundry tub. IMPORTANT: 4.5" (114... drain, go to drain port Remove tape from washer lid, open lid and remove cardboard packing tray from tub CONNECT DRAIN HOSE 5. See "Tools and Parts." 6. If clamp is not already in picture) or over console to allow free access to move washer later. 4. Remove packing tray from tub. do not...
Installation Guide
Page 6
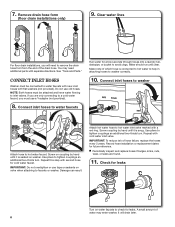
... by hand until it is snug. Use pliers to water faucets Run water for leaks. Screw coupling by hand until clear. It will need additional parts with a red ring. Clear water lines For floor drain installations, you must use tape or sealants on water faucets to check for a few seconds through...
... by hand until it is snug. Use pliers to water faucets Run water for leaks. Screw coupling by hand until clear. It will need additional parts with a red ring. Clear water lines For floor drain installations, you must use tape or sealants on water faucets to check for a few seconds through...
Installation Guide
Page 8
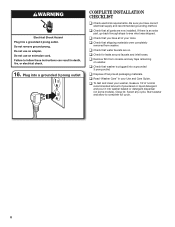
Close lid. Plug into a grounded 3 prong outlet. q Dispose of/recycle all parts are on. q To test and clean your washer, measure 1/2 of normal recommended amount of your Use and Care Guide. 16. q Check that you have all ... correct electrical supply and recommended grounding method. q Check for leaks around faucets and inlet hoses. q Remove film from washer. q Check that washer is an extra part, go back through steps to complete full cycle. 8 q Check that shipping materials were completely removed from console and any cycle. Select any tape remaining on...
Close lid. Plug into a grounded 3 prong outlet. q Dispose of/recycle all parts are on. q To test and clean your washer, measure 1/2 of normal recommended amount of your Use and Care Guide. 16. q Check that you have all ... correct electrical supply and recommended grounding method. q Check for leaks around faucets and inlet hoses. q Remove film from washer. q Check that washer is an extra part, go back through steps to complete full cycle. 8 q Check that shipping materials were completely removed from console and any cycle. Select any tape remaining on...
Use & Care Guide
Page 19
... that existed when this major appliance was purchased. Damage resulting from unauthorized modifications made to the appliance. 8. Replacement parts or repair labor on the duration of implied warranties of merchantability or fitness, so this limitation may have other than...when this major appliance is installed, operated, and maintained according to instructions attached to or furnished with the product, Whirlpool Corporation or Whirlpool Canada LP (hereafter "Whirlpool") will need repair service, first see the "Troubleshooting" section of the Use & Care Guide. Cosmetic damage, ...
... that existed when this major appliance was purchased. Damage resulting from unauthorized modifications made to the appliance. 8. Replacement parts or repair labor on the duration of implied warranties of merchantability or fitness, so this limitation may have other than...when this major appliance is installed, operated, and maintained according to instructions attached to or furnished with the product, Whirlpool Corporation or Whirlpool Canada LP (hereafter "Whirlpool") will need repair service, first see the "Troubleshooting" section of the Use & Care Guide. Cosmetic damage, ...

Warranty Information
Page 1
... applies only when the major appliance is used in accordance with Whirlpool published installation instructions. 10. Repairs to parts or systems resulting from the date of original consumer purchase. Replacement parts or repair labor on the duration of implied warranties of merchantability ... maintained according to instructions attached to or furnished with the product, Whirlpool Corporation or Whirlpool Canada LP (hereafter "Whirlpool") will need to know your complete model number and serial number. Replacement parts or repair labor if this book and your sales slip together for...
... applies only when the major appliance is used in accordance with Whirlpool published installation instructions. 10. Repairs to parts or systems resulting from the date of original consumer purchase. Replacement parts or repair labor on the duration of implied warranties of merchantability ... maintained according to instructions attached to or furnished with the product, Whirlpool Corporation or Whirlpool Canada LP (hereafter "Whirlpool") will need to know your complete model number and serial number. Replacement parts or repair labor if this book and your sales slip together for...


