
Owners Manual
Page 17
...of purchase, when this major appliance is operated and maintained according to instructions attached to or furnished with the product, Whirlpool Corporation or Whirlpool Canada LP (hereafter "Whirlpool") will need repair service, rst see the "Troubleshooting" section of the Use & Care Guide. Service must provide ... to the nish of products not approved by an authorized Whirlpool servicer is not available. 9. Repairs to parts or systems resulting from state to state or province to determine if another warranty applies. Replacement parts or repair labor on how to use your sales slip ...
...of purchase, when this major appliance is operated and maintained according to instructions attached to or furnished with the product, Whirlpool Corporation or Whirlpool Canada LP (hereafter "Whirlpool") will need repair service, rst see the "Troubleshooting" section of the Use & Care Guide. Service must provide ... to the nish of products not approved by an authorized Whirlpool servicer is not available. 9. Repairs to parts or systems resulting from state to state or province to determine if another warranty applies. Replacement parts or repair labor on how to use your sales slip ...
Installation Instructions
Page 2
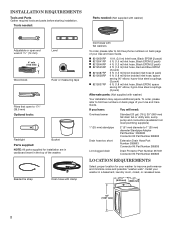
... order, please refer to toll-free numbers on back page of your washer to 19⁄16" (39.5 mm) Optional tools: Flashlight Bucket Parts supplied: NOTE: All parts supplied for installation are in cardboard insert in a basement, laundry room, closet, or recessed area. 271/2" 27" (648 mm) (686 mm...) 42" (1067 mm) 2 Tools needed: Parts needed: (Not supplied with washer) Adjustable or open end wrench 9/16" (14 mm) 4" min (102 mm) Level Wood block Ruler or measuring tape Pliers ...
... order, please refer to toll-free numbers on back page of your washer to 19⁄16" (39.5 mm) Optional tools: Flashlight Bucket Parts supplied: NOTE: All parts supplied for installation are in cardboard insert in a basement, laundry room, closet, or recessed area. 271/2" 27" (648 mm) (686 mm...) 42" (1067 mm) 2 Tools needed: Parts needed: (Not supplied with washer) Adjustable or open end wrench 9/16" (14 mm) 4" min (102 mm) Level Wood block Ruler or measuring tape Pliers ...
Installation Instructions
Page 3
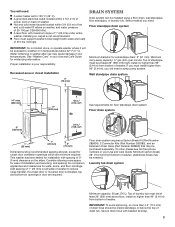
... mm) of washer. Minimum carry-away capacity: 17 gal. (64 L) per minute. Floor drain system requires a Siphon Break Kit (Part Number 285834), 2 Connector Kits (Part Number 285385), and an Extension Drain Hose (Part Number 285863) that may be needed.) Laundry tub drain system Minimum capacity: 20 gal. (76 L). Minimum siphon break: 28" (710...
... mm) of washer. Minimum carry-away capacity: 17 gal. (64 L) per minute. Floor drain system requires a Siphon Break Kit (Part Number 285834), 2 Connector Kits (Part Number 285385), and an Extension Drain Hose (Part Number 285863) that may be needed.) Laundry tub drain system Minimum capacity: 20 gal. (76 L). Minimum siphon break: 28" (710...
Installation Instructions
Page 5
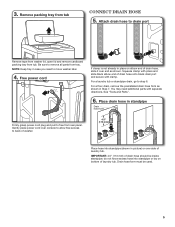
...from tub. Attach drain hose to free from tray. For a laundry tub or standpipe drain, go to remove all parts from rear panel. Place drain hose in case you need additional parts with clamp. IMPORTANT: 4.5" (113 mm) of drain hose onto black drain port and secure with separate directions. do...hose into standpipe (shown in Step 7. Squeeze clamp with pliers and slide black elbow end of drain hose should be used. 5 See "Tools and Parts". 6. NOTE: Keep tray in standpipe Drain hose form Firmly grasp power cord plug and pull to drain port Remove tape from washer lid, open ...
...from tub. Attach drain hose to free from tray. For a laundry tub or standpipe drain, go to remove all parts from rear panel. Place drain hose in case you need additional parts with clamp. IMPORTANT: 4.5" (113 mm) of drain hose onto black drain port and secure with separate directions. do...hose into standpipe (shown in Step 7. Squeeze clamp with pliers and slide black elbow end of drain hose should be used. 5 See "Tools and Parts". 6. NOTE: Keep tray in standpipe Drain hose form Firmly grasp power cord plug and pull to drain port Remove tape from washer lid, open ...
Installation Instructions
Page 6
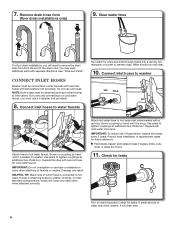
... flat washers (not provided). Clear water lines For floor drain installations, you will cross over each other when attached correctly. See "Tools and Parts". NOTE: Both hoses must be attached and have water flowing to remove the drain hose form from the end of water may enter washer.... In most standard configurations, hoses will need additional parts with cold water inlet valve. You may need to inlet valves. Water should run until it is snug. Repeat this step with a red ...
... flat washers (not provided). Clear water lines For floor drain installations, you will cross over each other when attached correctly. See "Tools and Parts". NOTE: Both hoses must be attached and have water flowing to remove the drain hose form from the end of water may enter washer.... In most standard configurations, hoses will need additional parts with cold water inlet valve. You may need to inlet valves. Water should run until it is snug. Repeat this step with a red ...
Installation Instructions
Page 8
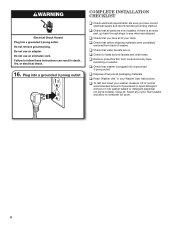
...3 prong outlet Complete Installation CHECKLIST q Check electrical requirements. Start washer and allow to see what was skipped. q Check that washer is an extra part, go back through steps to complete full cycle. 8 q Check for leaks around faucets and inlet hoses. q Read "Washer Use" in your ...tools. Select any tape remaining on . q Check that you have all of /recycle all parts are on washer. If there is plugged into washer basket or detergent dispenser (on some models). q Check that all packaging materials. Be sure...
...3 prong outlet Complete Installation CHECKLIST q Check electrical requirements. Start washer and allow to see what was skipped. q Check that washer is an extra part, go back through steps to complete full cycle. 8 q Check for leaks around faucets and inlet hoses. q Read "Washer Use" in your ...tools. Select any tape remaining on . q Check that you have all of /recycle all parts are on washer. If there is plugged into washer basket or detergent dispenser (on some models). q Check that all packaging materials. Be sure...

Warranty
Page 1
...Service calls to be easily determined. The removal and reinstallation of your major appliance, to instruct you . Replacement parts or repair labor on the product. WHIRLPOOL SHALL NOT BE LIABLE FOR INCIDENTAL OR CONSEQUENTIAL DAMAGES. In the U.S.A., call . 7/08 Keep this limited warranty....Pick up and delivery. This major appliance is used in the country in a remote area where service by a Whirlpool designated service company. Repairs to parts or systems resulting from state to state or province to correct house wiring or plumbing. 3. DISCLAIMER OF IMPLIED WARRANTIES...
...Service calls to be easily determined. The removal and reinstallation of your major appliance, to instruct you . Replacement parts or repair labor on the product. WHIRLPOOL SHALL NOT BE LIABLE FOR INCIDENTAL OR CONSEQUENTIAL DAMAGES. In the U.S.A., call . 7/08 Keep this limited warranty....Pick up and delivery. This major appliance is used in the country in a remote area where service by a Whirlpool designated service company. Repairs to parts or systems resulting from state to state or province to correct house wiring or plumbing. 3. DISCLAIMER OF IMPLIED WARRANTIES...

Dimension Guide
Page 1
...from bottom of the door are minimum required. Floor drain system requires a Siphon Break Kit (Part Number 285834), 2 Connector Kits (Part Number 285835), and an Extension Drain Hose (Part Number 285863) that a separate circuit serving only this washer be needed.) Laundry tub drain system...minimum ventilation openings in .2 (310 cm2) 41/2" (114 mm) See requirements for a standpipe drain: 2" (51 mm). Because Whirlpool Corporation policy includes a continuous commitment to improve our products, we reserve the right to change materials and specifications without notice. W10240509C 06...
...from bottom of the door are minimum required. Floor drain system requires a Siphon Break Kit (Part Number 285834), 2 Connector Kits (Part Number 285835), and an Extension Drain Hose (Part Number 285863) that a separate circuit serving only this washer be needed.) Laundry tub drain system...minimum ventilation openings in .2 (310 cm2) 41/2" (114 mm) See requirements for a standpipe drain: 2" (51 mm). Because Whirlpool Corporation policy includes a continuous commitment to improve our products, we reserve the right to change materials and specifications without notice. W10240509C 06...


